Welcome to Ready eCommerce documentation and thank
you
for choosing Ready eCommerce.
This documentation is here to guide you through installing the project. It includes
detailed, step-by-step instructions to make the installation easy. Please take the
time to read the guide carefully and follow each step. By doing so, you’ll be able
to set up the project smoothly and without any issues.
📢 Important Update Notice
We have changed the update verification code. If you want to upgrade to our
latest
TAL update, you must update your configuration.
Finally, download the JDK from
Oracle, currently using JDK 19.0.2 in this
article (although JDK 20 is available).
Installing &
Configuring JDK and JAVA_HOME
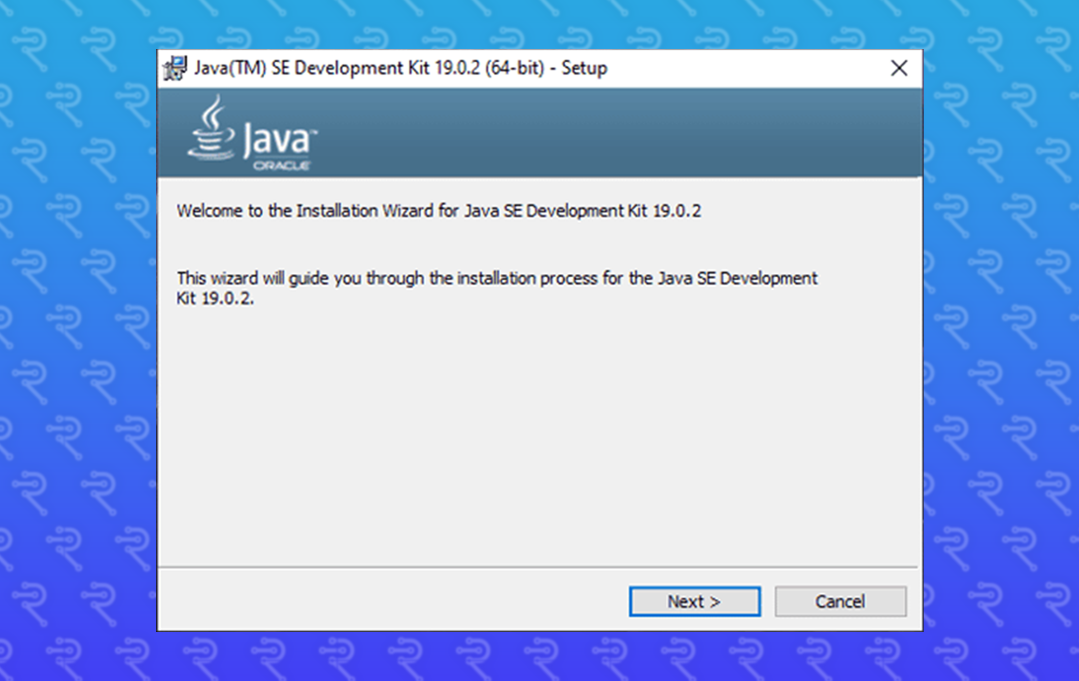
To start installation, navigate to the folder containing the JDK installation
file (typically named "jdk_XX_OS-Name_Processor-Type_bin") and
double-click to run the installer.
Upon running the setup, you'll be greeted with the initial screen. Click "Next".
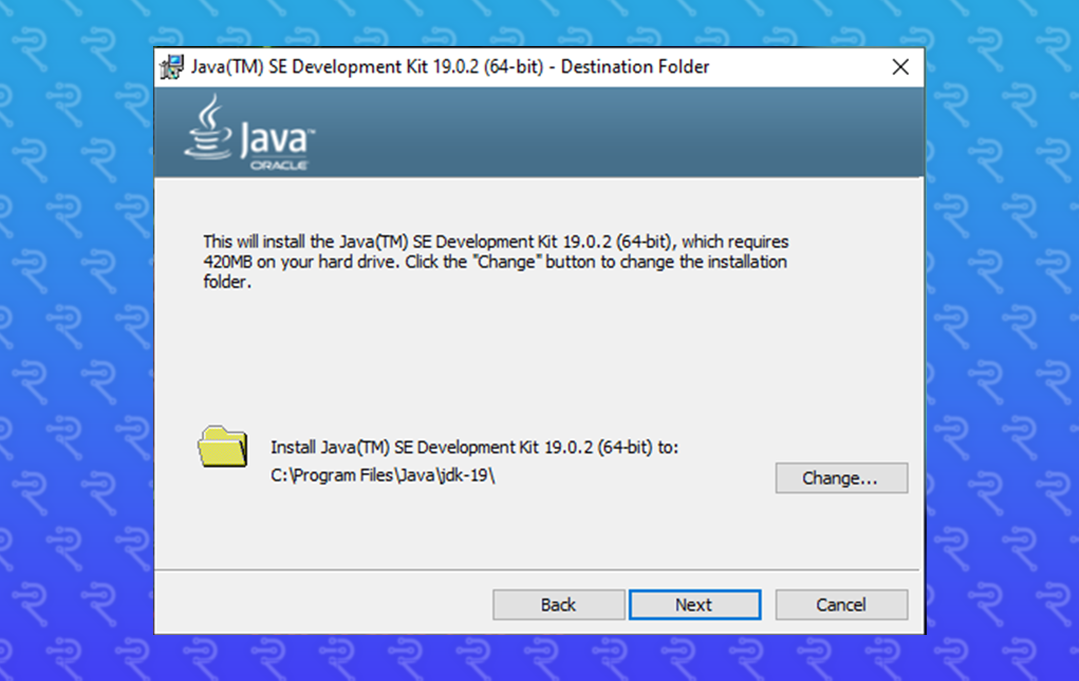
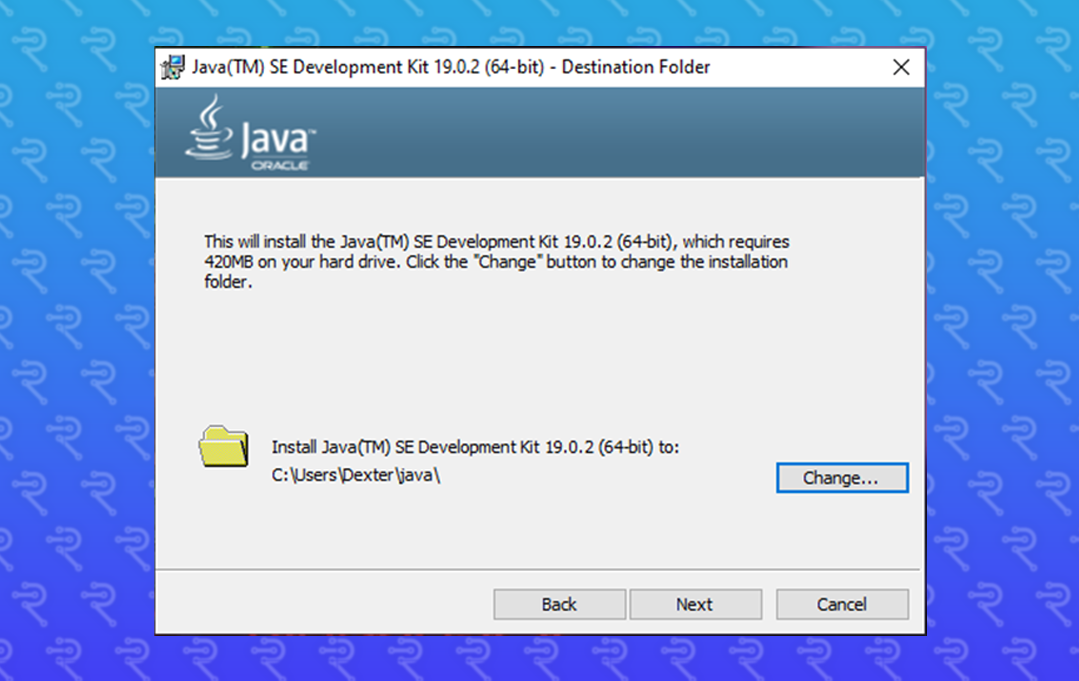
You'll then see the option to customize your JDK installation. Click on
"Change".
Click "Change" to modify the JDK directory. Avoid using "whitespaces" in the
directory path as shown below:
The installation will take a few minutes. Accept User Access Control by clicking
"Yes" when prompted. Once complete, click "Close" when the setup confirms your
JDK installation at a directory like C:\Users\Dexter\java\jdk19.02.
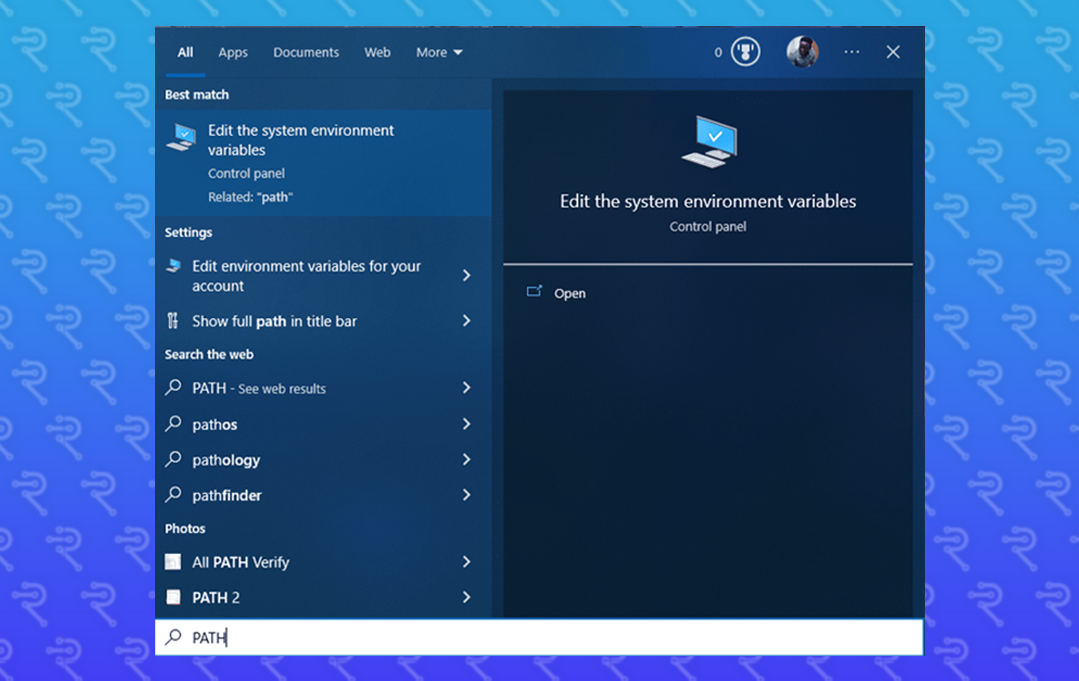
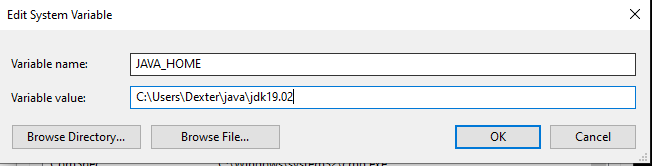
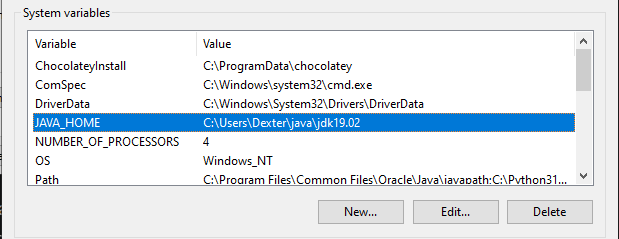
Next, set the JAVA_HOME environment variable. Search for "PATH" and
click "Edit the system environment variables".
Click on "Environment Variables", then "New" under the System variables
section. Enter JAVA_HOME for the Variable name and the JDK
path (e.g., C:\Users\Dexter\java\jdk19.02) for the Variable
value. Click "OK".
Now you’ve successfully installed and configured the JDK on your Windows machine.
You can now proceed to install and configure Android Studio.
First, download Android Studio if you haven't
already. I’ll be waiting for you! 😉
Once downloaded, during installation, set the directory to
C:\Users\Dexter\Android\AndroidStudio. Avoid spaces in the path, as
this is important for correct configuration with commands like
flutter run, flutter doctor,
flutter pub get, and flutter upgrade.
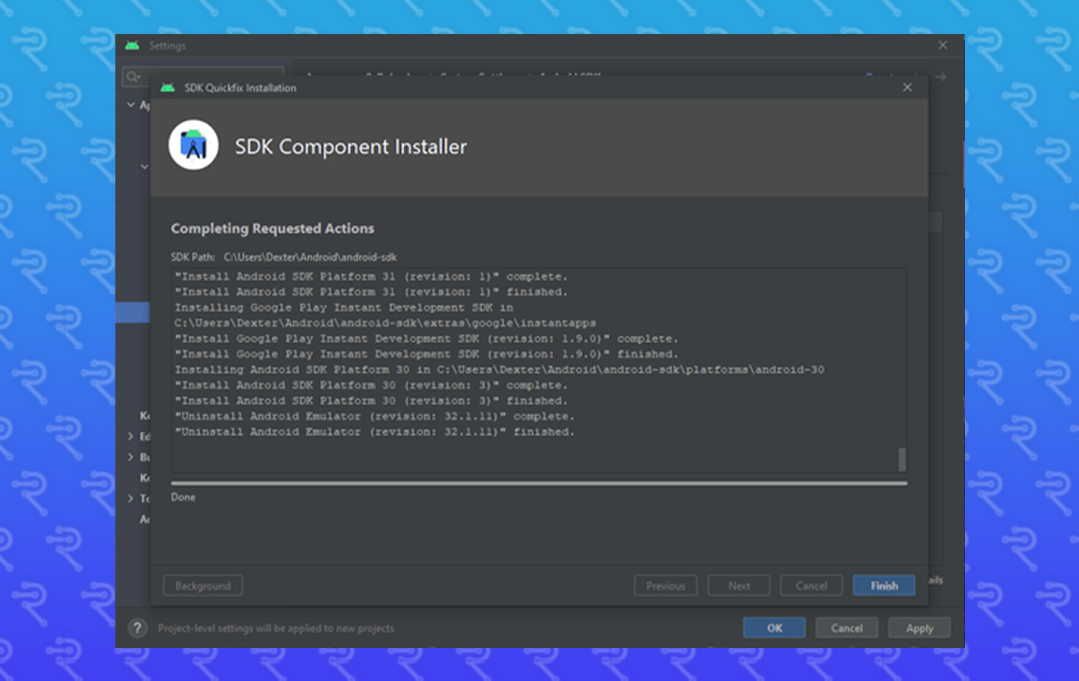
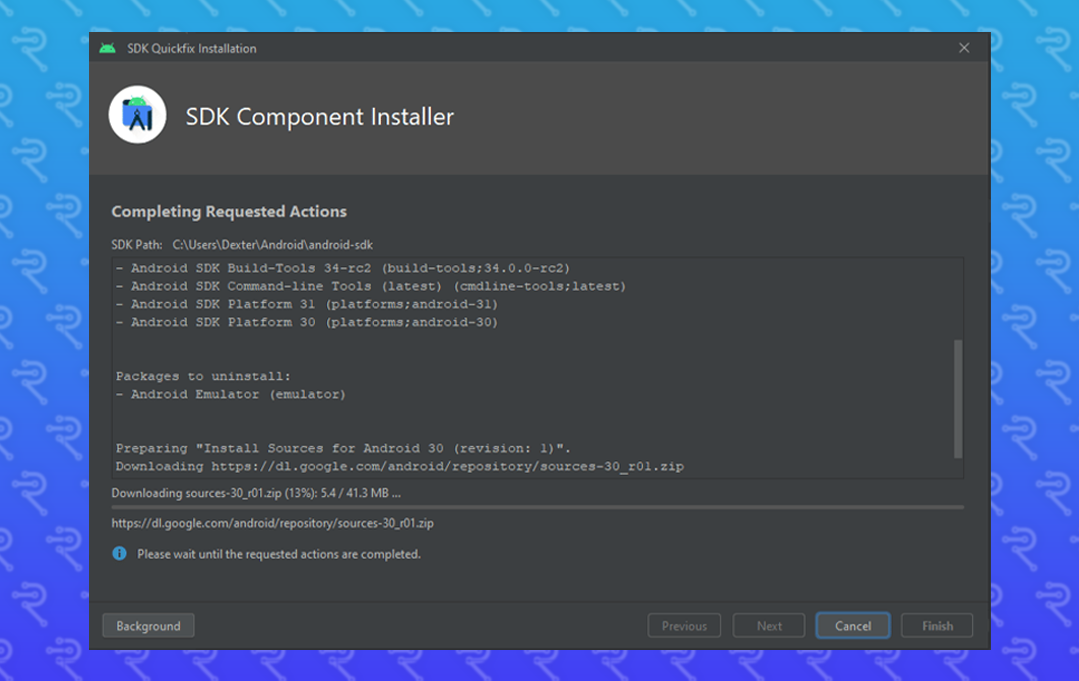
The installation may take about 30 minutes, depending on your system. You'll also
need to install the Android SDKs. In the SDK Manager, ensure you select
the required options under the SDK Platforms tab, then move to
SDK Tools for additional tool selections.
Note: I prefer using a physical device over a virtual one for
development.
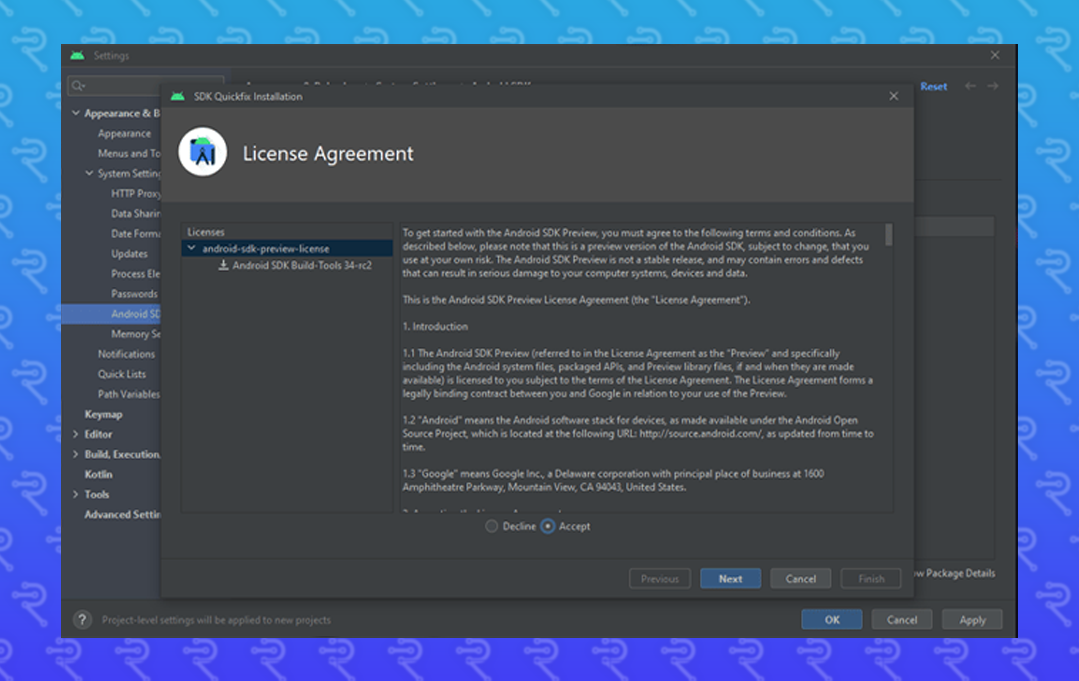
During setup, confirm by clicking "OK" when prompted. Then,
agree to the license terms and select "Accept" before
proceeding by clicking "Next".
Wait for the setup process to complete. If interrupted, you'll need to restart
the process.
Once finished, click "Finish".
Now, navigate to "Plugins" in the left pane. Search for the
"Flutter", "Dart", and
"Gradle" plugins in the "Marketplace" tab and install them.
Restart Android Studio to activate the plugins.
Note: Install all necessary plugins before restarting Android
Studio.
Installing & Configuring VS
Code
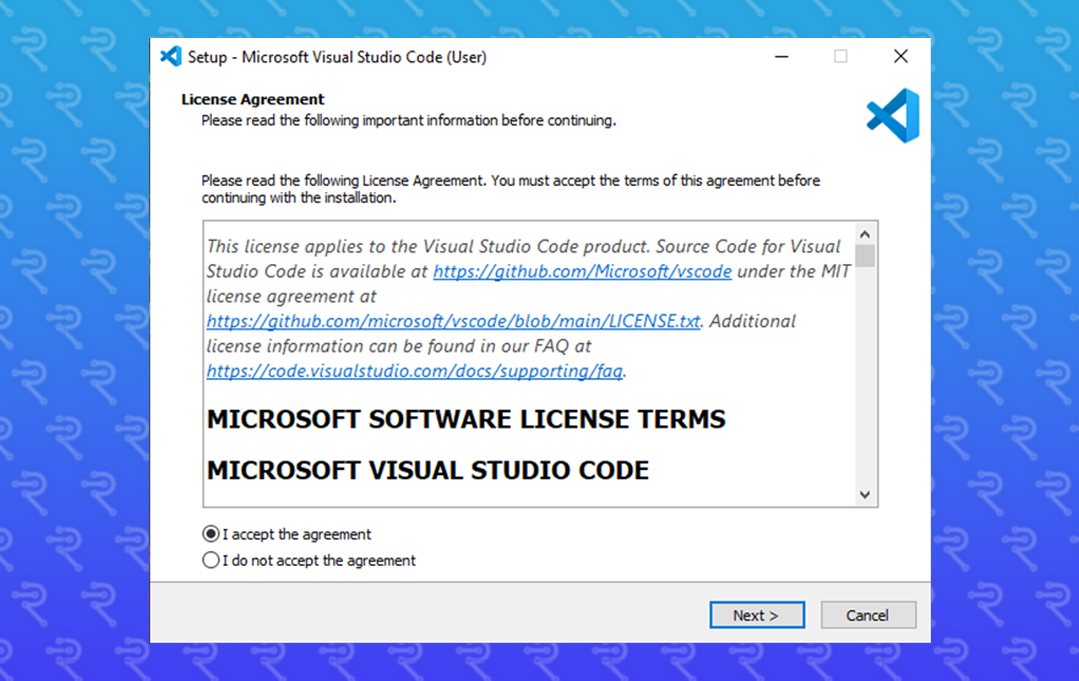
Next, download and install VS Code. Run the installation and
click "I accept the agreement", then "Next".
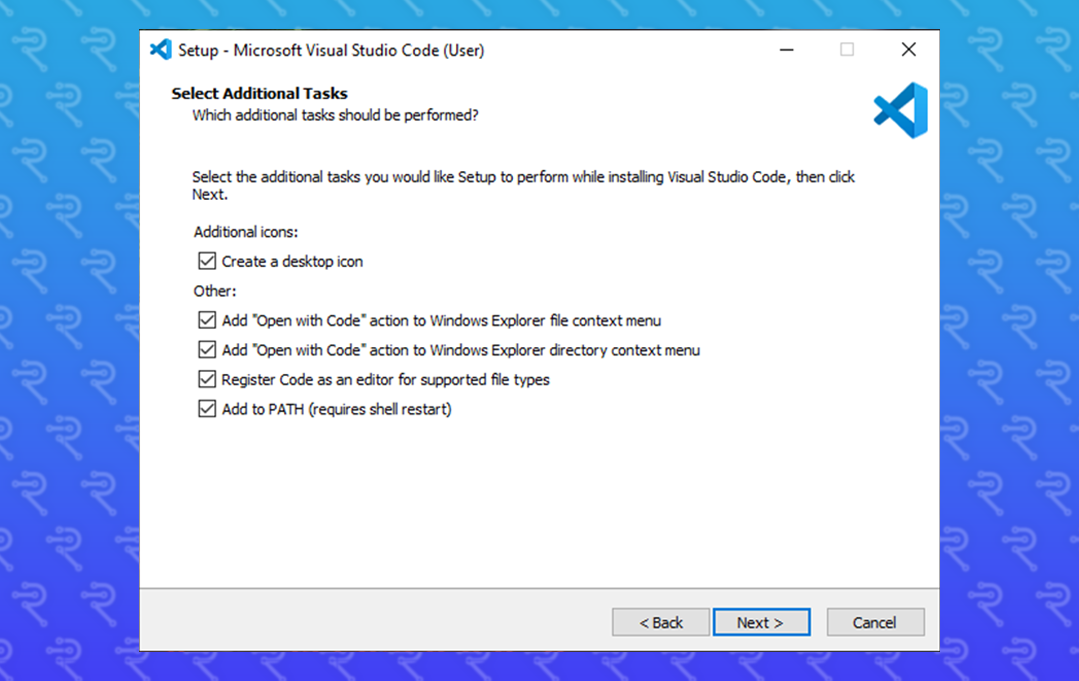
Select all options to customize your installation, then click
"Next" and "Install".
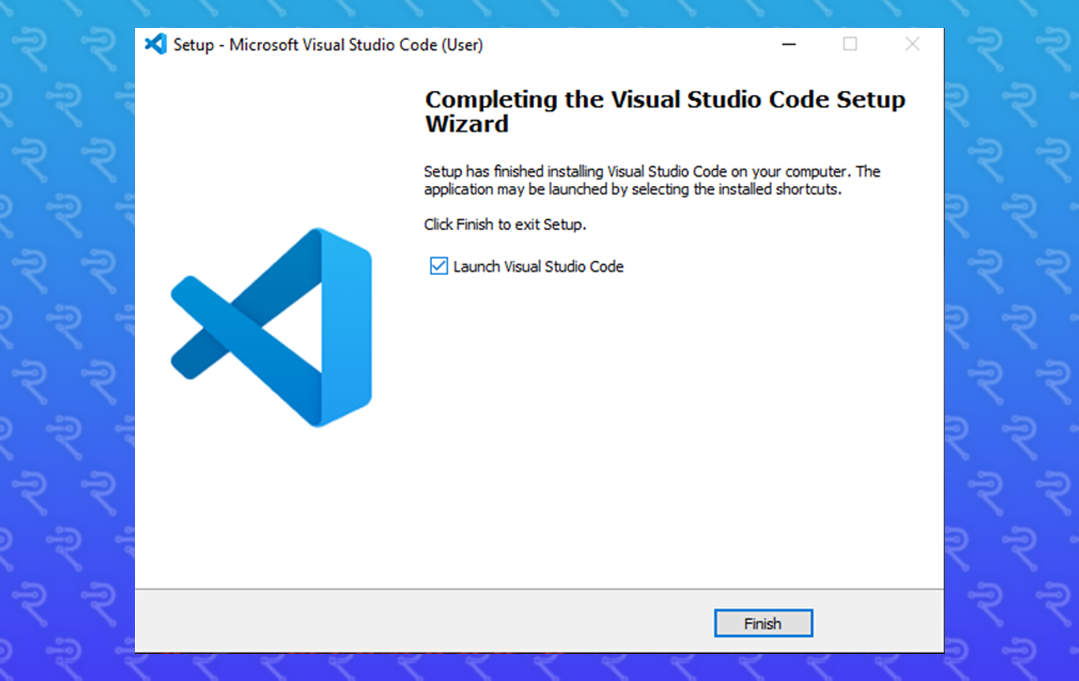
Click "Install" and wait for the process to finish.
When done, click "Finish" to complete the installation.
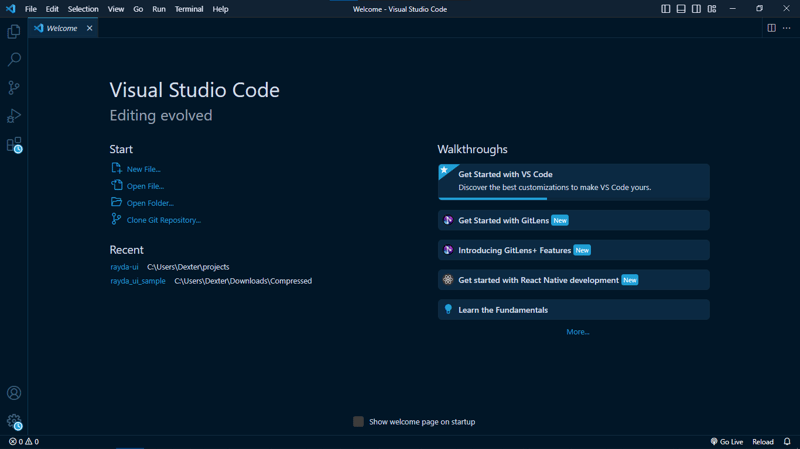
Once your VS Code is running, you'll be greeted by the "Welcome" page.
While my setup is customized, you should see this page in its default form.
Installing & Configuring Flutter SDK
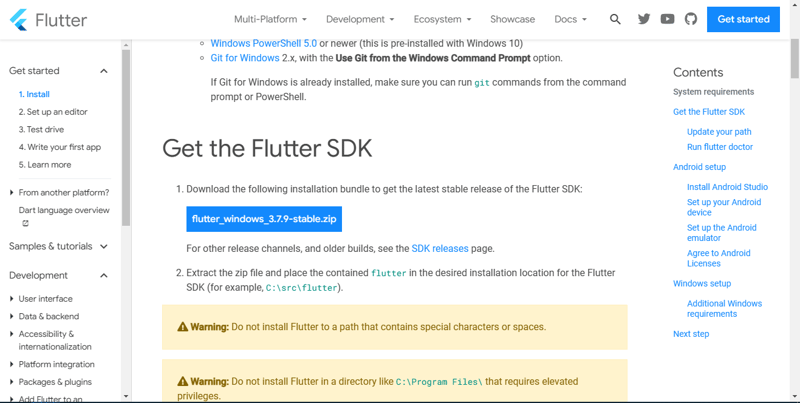
Download the latest Flutter SDK from the official site. At the
time of writing, the latest version is
flutter_windows_3.7.9-stable.
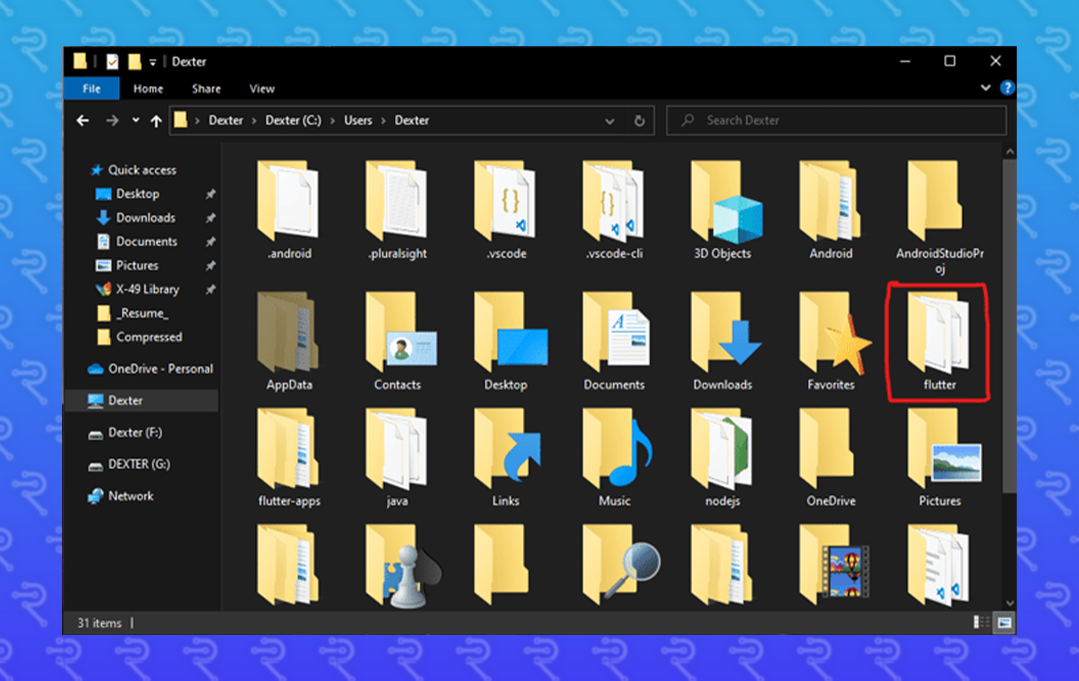
After downloading, extract the folder named flutter to a directory
without spaces, such as C:\Users\Dexter\flutter.
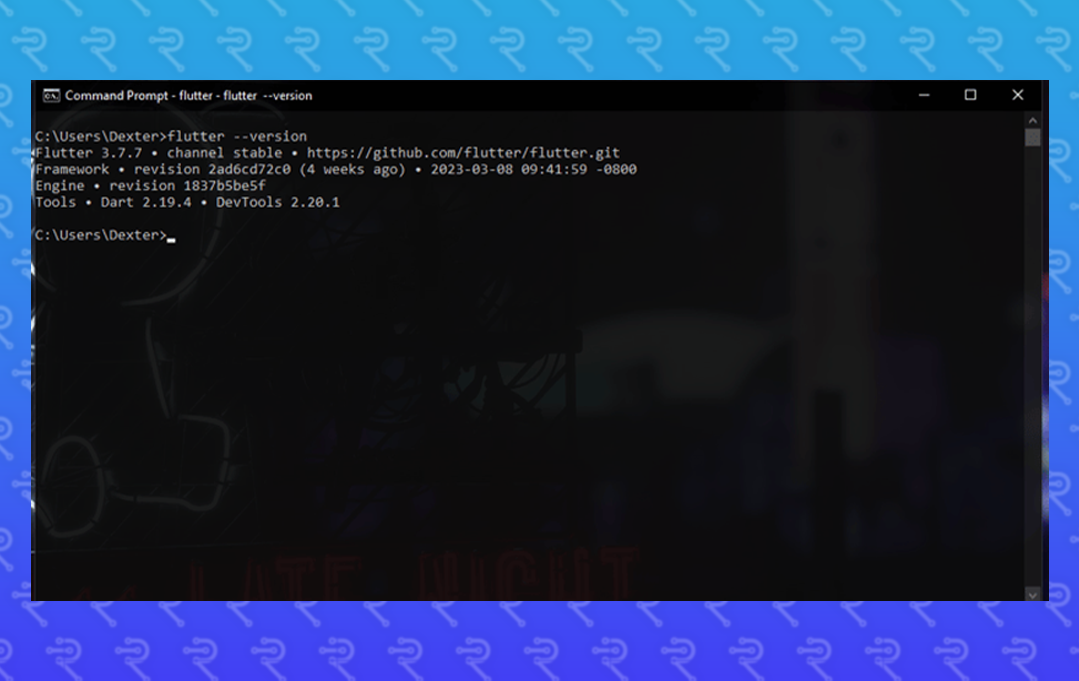
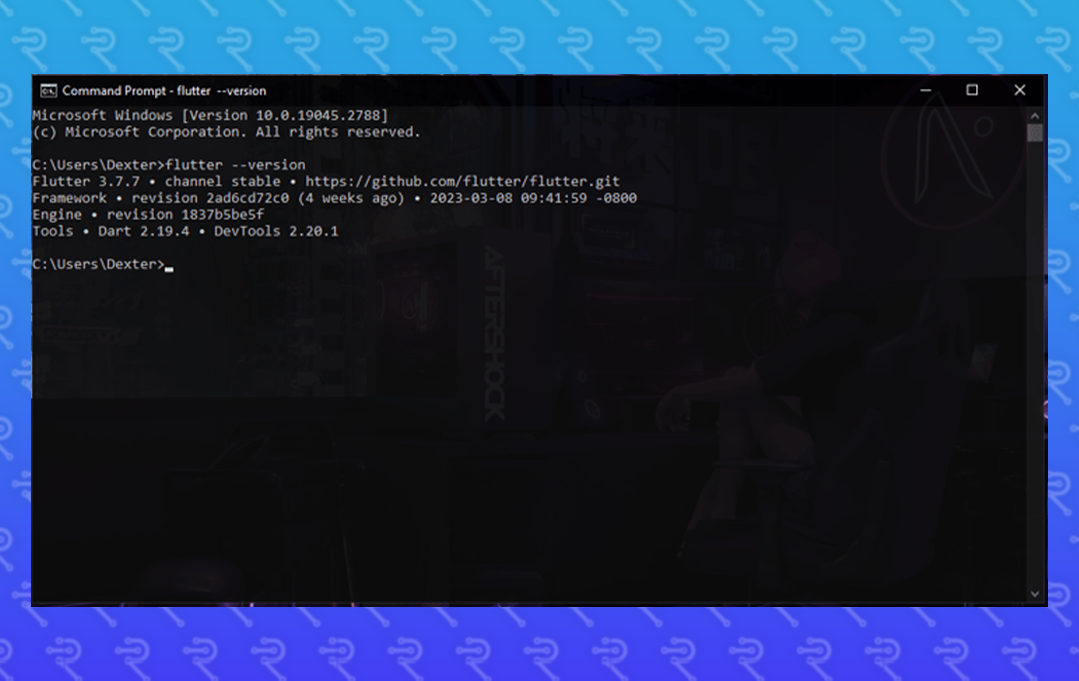
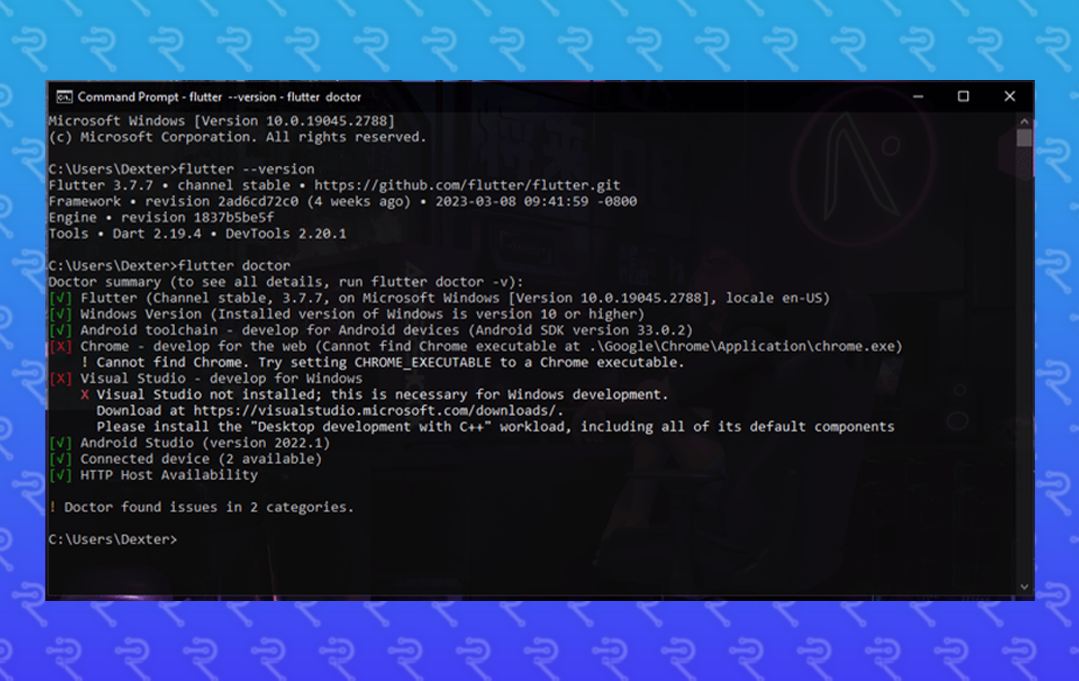
Run the following command to verify installation:
flutter --version.
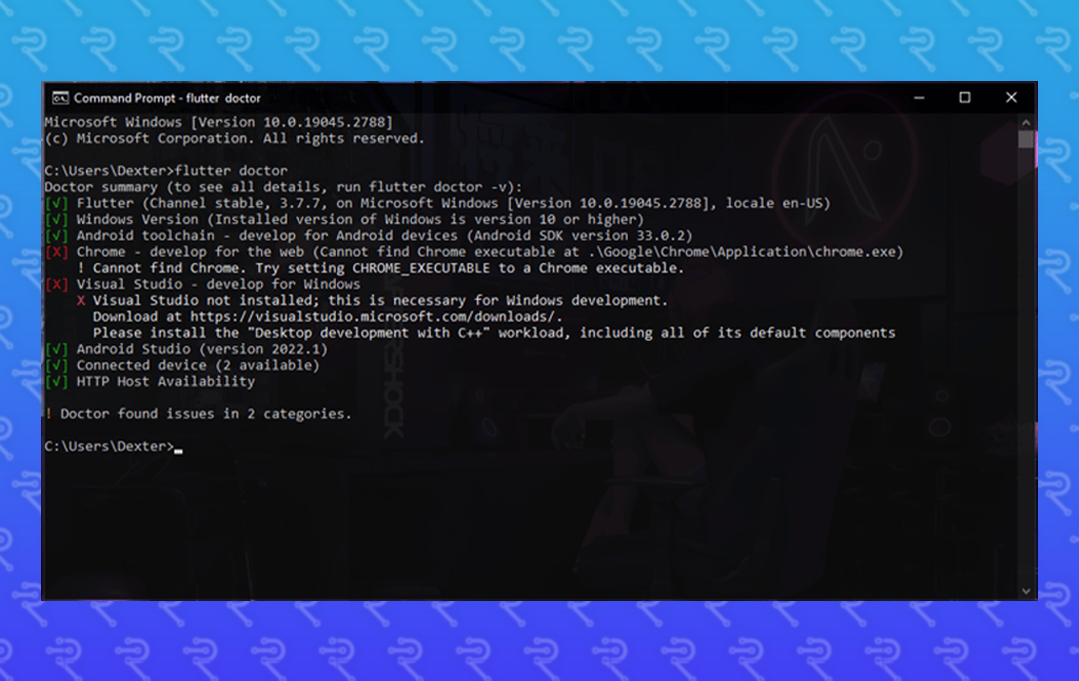
Then run flutter doctor to check for necessary dependencies.
After some processing, run flutter doctor again to complete the
setup.
If you encounter "Android SDK Licenses" issues, run the command
flutter doctor --android-licenses to accept the necessary SDK
licenses.
Verify Your Installation
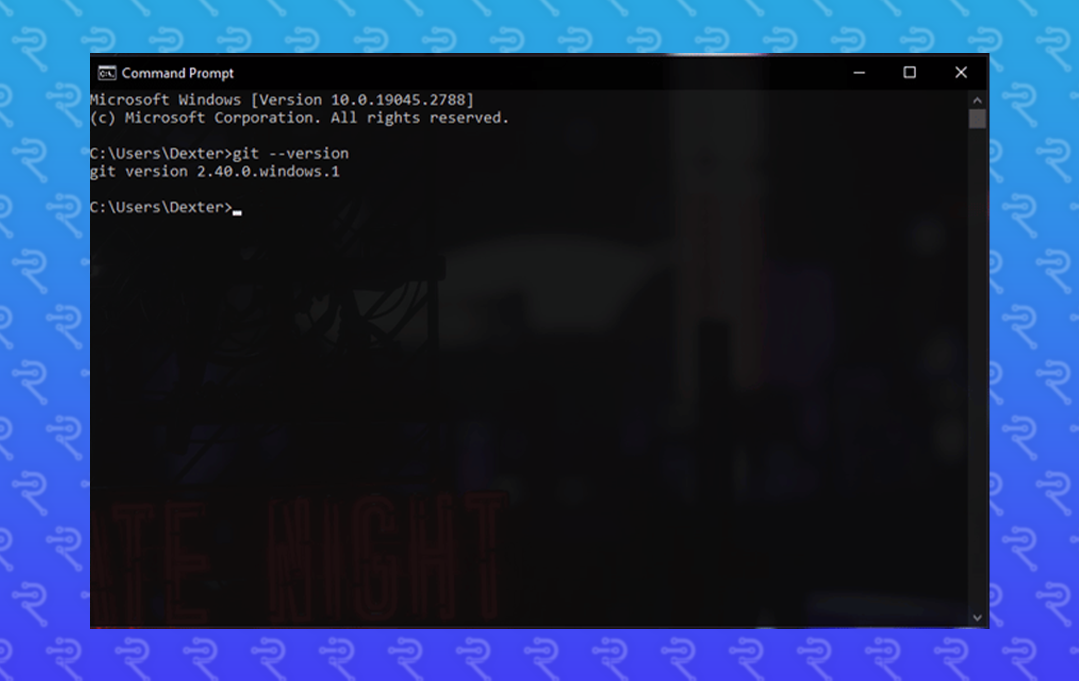
Check your Git version by running git --version in the shell.
Run the commands flutter --version and flutter doctor
to confirm everything is working.
Note: If you see warnings about Chrome or Visual Studio, don't
worry—these are not critical. We'll cover Visual Studio installation later for
Windows desktop app development using Flutter.
Conclusion
You've successfully set up Flutter on your Windows machine! Check the Flutter
installation page for updated instructions and specific versions.
Flutter Project Run 2.1
3. Download and Extract the Project:
Download the Package: Go to your Codecanyon account and download
the Ready eCommerceFlutter app package.
Extract the Files: Extract the downloaded ZIP file to a preferred
location on your computer.
4. Set Up Your Development Environment:
Install Flutter and Dart: Follow the instructions on the Flutter
installation page to install Flutter and Dart.
Configure Your IDE: Install and configure your preferred IDE
(Android Studio, VS Code, or IntelliJ IDEA). Install the Flutter and Dart plugins.
5. Open the Project:
Open Your IDE: Launch your IDE (Android Studio, VS Code, or
IntelliJ IDEA).
Open the Project Folder: Use the "Open" or "Import" option in your
IDE to open the folder where you extracted the project.
6. Install Dependencies:
Open Terminal/Command Prompt: Navigate to the project directory:
bash
cd path/to/your/project
Install Dependencies: Run the following command to fetch and
install the required dependencies:
bash
flutter pub get
7. Set Up Emulator or Device:
Android Emulator: Open Android Studio and go to the AVD Manager.
Create or start an Android Virtual Device (AVD).
iOS Simulator (macOS only): Open Xcode and start the iOS Simulator.
8. Run the App:
Run the App: Ensure your emulator/device is connected and running.
In your IDE, run the following command or use the built-in run feature:
bash
flutter run
9. Build the App for Release:
For Android: Run the following command to generate a release APK:
bash
flutter build apk --release
For iOS: Run the following command to generate a release build for
iOS:
bash
flutter build ios --release
10. Final Checks:
Run Tests: Ensure that you have run all tests to verify the app
functions as expected.
Update App Version: Don’t forget to increment the app version in
the pubspec.yaml file for the release.
Play store Publish 2.2
How to Publish Your Android App on the Play Store
Before publishing your app, consider the following:
Prepare Your Assets: Have high-quality app screenshots,
descriptions,
and your APK ready for upload.
App Signing: If using an Android App Bundle, enroll in Play App
Signing
for added security. This keeps your app signing key stored safely on Google's secure
infrastructure.
File Size Limit: Keep your app's size under 150 MB to avoid
download
issues. Remove any unused code or resources if necessary.
A Step-By-Step Guide
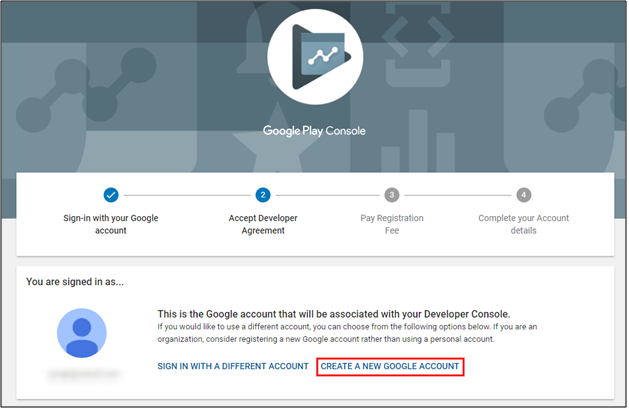
Step 1 – Google Play Console Developer Account.
Creating a Google Developer Account on the Google Play Console is one of the essential
steps
in publishing an Android app to the Play Store. The Google Play Console serves as the
backend platform for managing and publishing apps on the Play Store. Developers must
establish a developer account, which requires a one-time fee of $25, payable via credit
card
or online banking. After submission, please note that the account activation process may
take up to 48 hours.
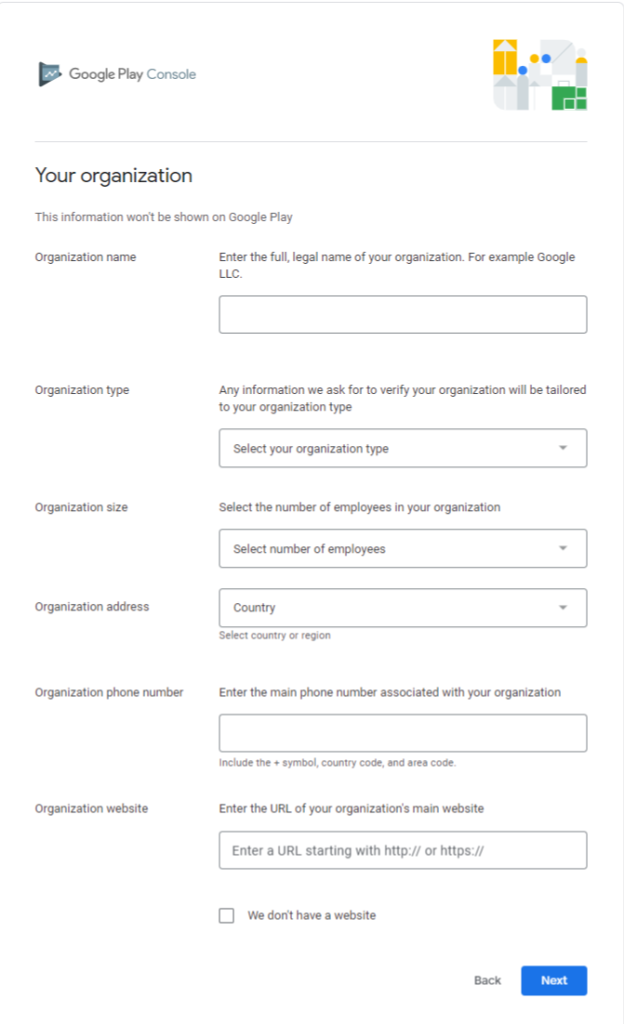
Sign in to the Google Play Console using your Gmail ID. After signing in, select whether
the
app account will be owned by an individual or an organization. Provide the required
basic
information, complete the payment process, and finalize your account creation.
Finally, ensure you fill out all the credentials asked while creating the account.
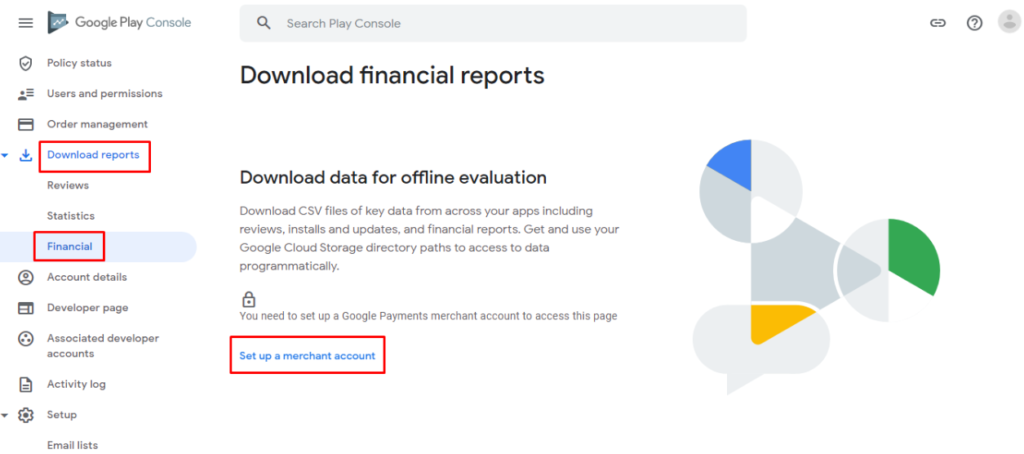
Step 2 – Set-up up a Google Merchant Account.
If your app includes in-app purchases, link your developer account to a Google Merchant
Account. If you already have a merchant account, go to Download reports >
Financial to access financial data. Don’t have one? Create a Google
Merchant
Account to enable this feature.
And to create one, click on setup up a merchant account.
After creating your merchant account, it will automatically link to your Google Play
Console,
allowing you to manage app sales, monitor performance, and generate reports.
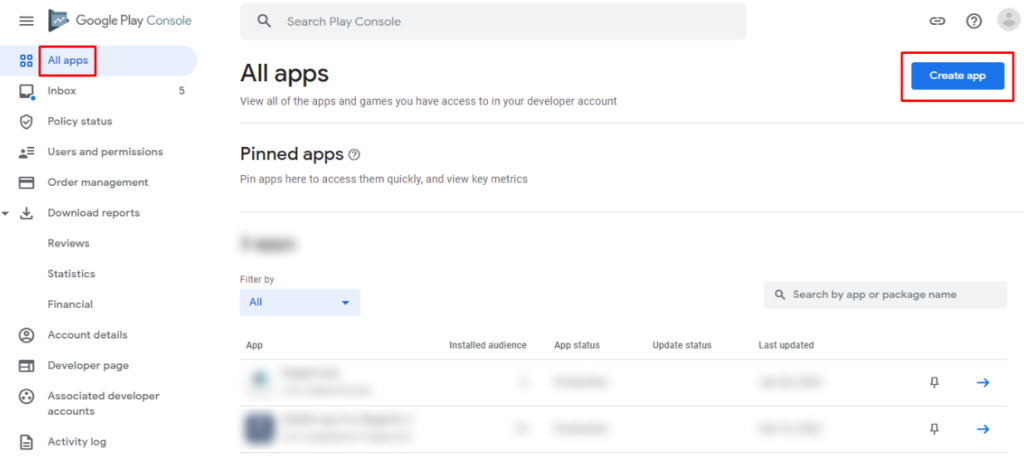
Step 3 – Create Application
Once the merchant account is linked to your Google Play Console, the next step is to
create
an
application. And for creating an application, there are a few essential steps that you
need
to follow:
Click on – Menu > All applications
Select the ‘Create Application’ option.
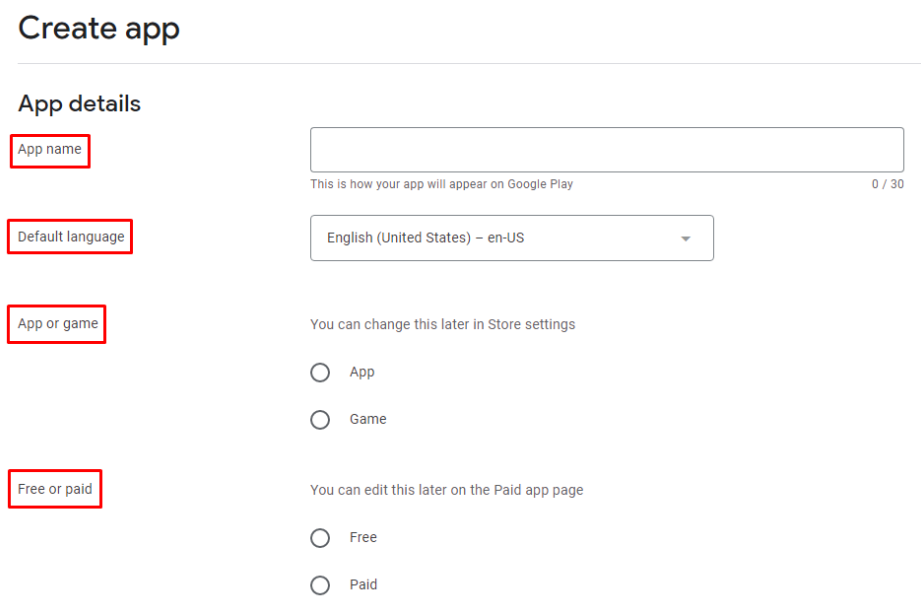
Next, the play console will ask you to enter some basic app details. For instance,
App Name – You must enter a 30-character long name in this field which will be
displayed
on the Google Play Console. However, this app name can be changed
afterward.
Default language – Another essential field is the setup of the app language. You can
navigate to the drop-down menu and set a default language for your app.
App or game – The next step is to define whether you upload an app or a game, but
this
can again be revised afterward from the store settings.
Free or paid – Define whether your app will be available free of cost or will
require
the user to pay for it. The free or paid section can be updated from the Paid app
page
later, but only until you publish your app. Once the app is live, you cannot
transform
your app from free to paid.
Next, you need to set up the bundle identifier for your app.
Once all of the above information is filled and verified, the Google Play Console will
enquire for affirmations from you. Ensure that your app matches the Google policies of
the
Developer Program and Accepts US export laws. As soon as you agree to the terms and
conditions, click Create App.
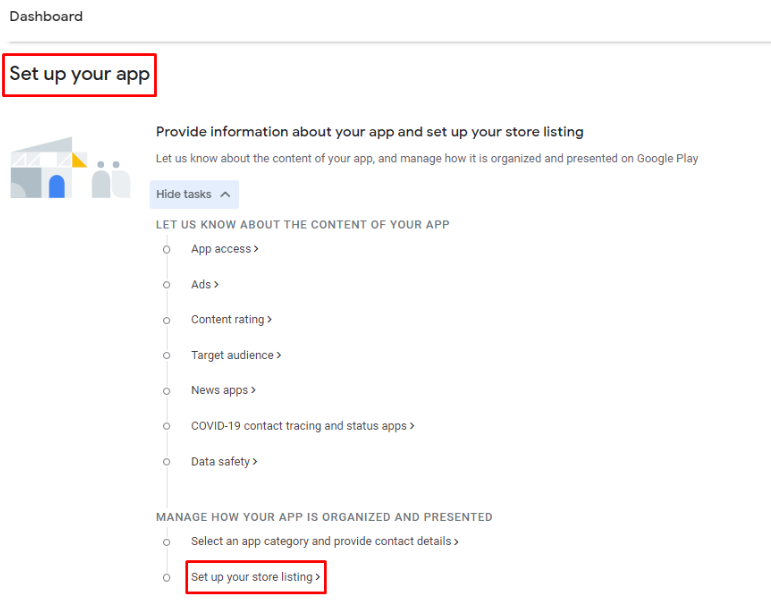
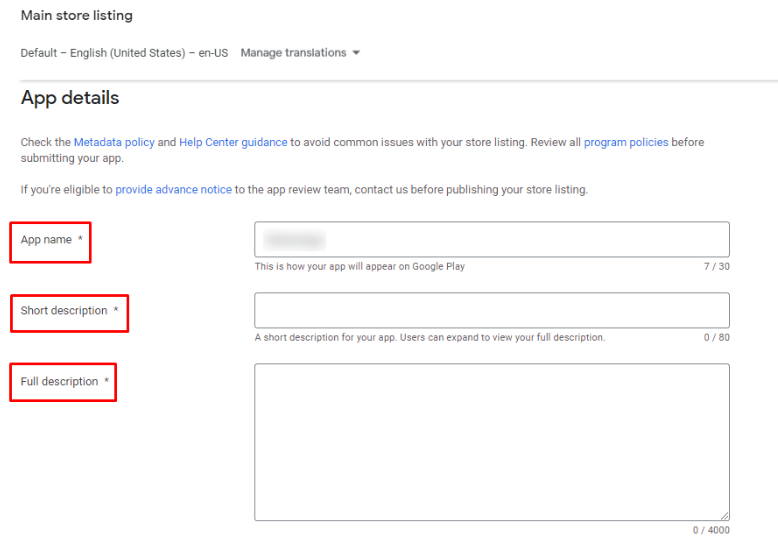
Step 4. App Store Listing Details
Click ‘Create App’ on the Google Play Console to access the setup dashboard. Here, you’ll
provide key details such as the app name, description, category, tags, and contact
information to complete your app listing.
The Google Play Console will enquire about the following:
App Name: Already provided in the previous step. If needed, you can
revise it here.
Short Description: Enter an 80-character summary that best captures
your app’s purpose.
Full Description: Elaborate on your app in up to 4,000 characters.
Include targeted keywords to optimize discoverability for the right audience.
After entering the information in the Google Play Console, the next step is to upload app
graphics, select the app category, and add the privacy policy. Ensure you use the
high-quality images prepared earlier for this stage of the publishing process.
Further, here are the details you would require:
Particulars
Details
Screenshots
2 to 8 in number, JPG or PNG. The ratio shouldn’t exceed 2:1.
Icon
512 x 512, PNG, Maximum file size: 1024KB.
Localization
If your app supports multiple languages, mention them and add
translations
to make your app information accessible to a broader audience.
Application Type and Categorization
Select application type (game or app) from the drop-down menu.
Choose a suitable category for your app. Rate your content after
uploading
your APK.
Contact Details
Provide necessary contact forms for users to reach you.
Privacy Policy
Add a privacy policy to comply with Google's guidelines and ensure app
privacy.
If you need more time, save your work as a draft and return later.
Once you are done uploading details, Hit the Save button.
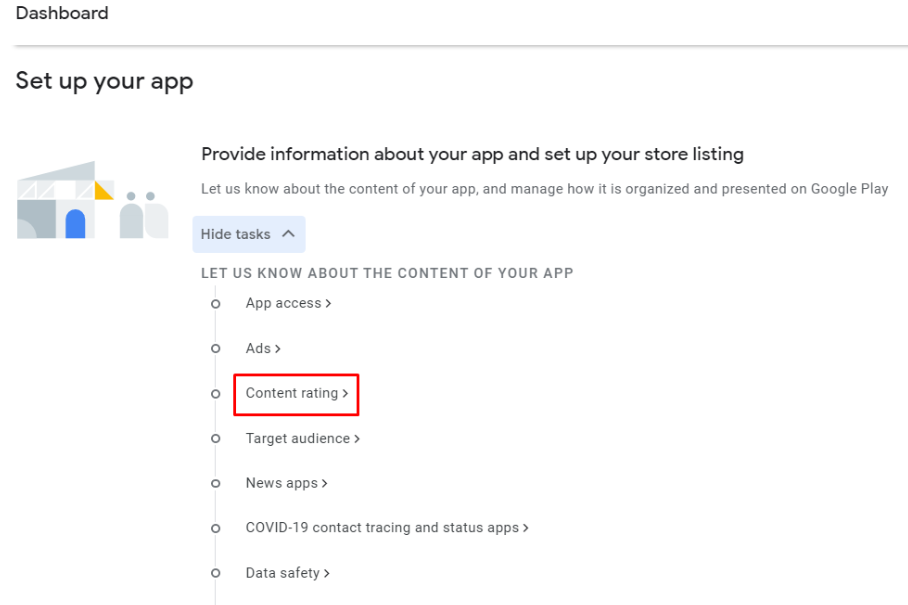
The next critical step is completing the content rating questionnaire. Without this,
Google
will classify your app as 'Unrated' and may remove it from the Play Store. To avoid
this,
follow these steps to add a content rating.
To add the content rating, you’ll have to navigate to the main dashboard, set up your
app,
and select the Content rating option.
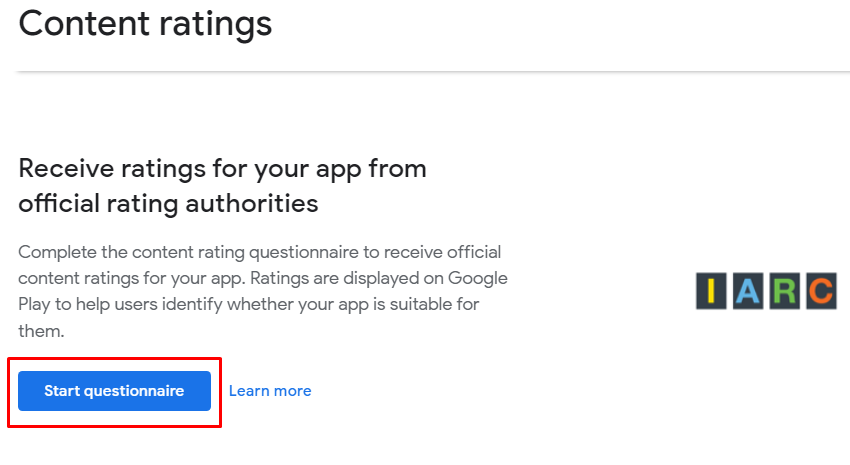
The Next dashboard will pop up, and you’ll be able to navigate the “Start Questionnaire”
button; you have to click the tab and get started.
In the content rating section, you'll provide basic information about your app. This
section
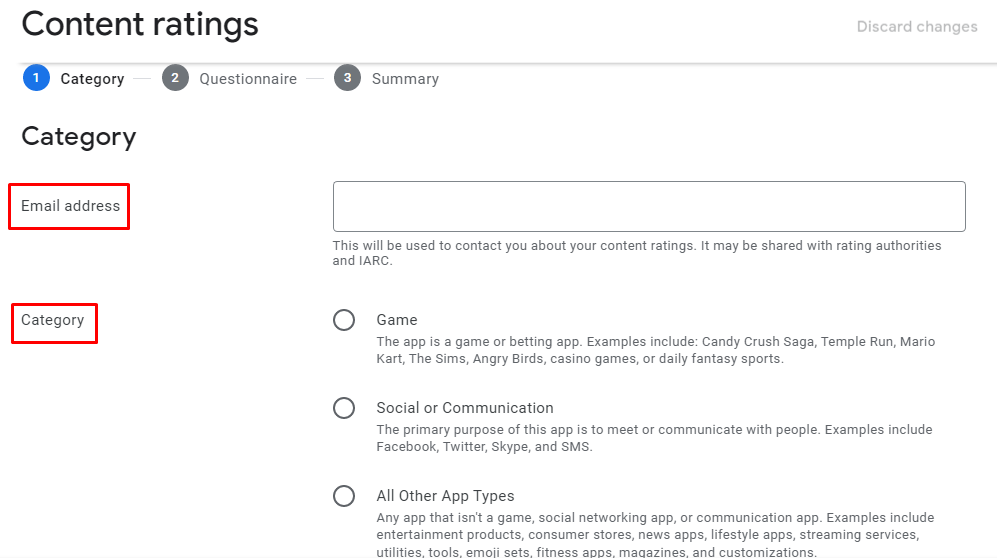
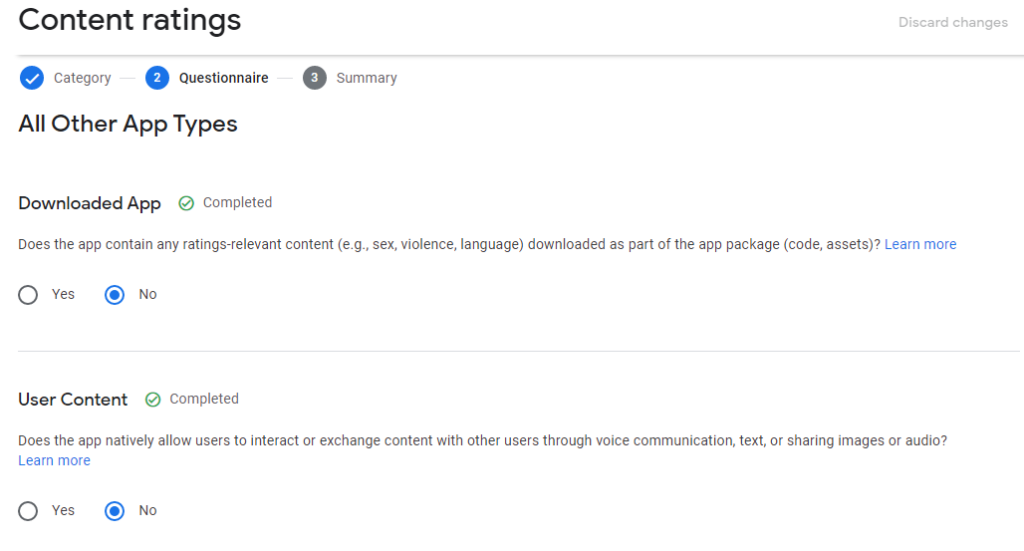
includes three subsections: Categories, Questionnaire, and Summary.
In the Category section, provide a contact email for users and select the appropriate
category for your app being published on the Play Store.
After filling in the above fields, click the 'Next' button to proceed to the
questionnaire
section. This section helps Google gather more information about your app to better
understand your target audience.
Once all the details are filled in, you can look at the content rating summary and hit
‘Submit’ to apply the changes.
Step 6 – Create & Upload Android App to Google Play
Uploading the APK to the Google Play Console is the first step in the app publishing
process,
where your app is submitted for Google's review and approval before going live
Before uploading the app, it's important to decide on the release type: Internal Test (up
to
100 selected testers), Closed Test (limited testers), Production Release (available to
all
Play Store users in selected countries), or Open Test (available to Google Playtesters,
with
users joining through your store listing).
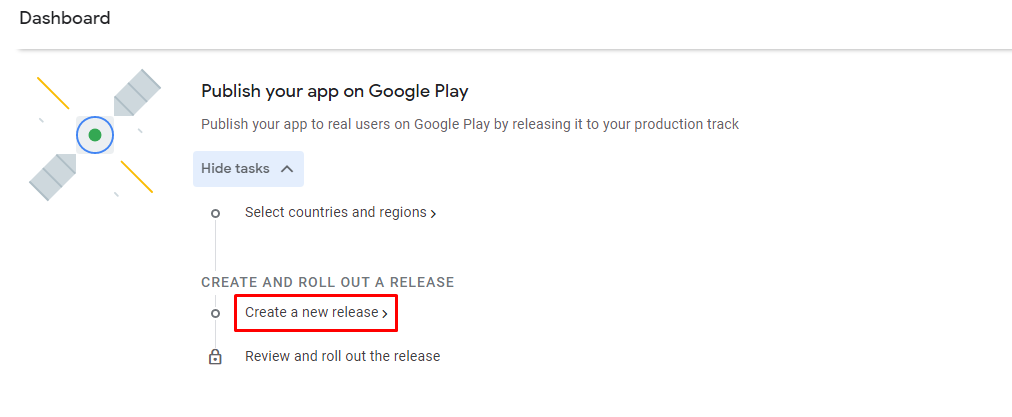
Once you have decided on the testing, go to the dashboard and select “Create a
new
release.”
After selecting “Create a new release,” you will be redirected to a
dashboard where you can upload the app bundles and enter the release details.
After entering all the details, double-check everything to ensure it's correct. Then,
complete the final step by adding the app to the platform. Next, go to the ‘App
Releases’
tab, select ‘Manage Production’, and click on ‘Edit Release’. Proceed by clicking
‘Review’,
then select ‘Start rollout to production’.
Finally, click ‘Confirm’, and that's it! Your app has been successfully uploaded to your
Google Play Store account for free.
App store Publish 2.3
Ready eCommerce: Publish Your App to the Apple App Store
Here’s a simple guide to help you publish your app to the Apple App Store:
Apple Developer Account
Create an Apple account if you don’t already have one.
Join the Apple Developer Program and pay the $99/year membership fee.
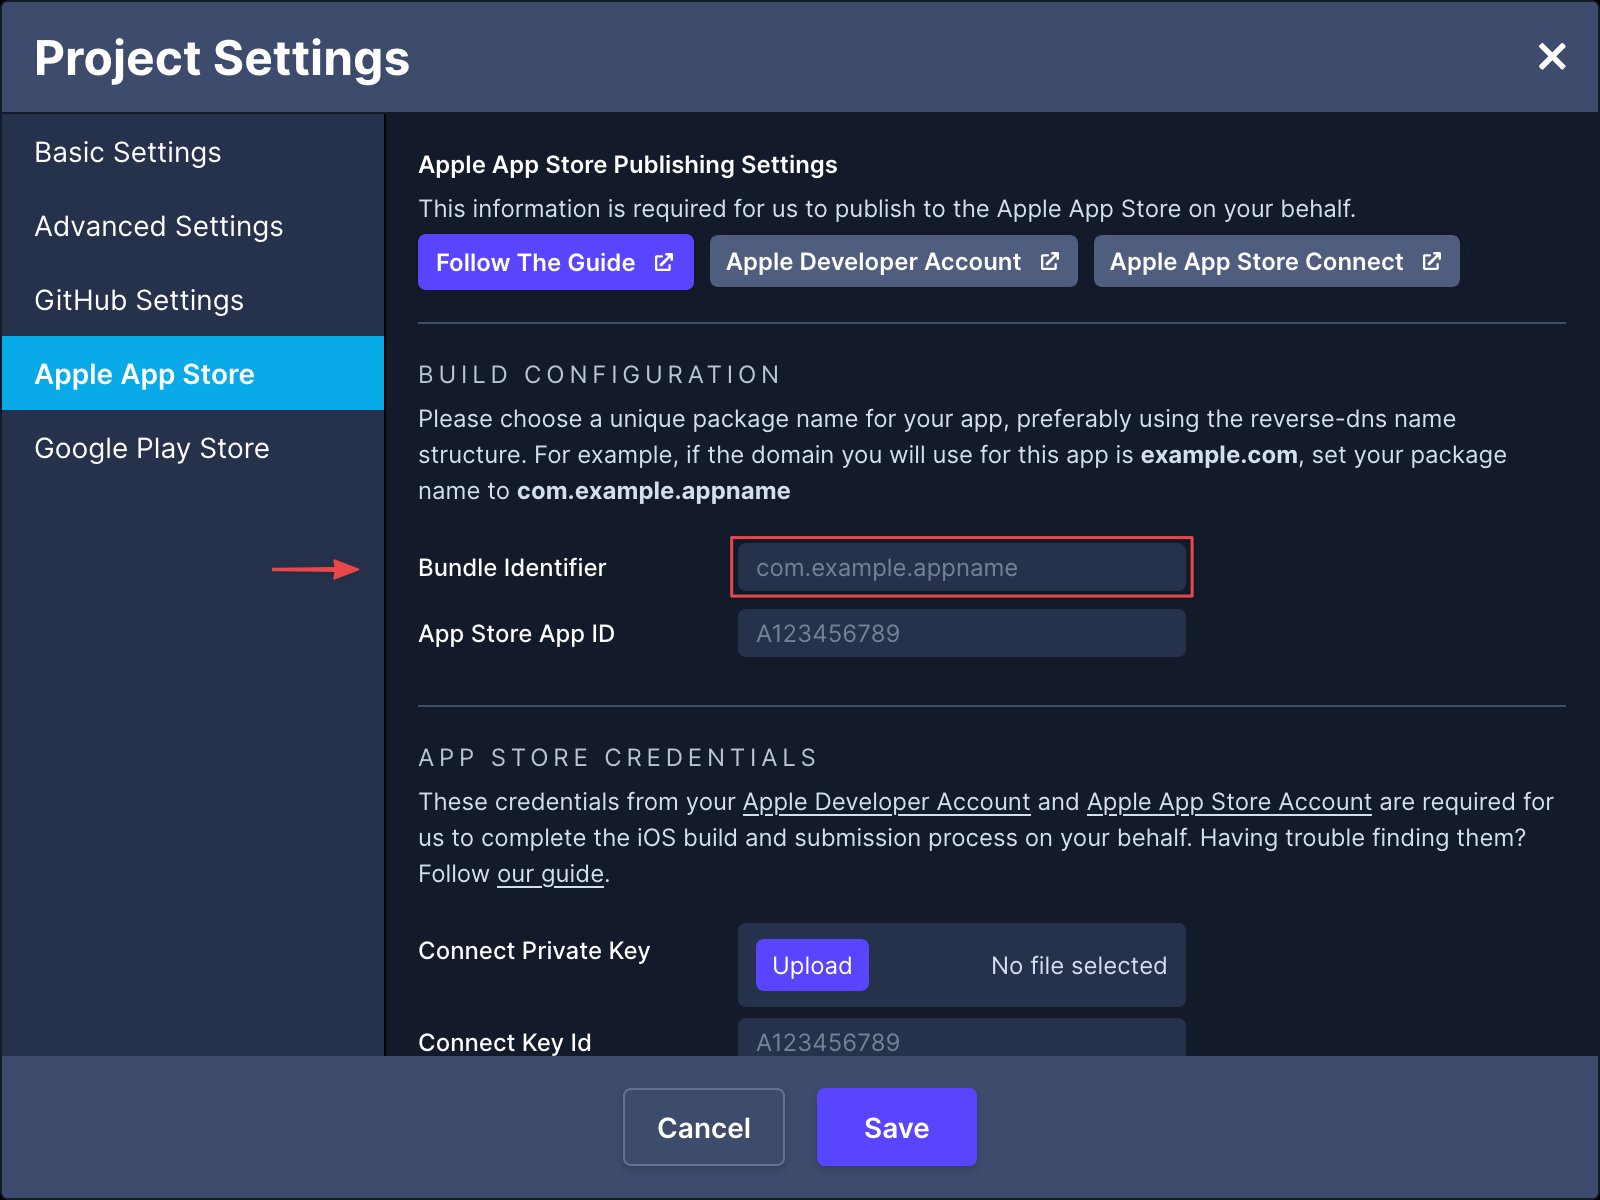
Create a Bundle Identifier
This is a unique ID for your app within Apple’s system.
Open your project in Draftbit.
Go to Project Settings.
Select Apple App Store from the menu.
Enter your Bundle Identifier using the reverse DNS format (e.g.,
com.example.appname).
Click Save.
📘 Your Bundle Identifier should use the reverse-dns name structure.
For
example, if the domain you will use for this app is example.com
, set your Bundle Identifier to com.example.appname.
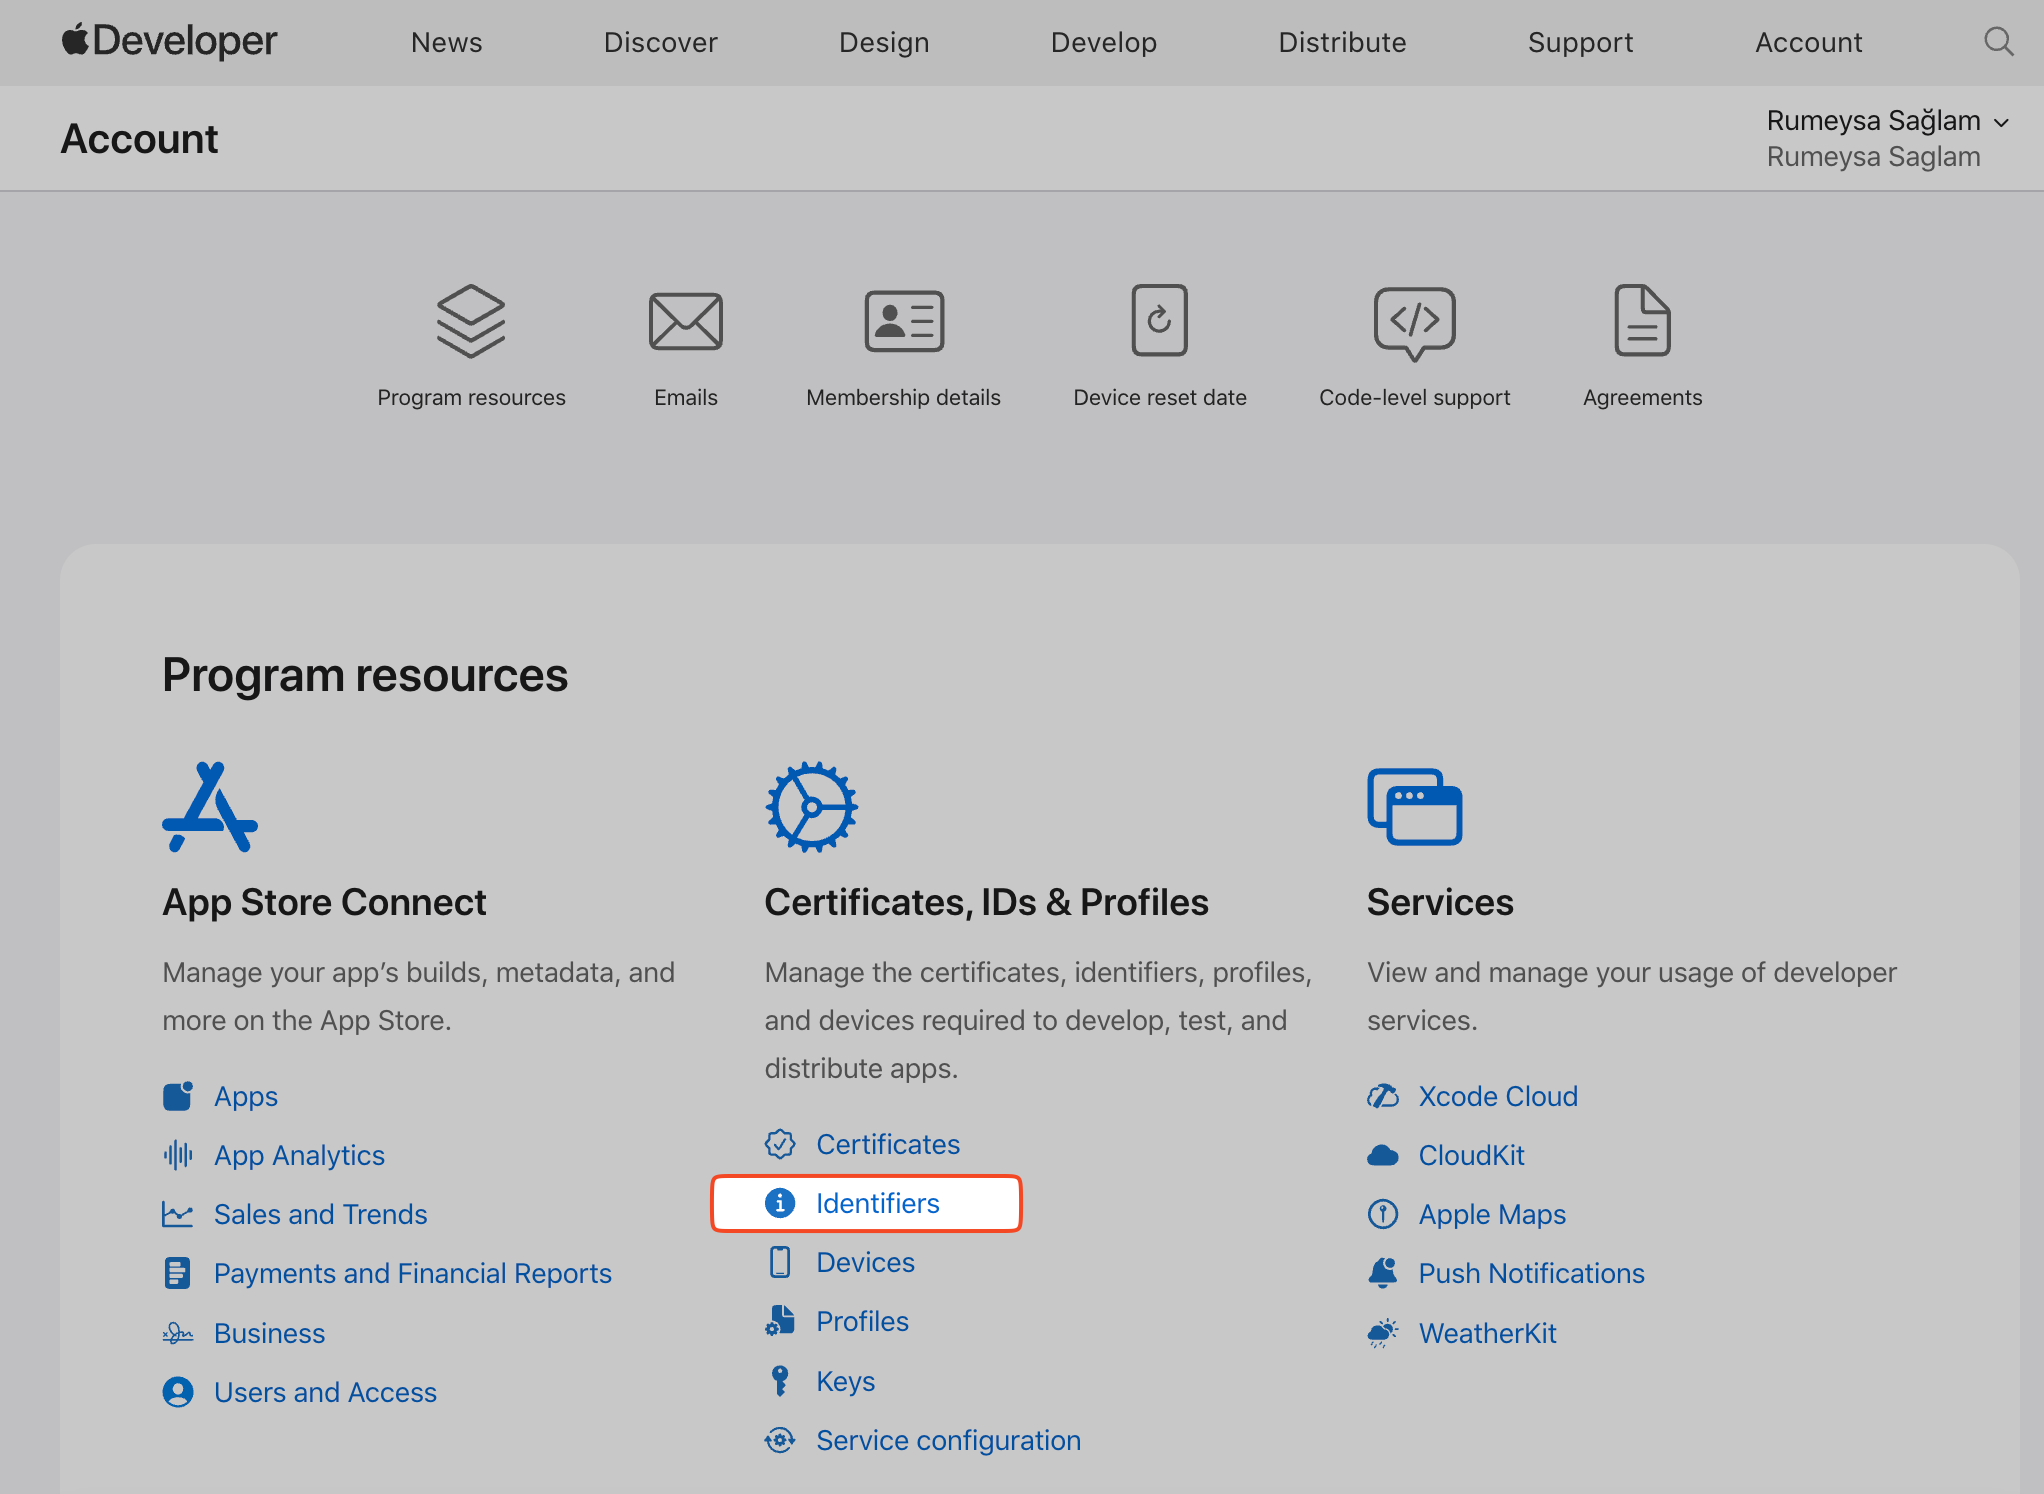
Next, log in to your Apple Developer account.
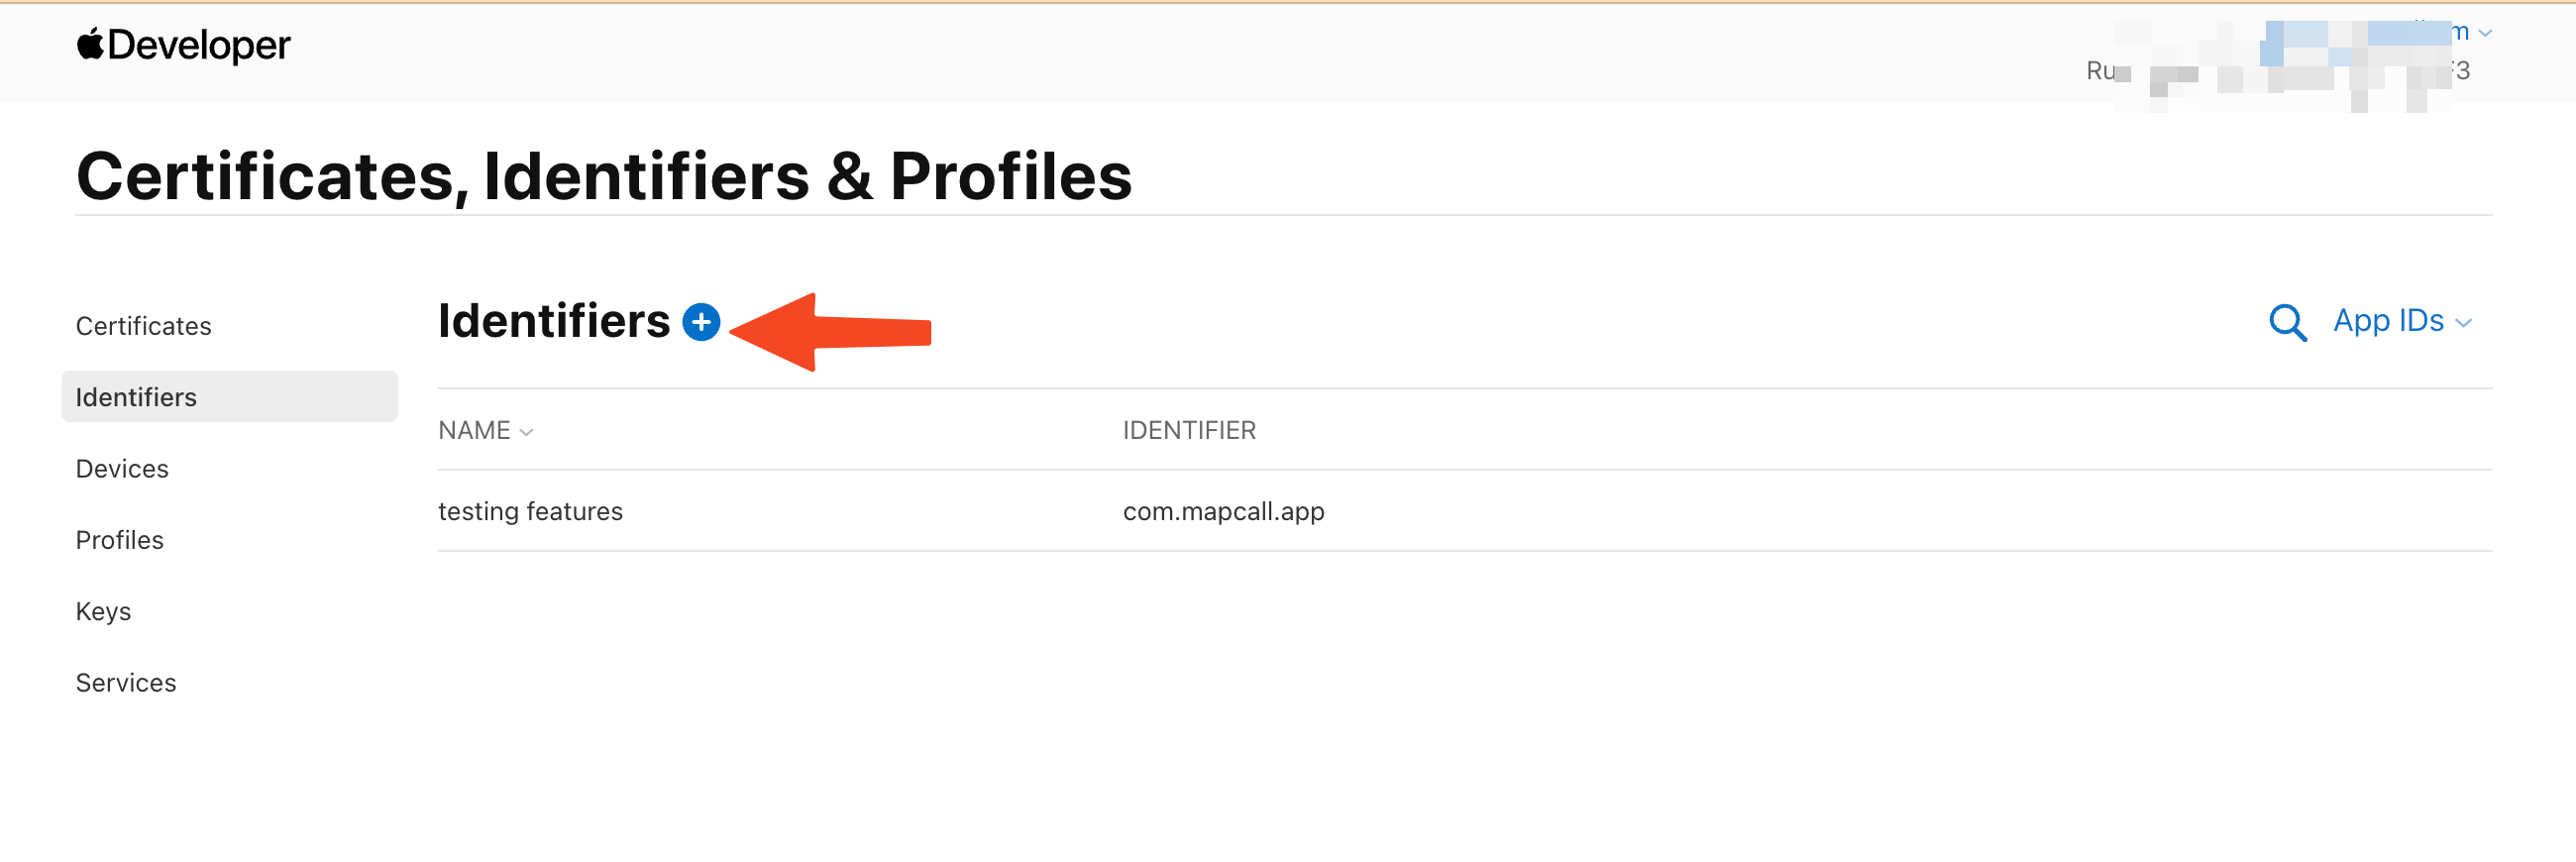
Go to your Apple Developer account and select Identifiers from Certificates, IDs &
Profiles section.
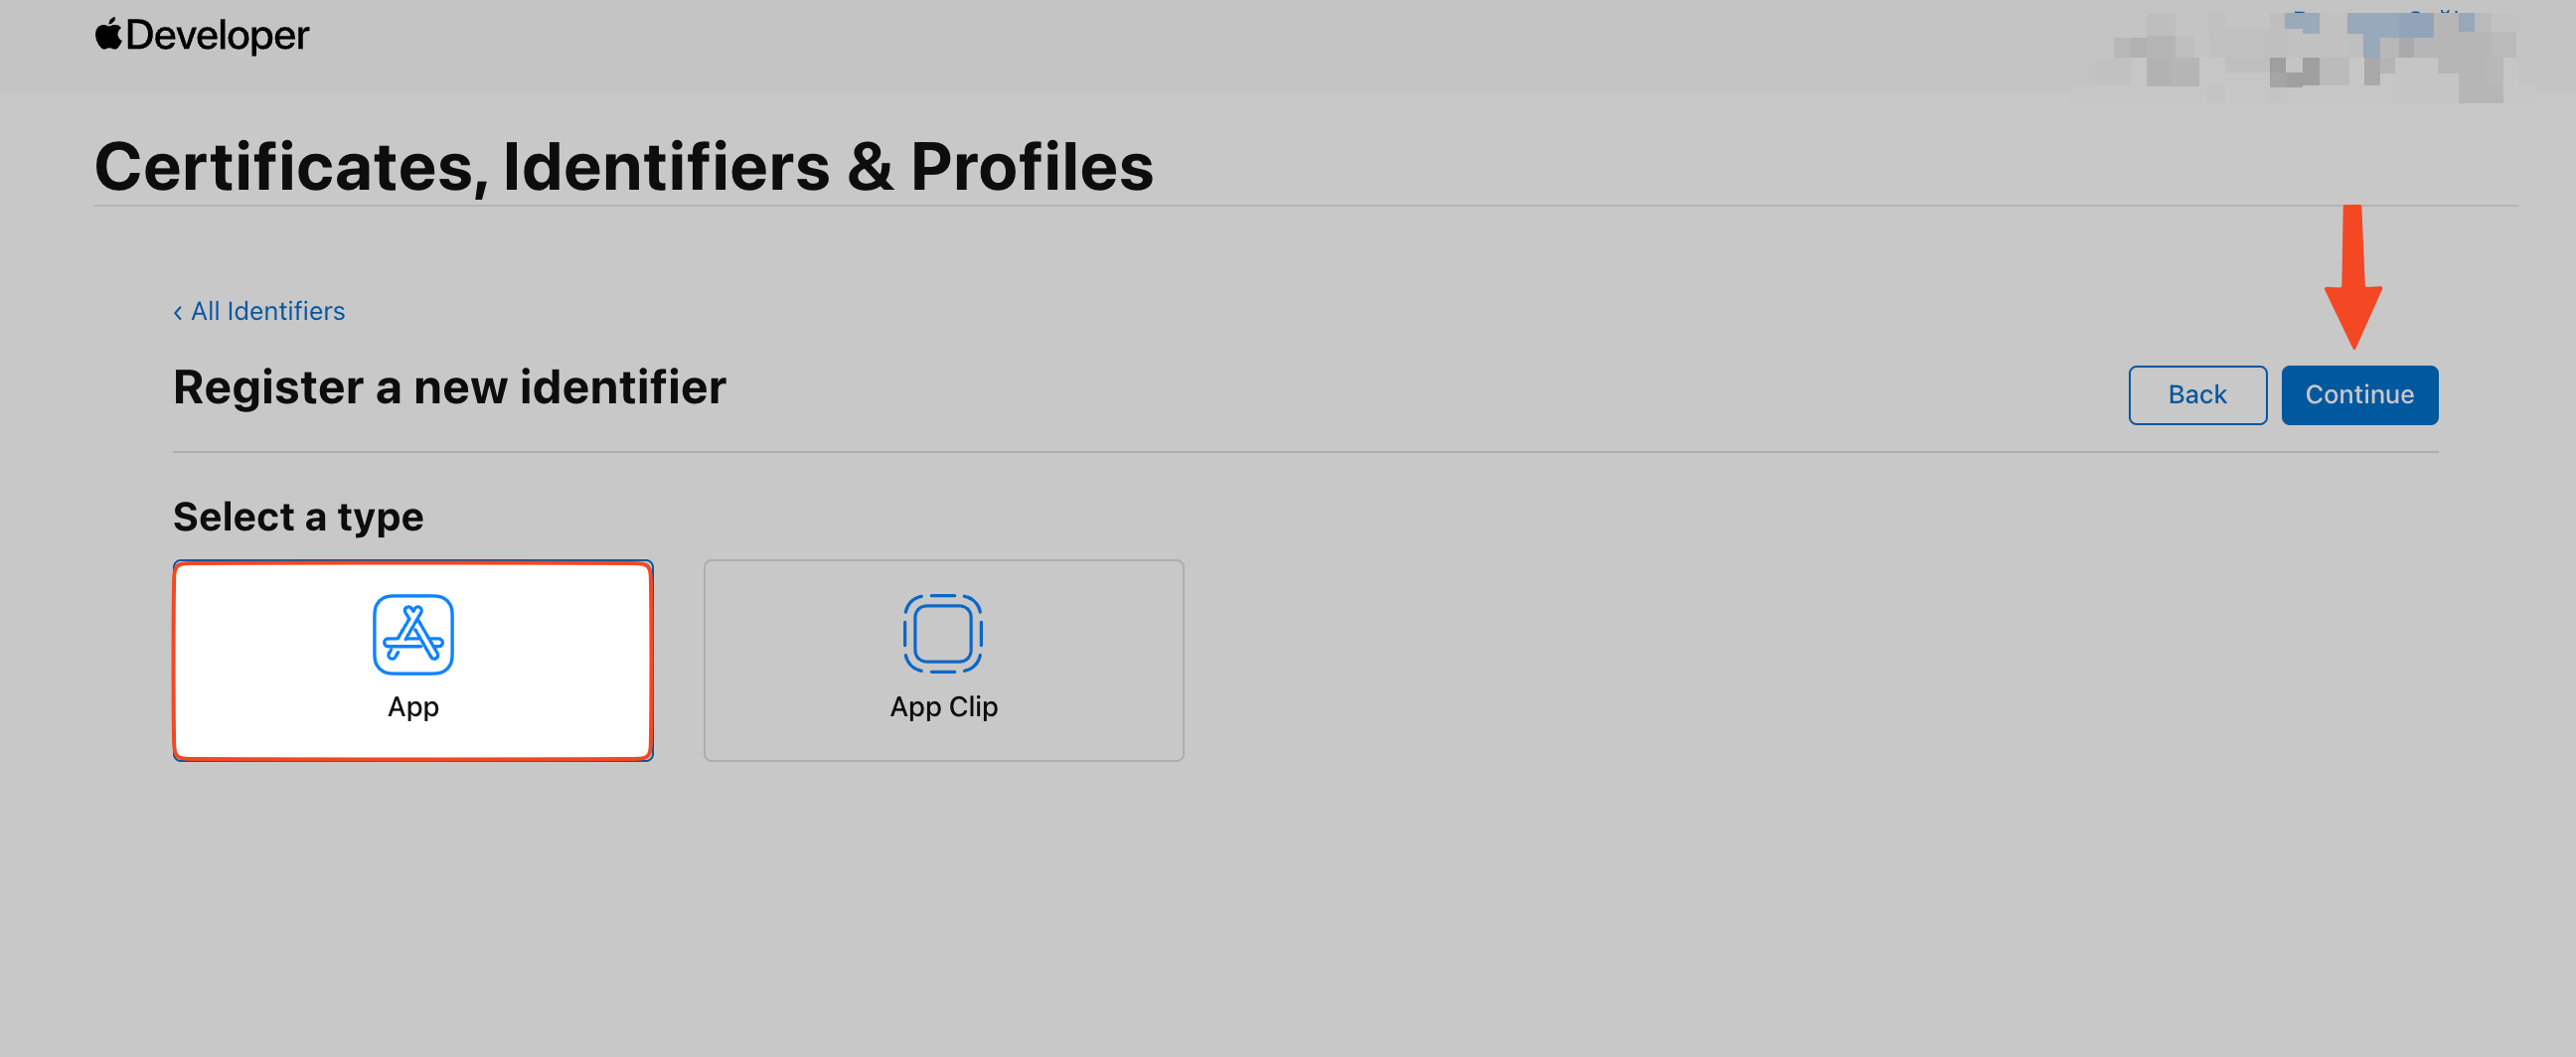
Click on the Add New Identifier button.
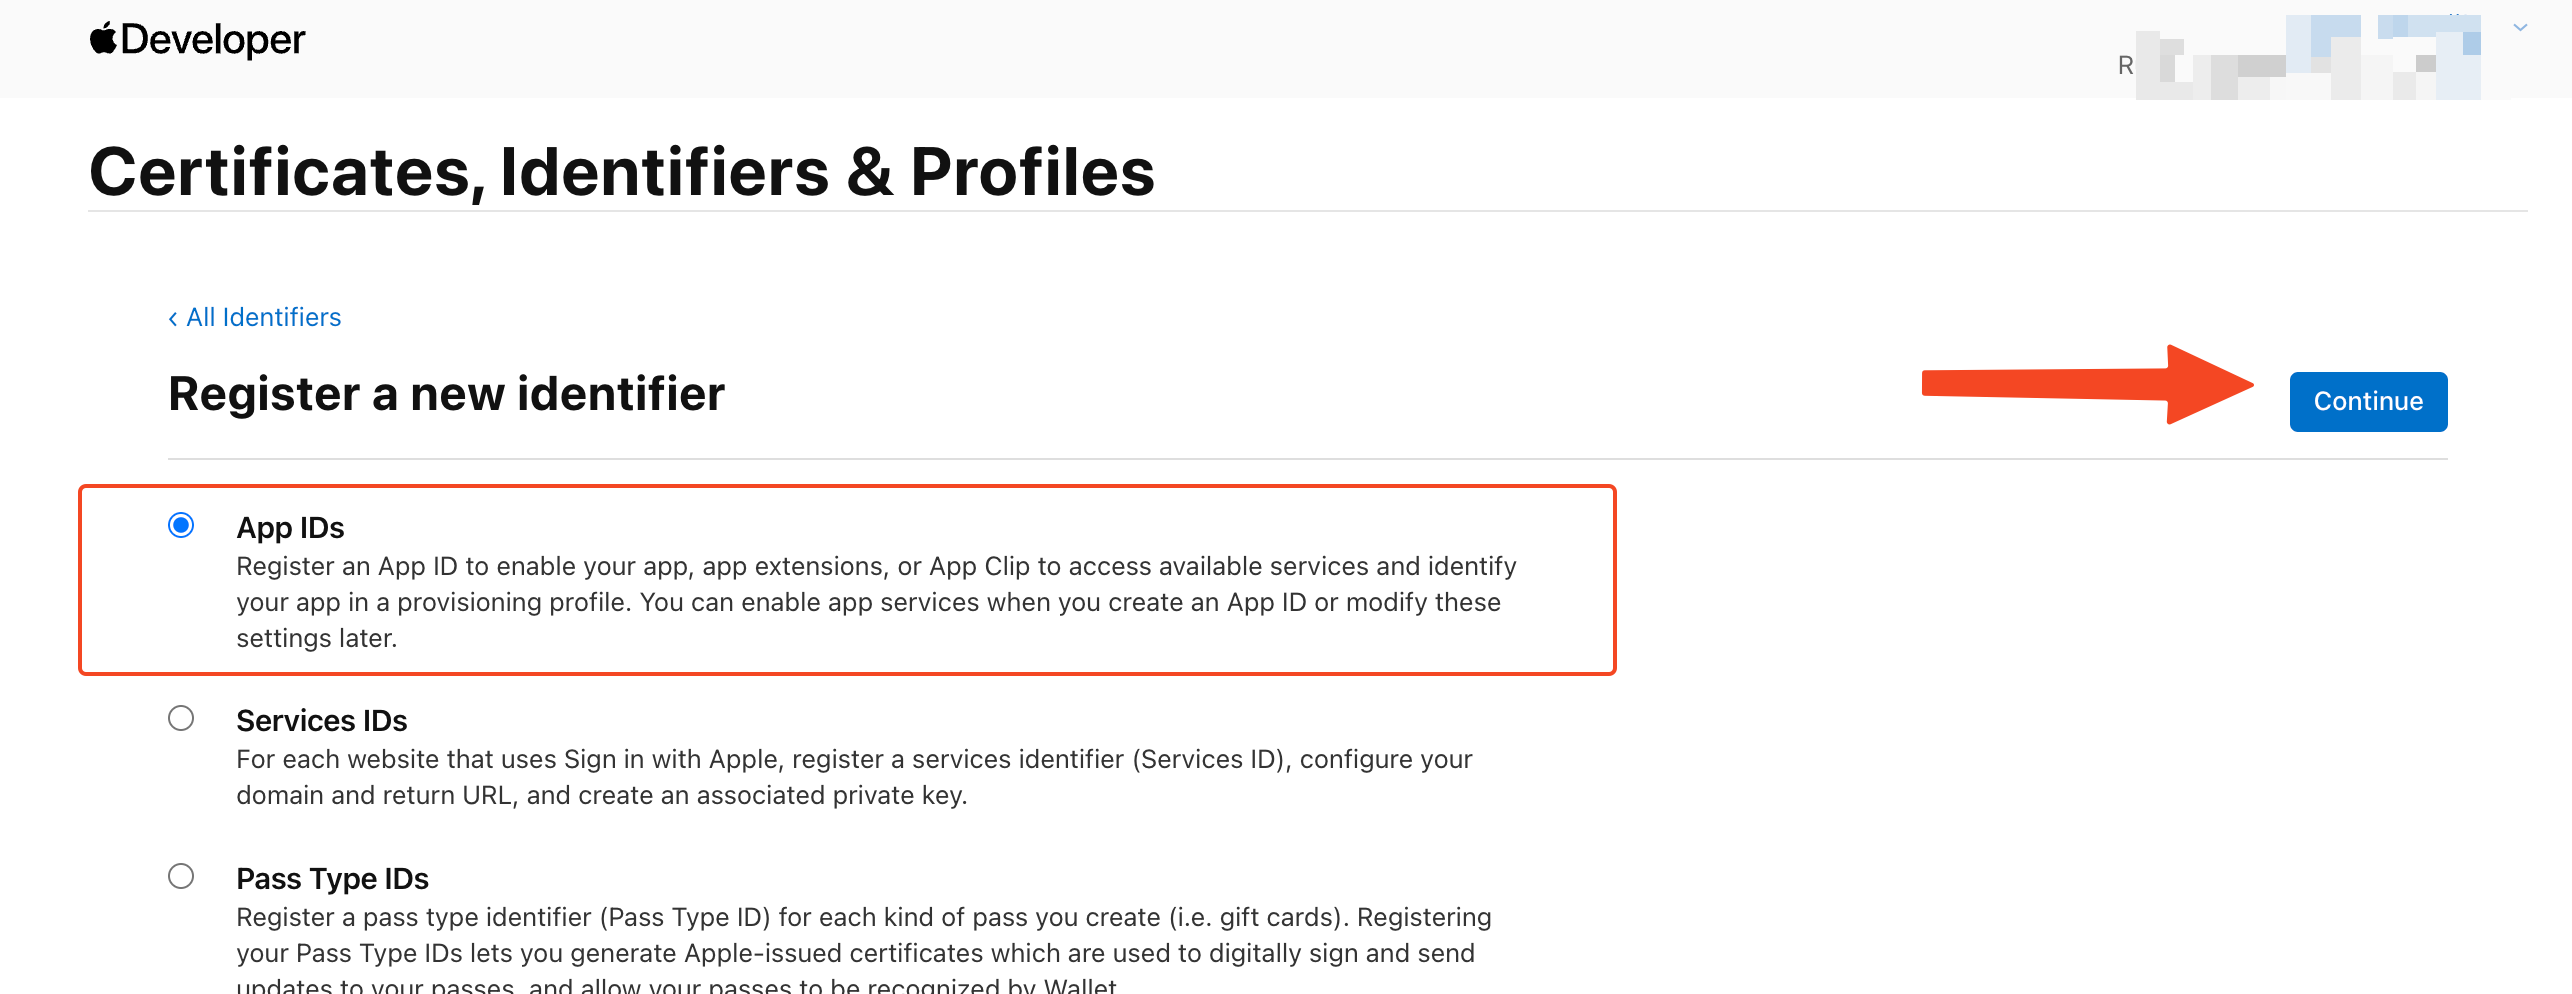
The Register a new identifier page will open. Select App IDs and
then
select Continue.
Select App and then click Continue.
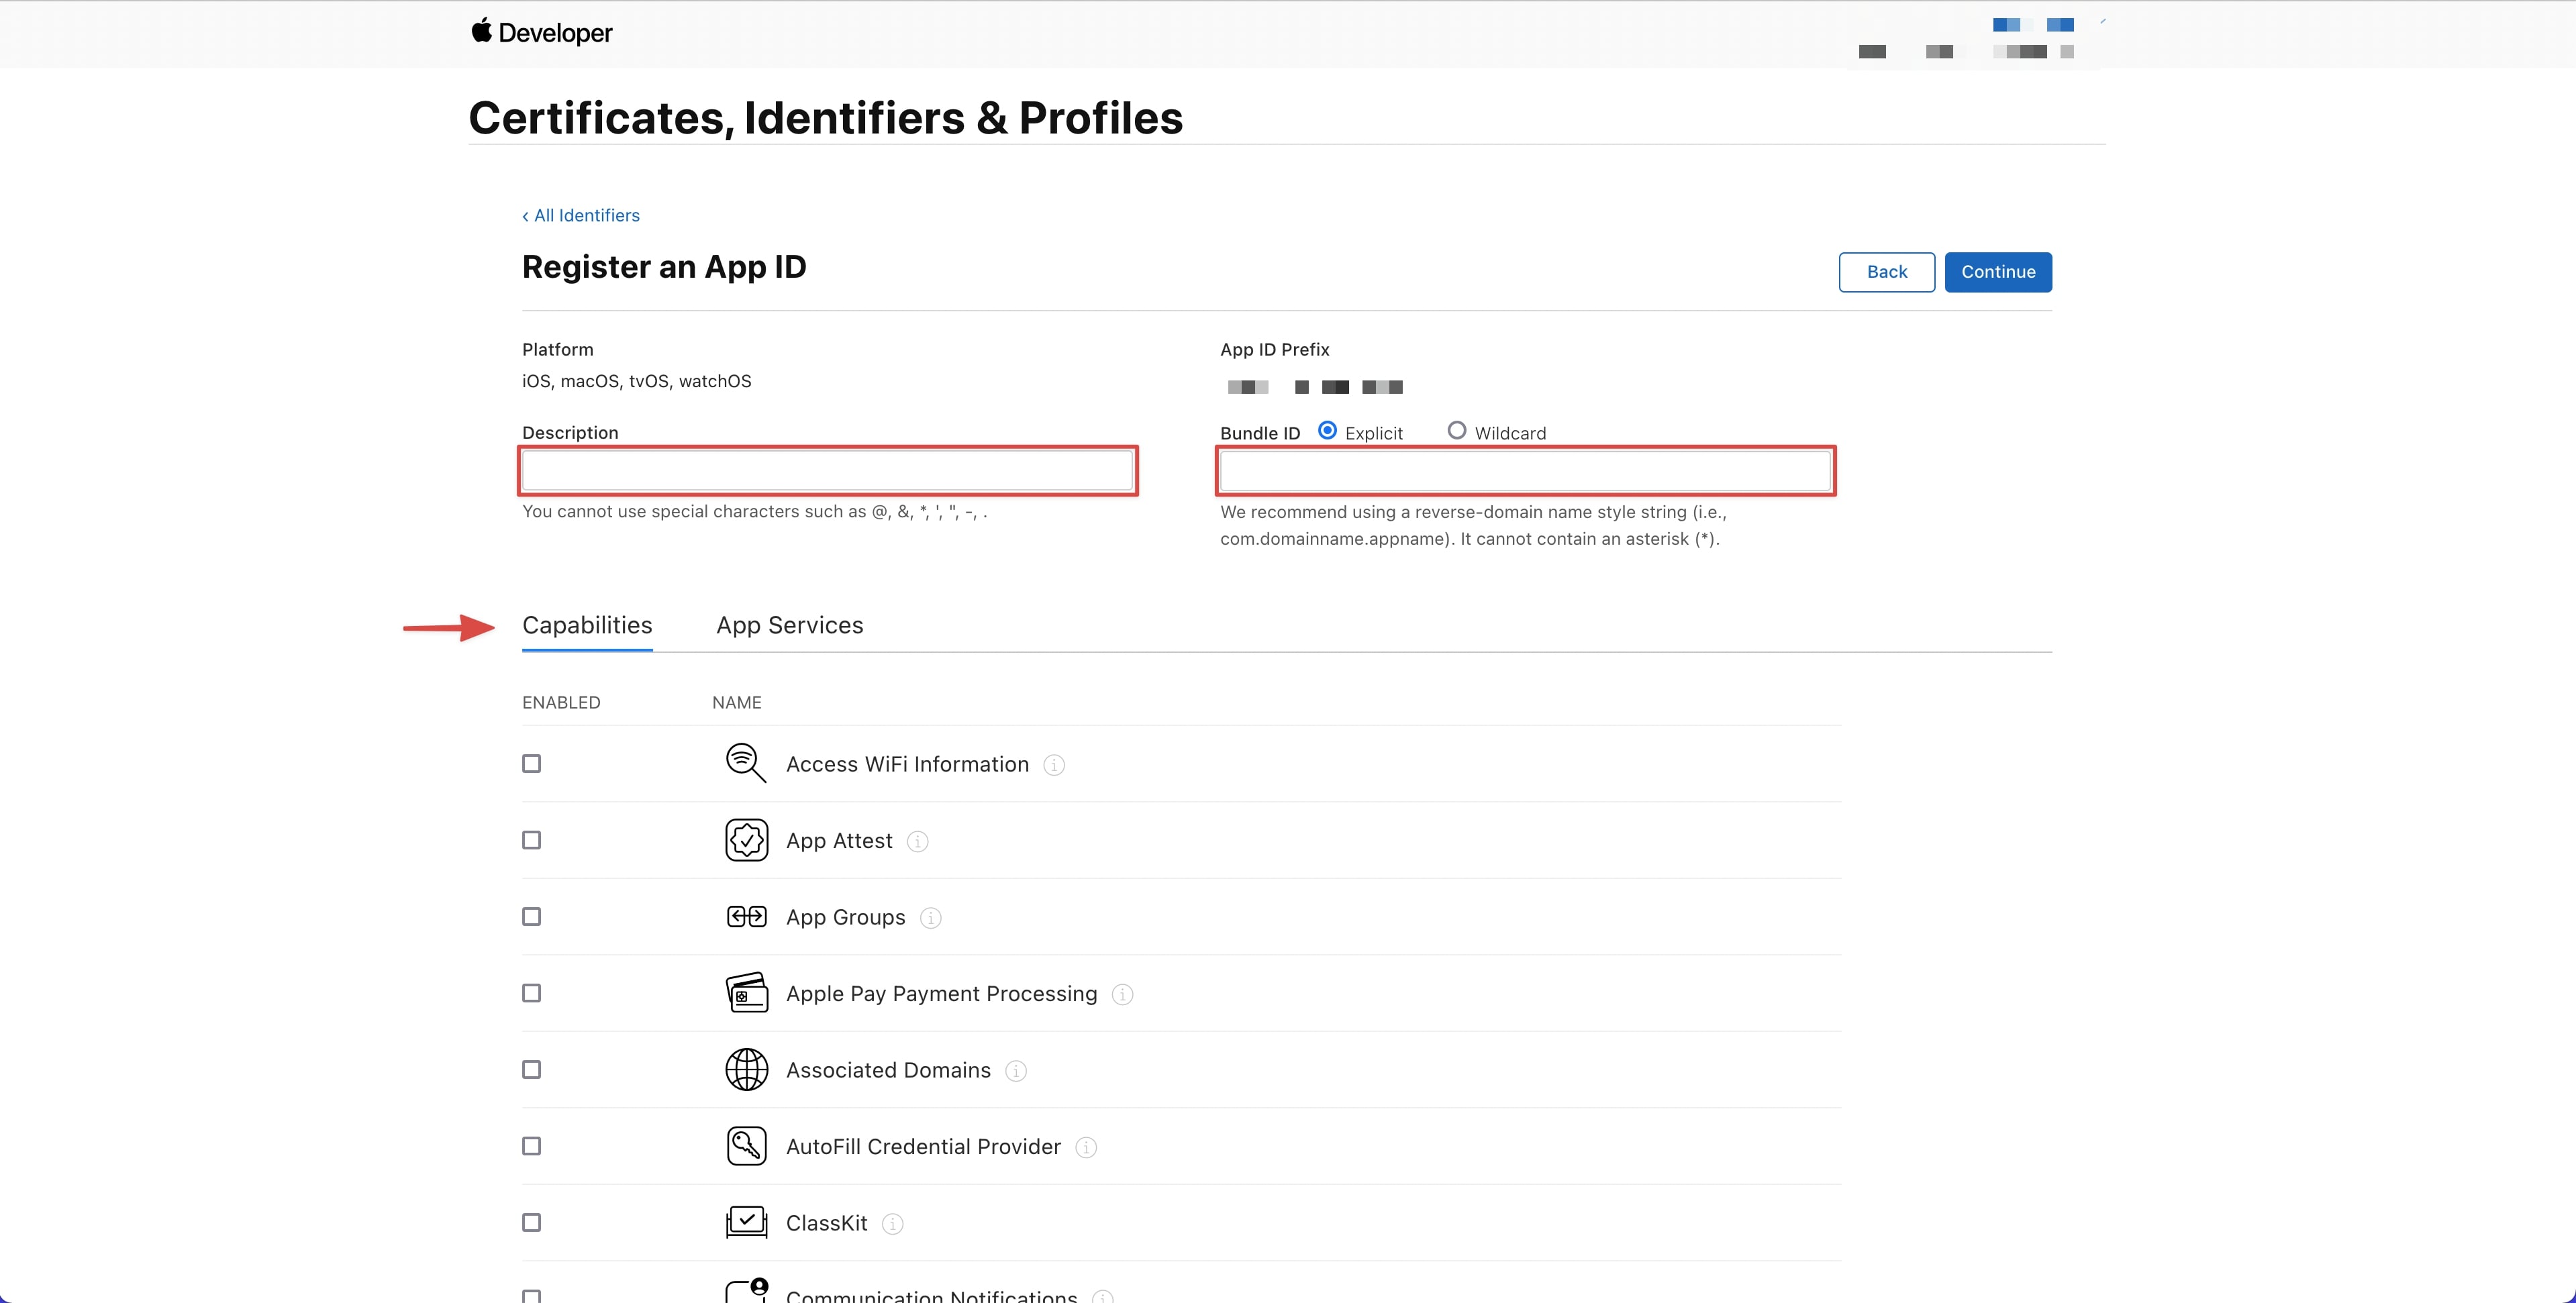
Enter the Apple Bundle information
Bundle ID: Copy the Bundle Identifier from your
Draftbit settings into this field. Be sure it matches the Bundle Identifier you
entered in Project Settings. If they are different, you will encounter
errors.
Description: Enter a short description for your Bundle
Capabilities: Scroll down and select the capabilities that are
required
for your app.
Check the boxes next to any other capabilities your app requires. For example, if
your
app requires Map capabilities make sure to check the box for that.
📘Draftbit requires Push Notifications, so check
the
box next to that capability..
When you are finished, select Register.
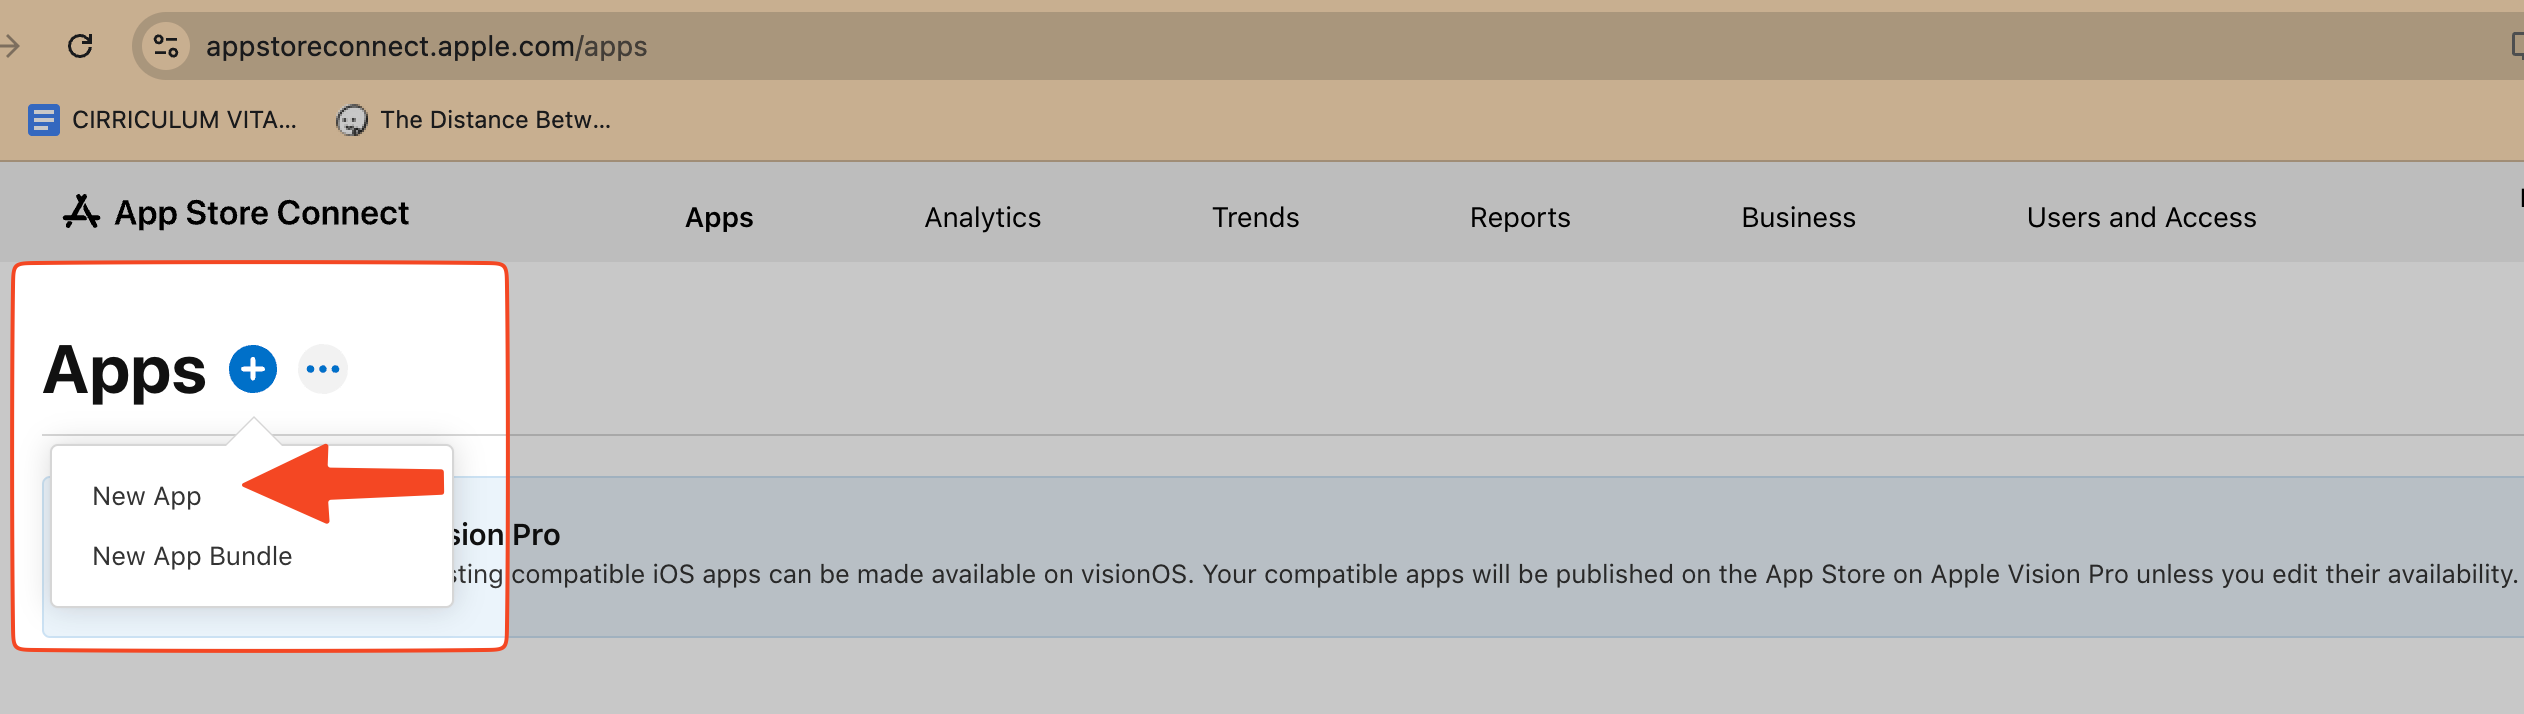
Add A New App To App Store Connect
Now, you need to add your app to App Store Connect which is where you will manage and
submit
your app to the App Store.
Click on the Add button (+) and then select New
App.
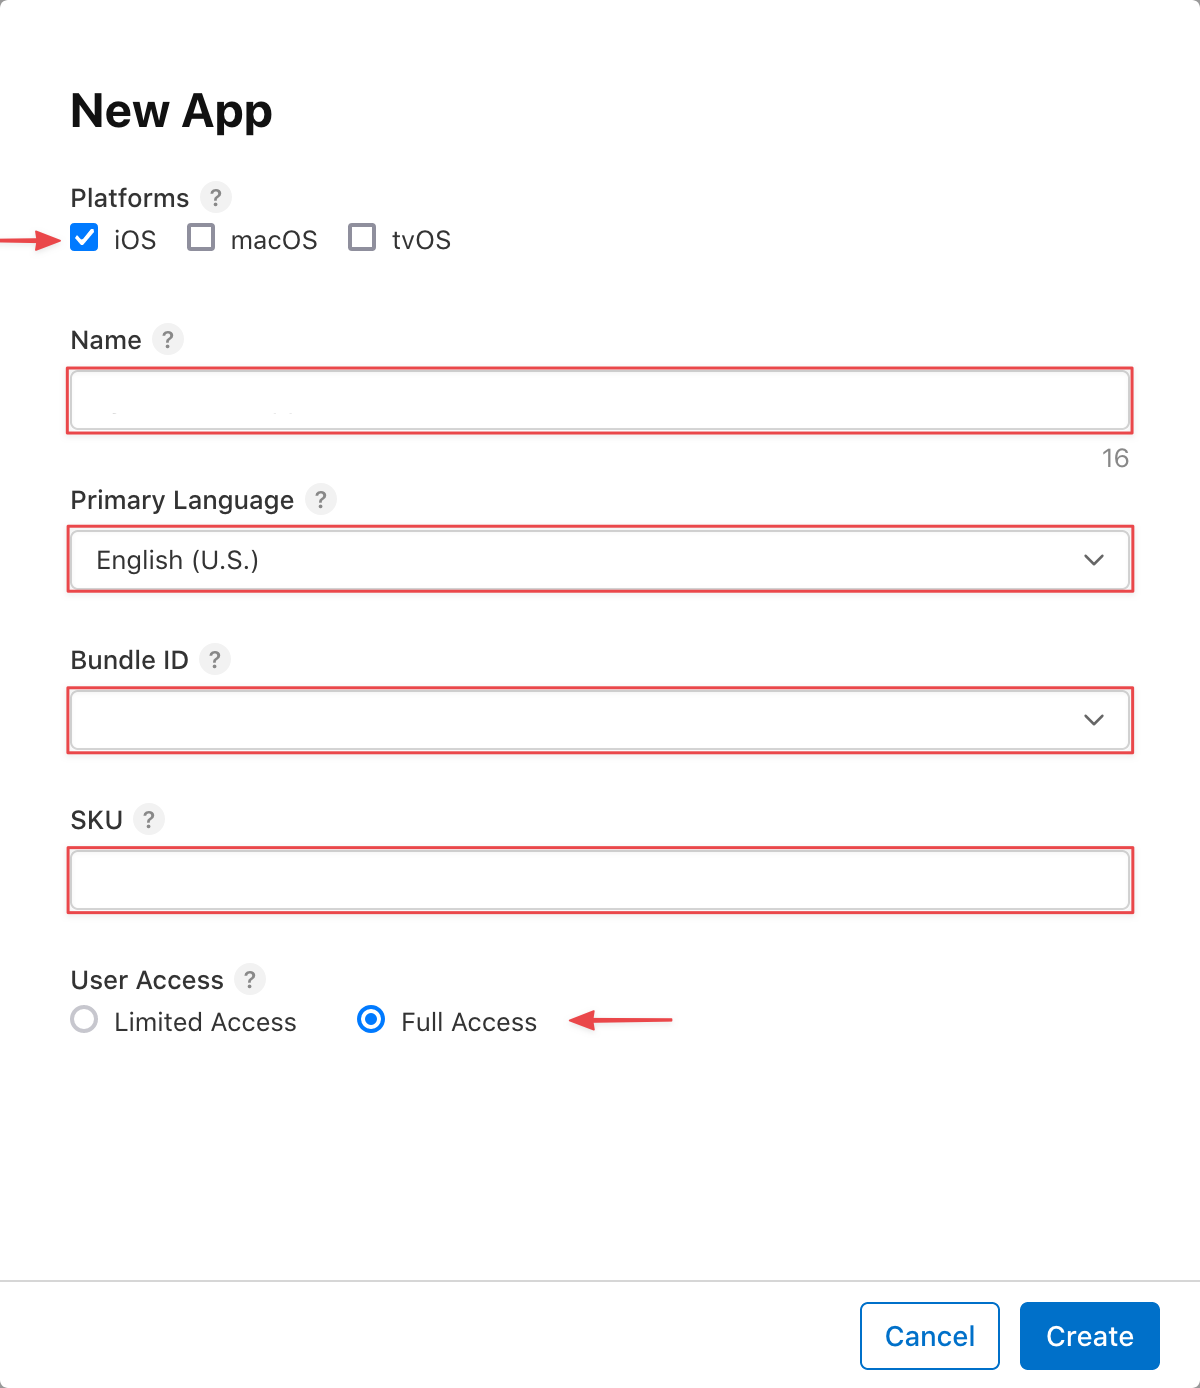
Enter your app information in the modal that appears:
Platform: for mobile apps this will be iOS.
Name: Enter a Name for your app (this is the name that will
show in the App Store).
Primary Language for your app.
Bundle ID: Select the Bundle ID you created in the previous
step.
SKU: Enter a unique identifier. We recommend using your
Bundle
ID here, as long as it's unique.
User Access: You should leave this set to Full
Access unless you intend to only use this app privately. If you
select Limited Access, you'll need to add the users that
you
would like to grant access to this app. This will only appear if you
have
other users included in your App Store Connect account.
Generate Your App Store Connect API Key and add it to Draftbit
📘 This step must be performed by an Admin User. _
At this point, you need to generate an API Key and add it to your Apple App Store
settings in
Draftbit.
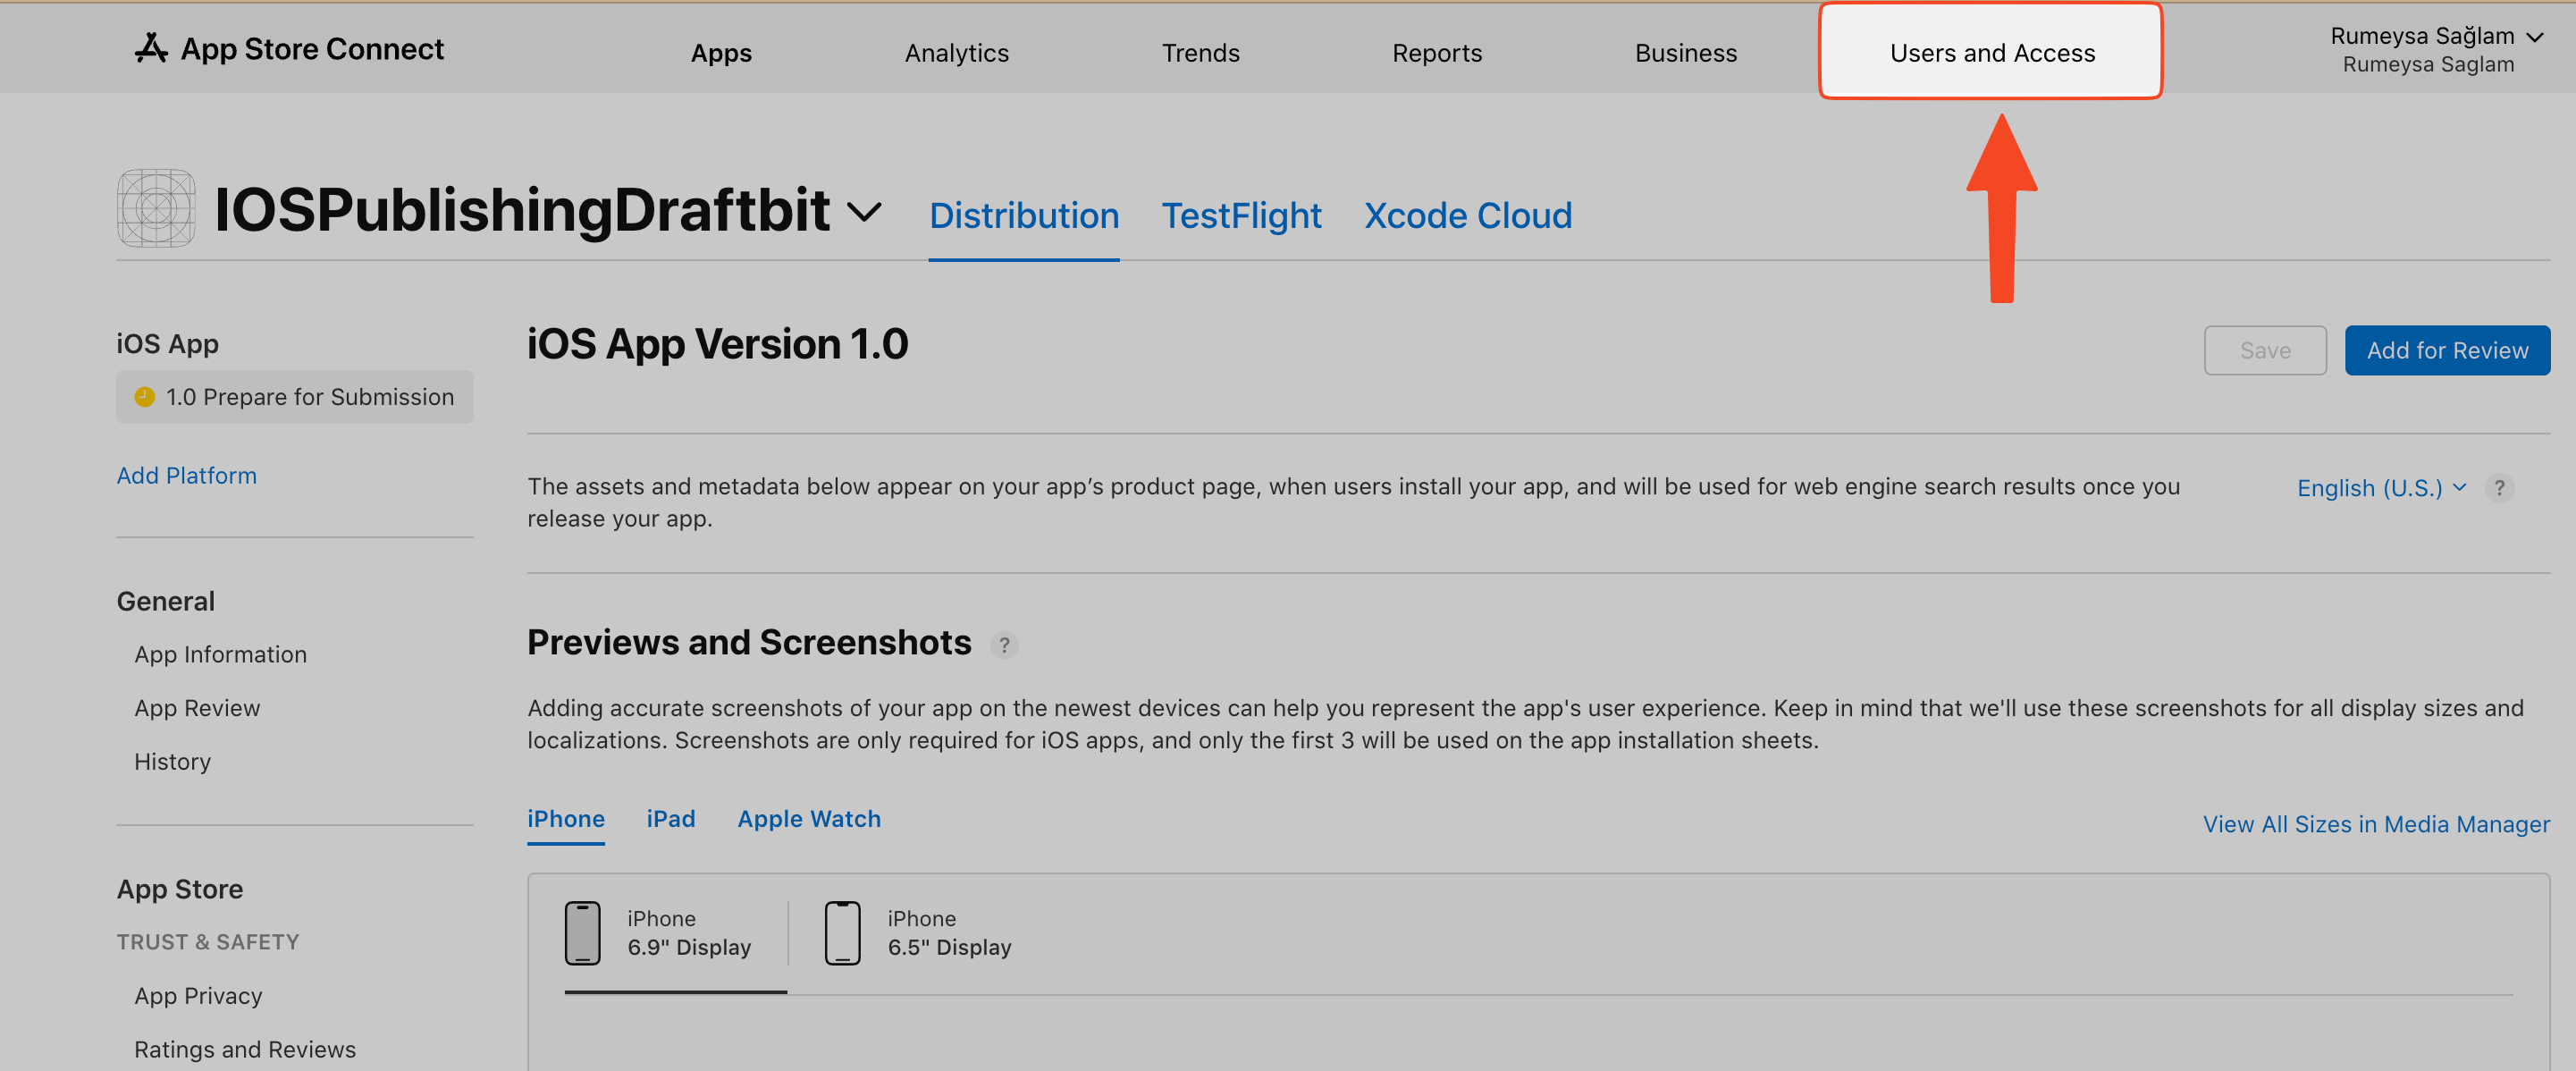
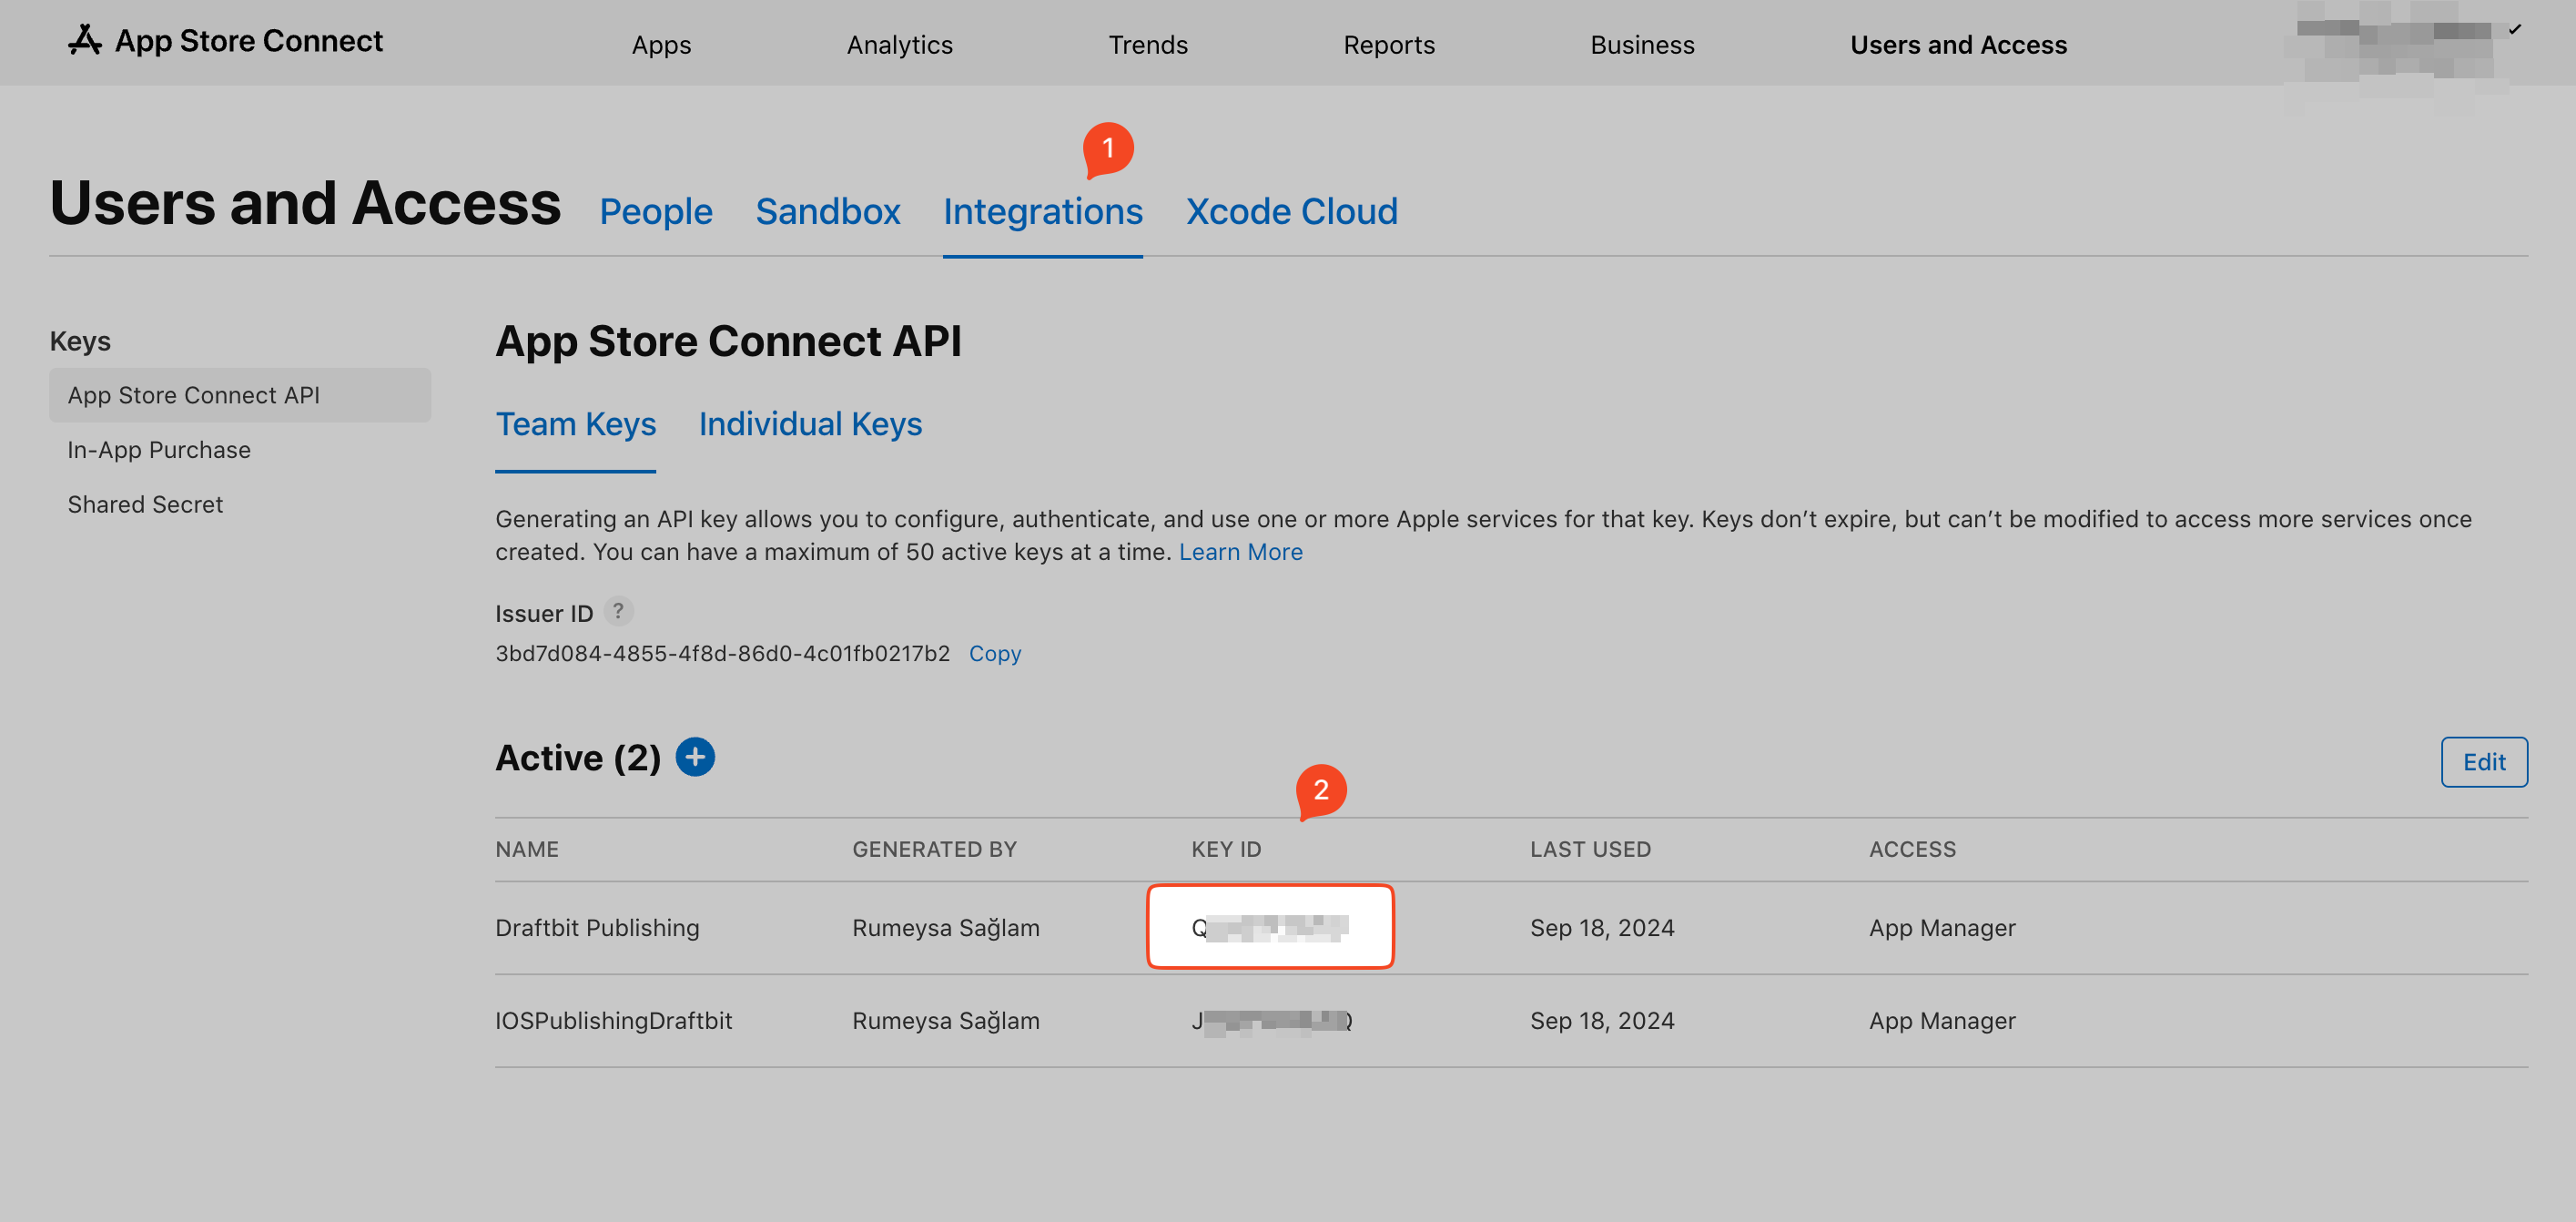
On the screen that you were navigated to after creating the app, choose Users and
Access.
From the Users and Access page, select Integrations tab on the top.
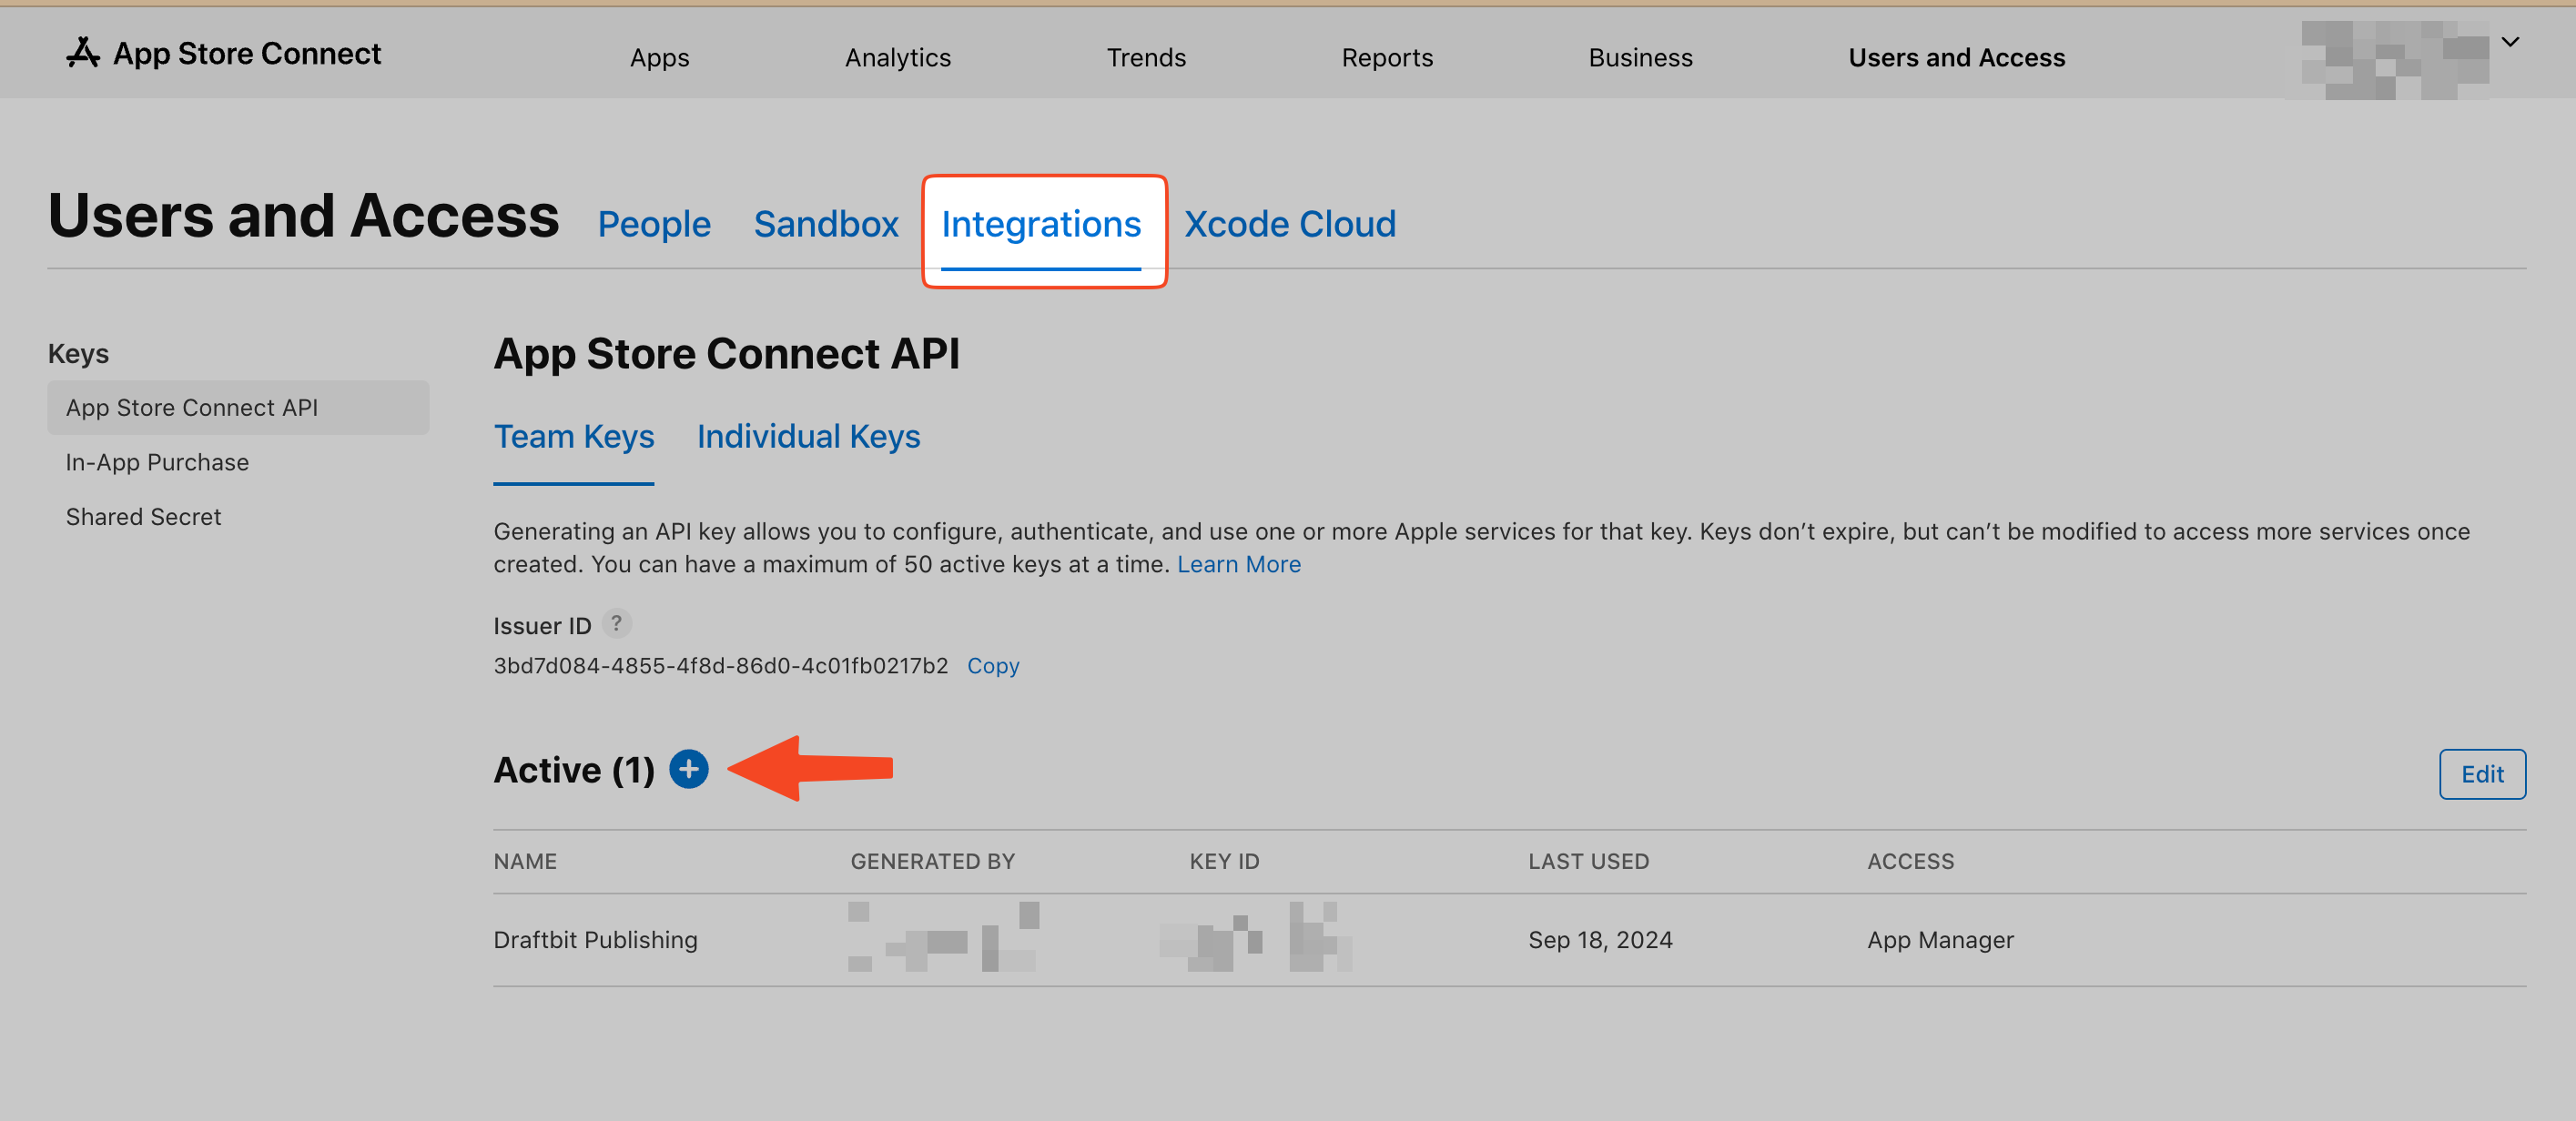
If you see the Request Access button, click on it.
If you haven't added a key before, click on the Generate API Key.
Otherwise, select the Add button (+).
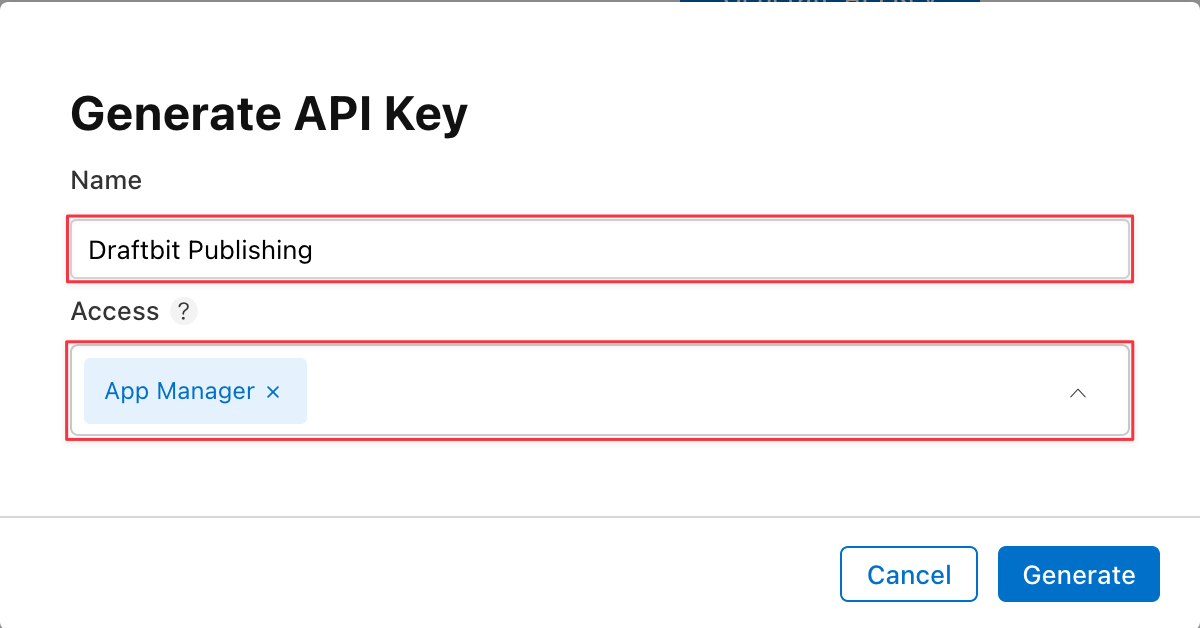
Enter your API Key Information in the modal that appears:
Name: Enter a name for the key. This is a reference and is
not
part of the key itself. We recommend naming it ‘Draftbit
Publishing’ so it will be easier to identify in the future.
Access: Select App Manager as the access
type.
For additional information on Roles, see the docs here.
When you are done, select Generate.
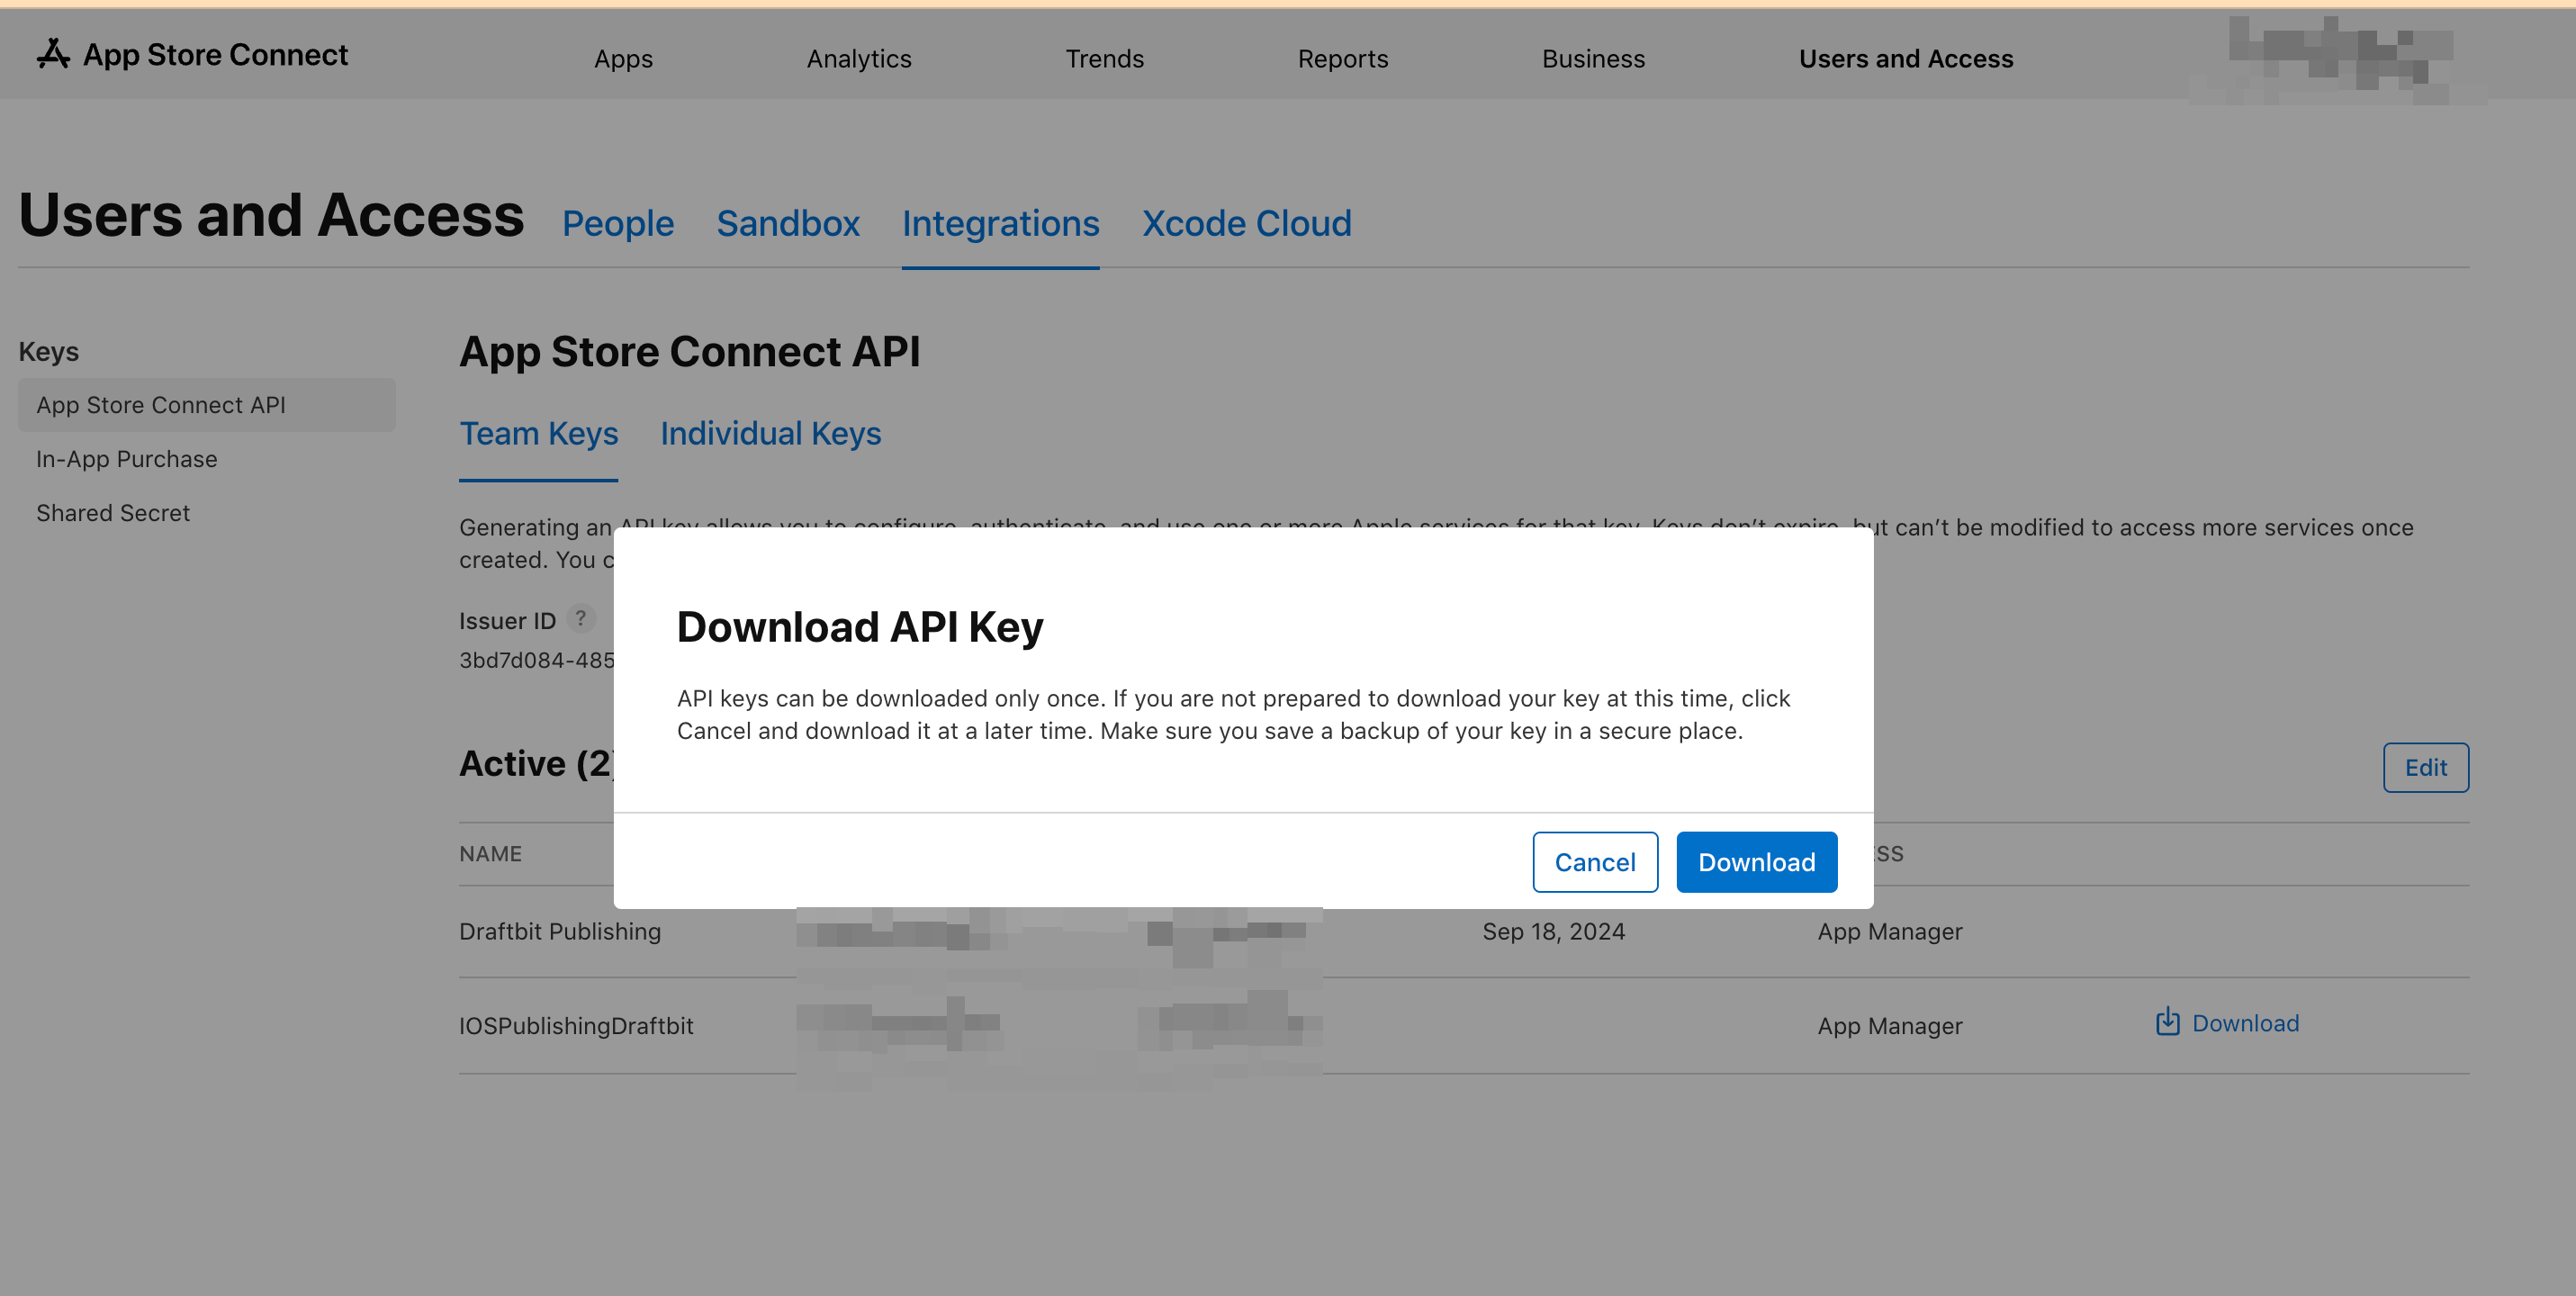
Find the row for the API Key you just generated and select Download API Key. A modal
will appear, select Download. Refresh the page if the link doesn’t appear
immediately.
Return to Draftbit and then:
Go to Project Settings -> Apple App Store.
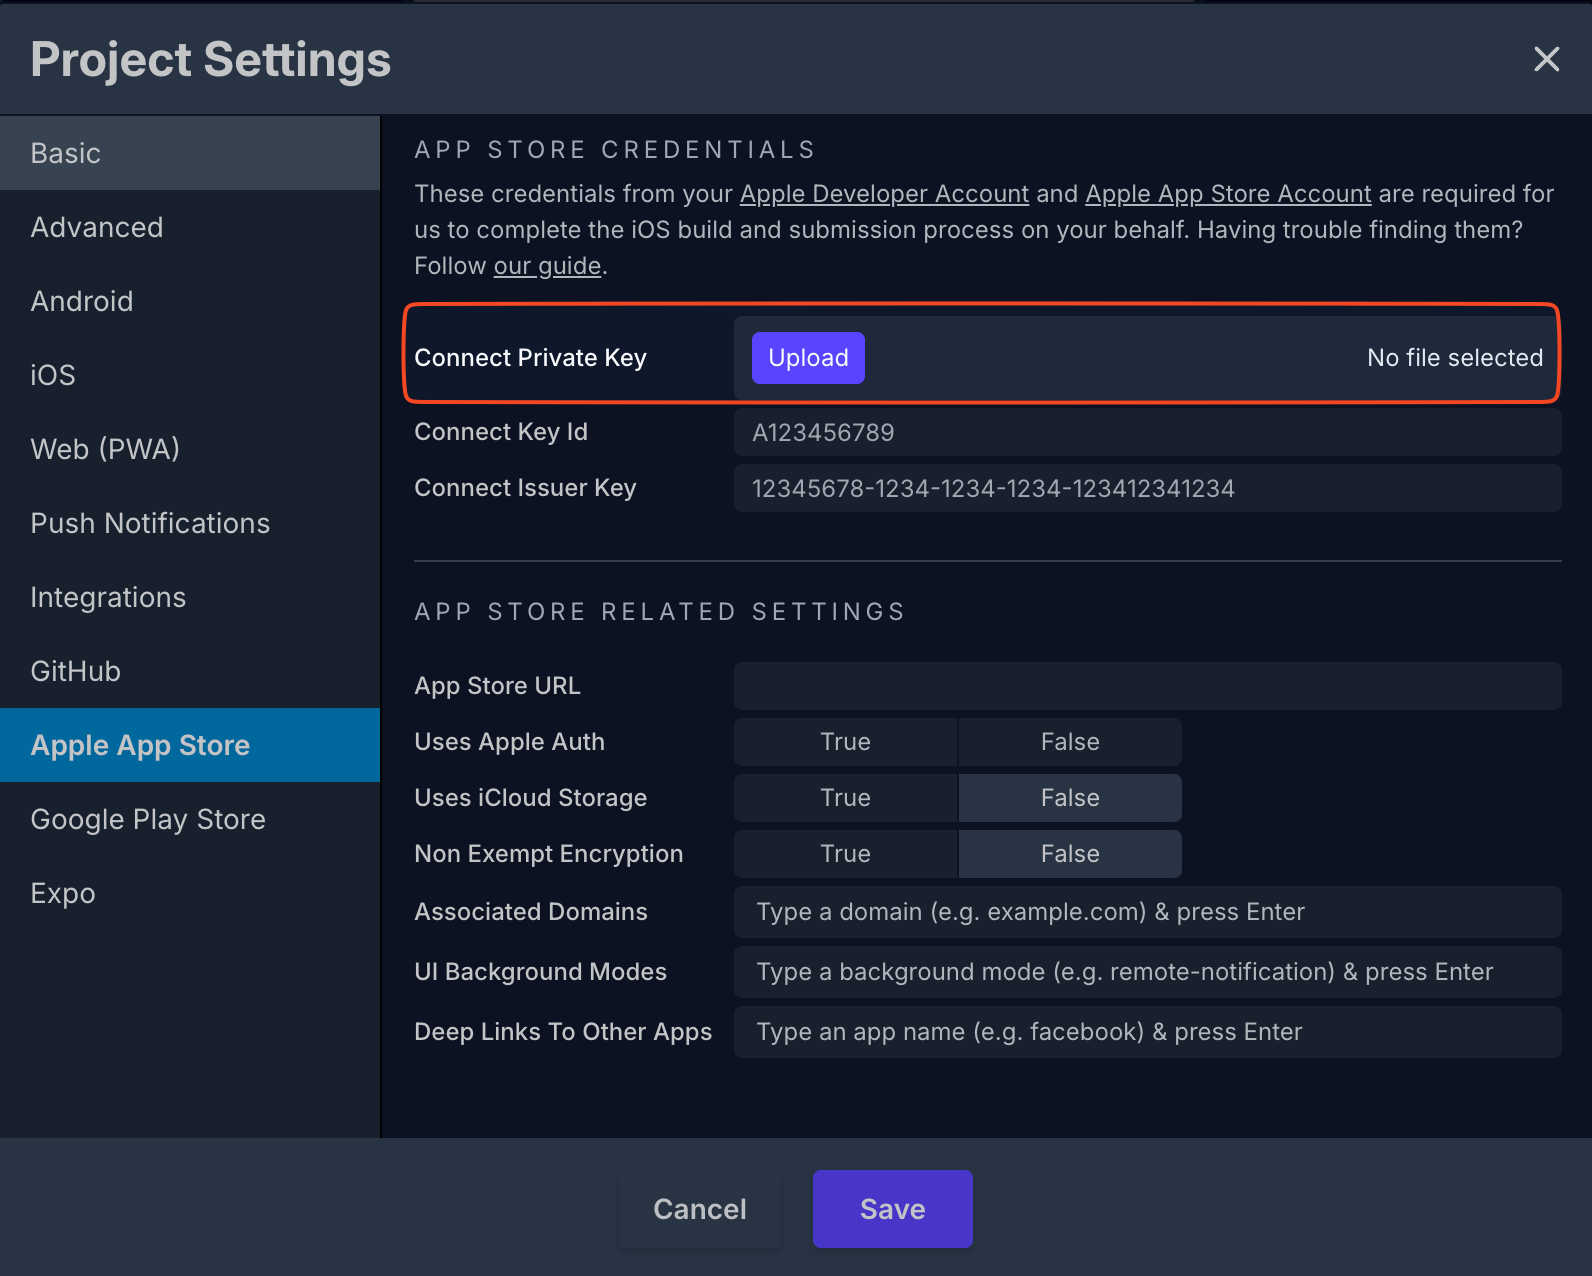
Scroll down to where it says Connect Private Key.
Upload the API Key file that you downloaded in the previous step
and
hit to Save button.
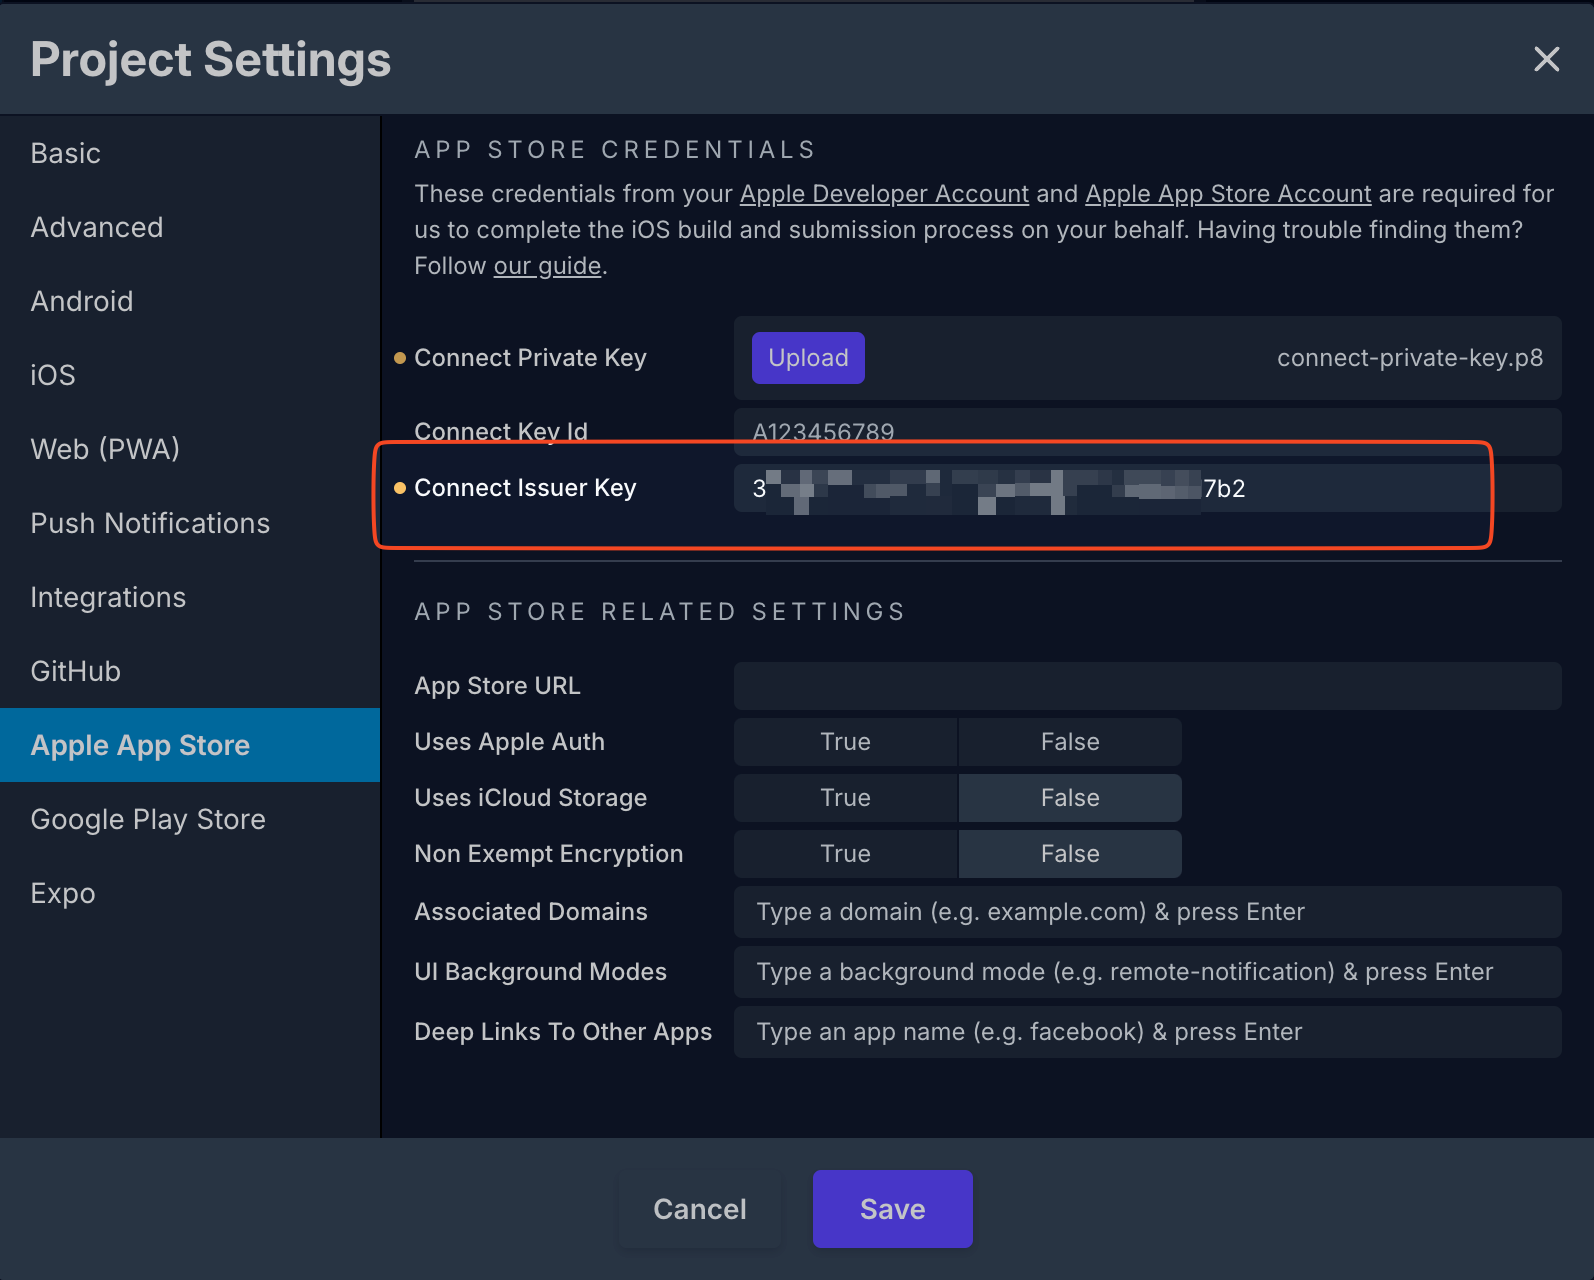
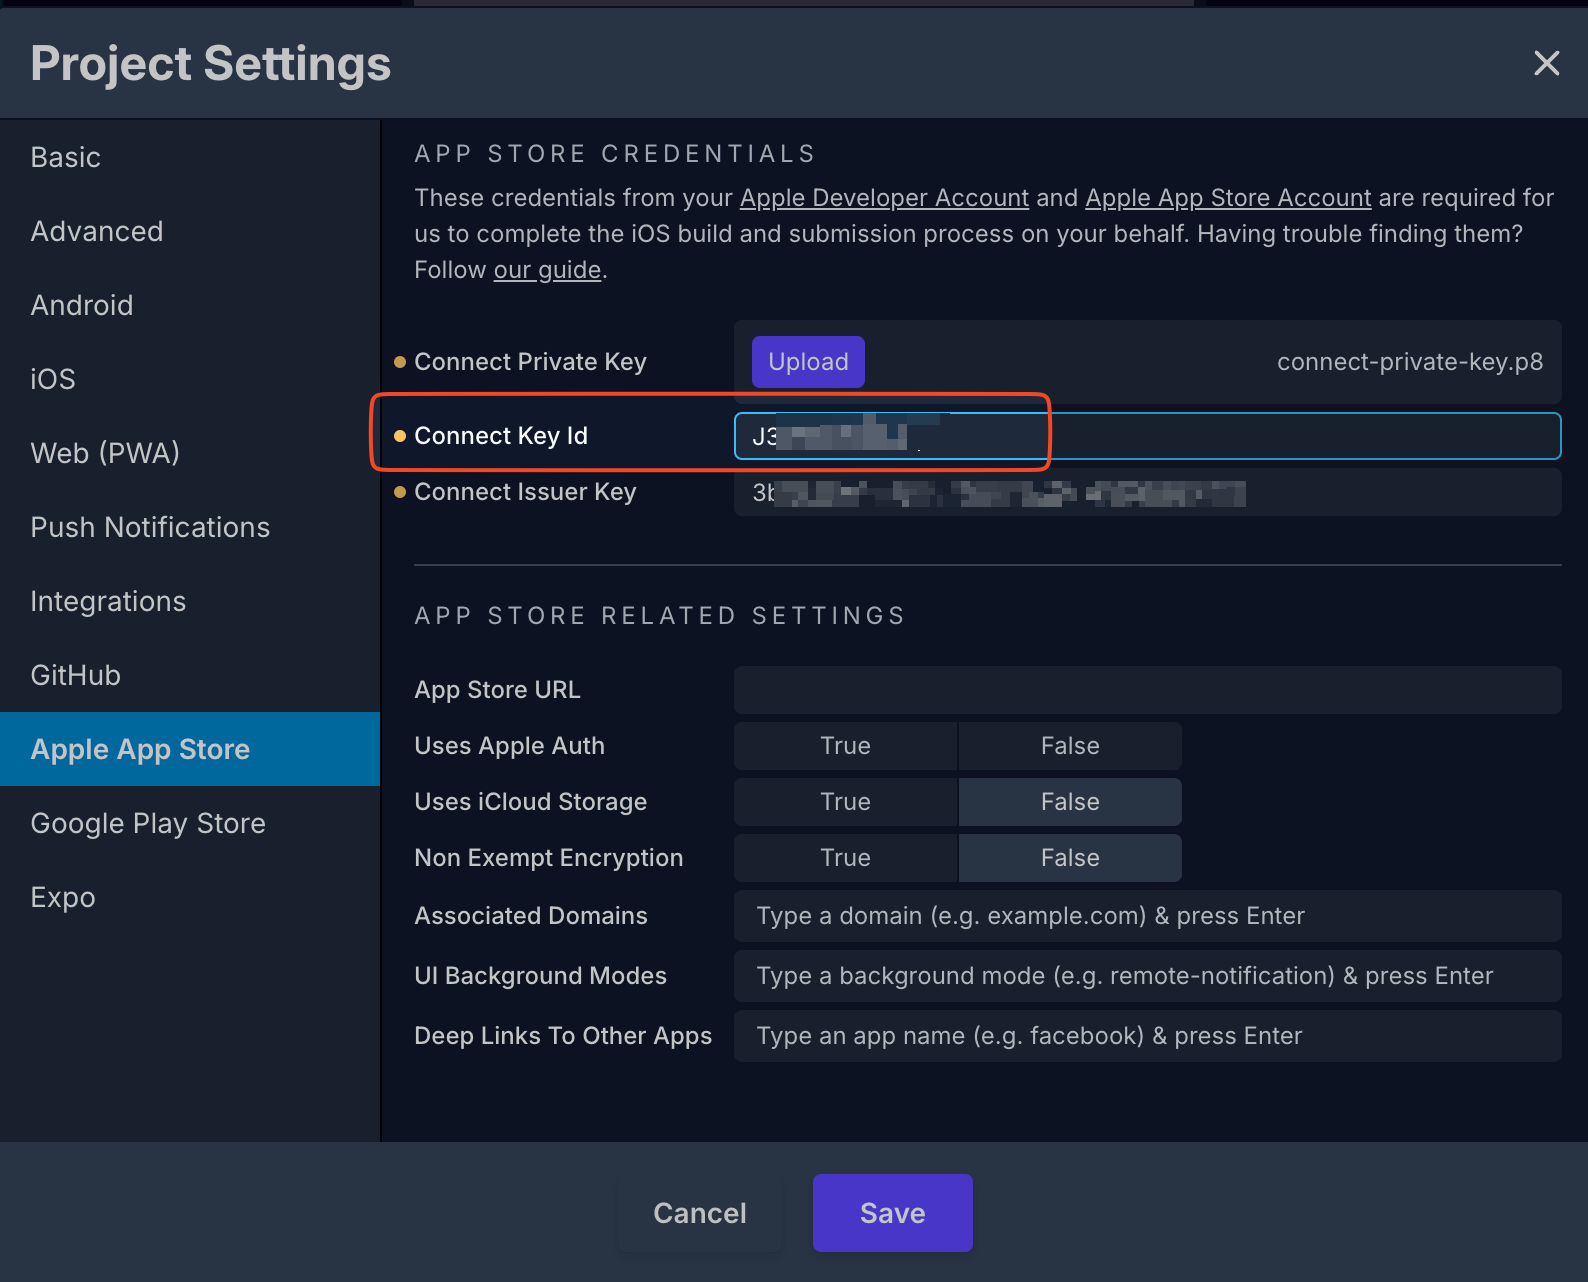
Add Your Issuer ID To Draftbit
Next you’ll need to get your Issuer ID and add that to your Apple App Store settings in
Draftbit.
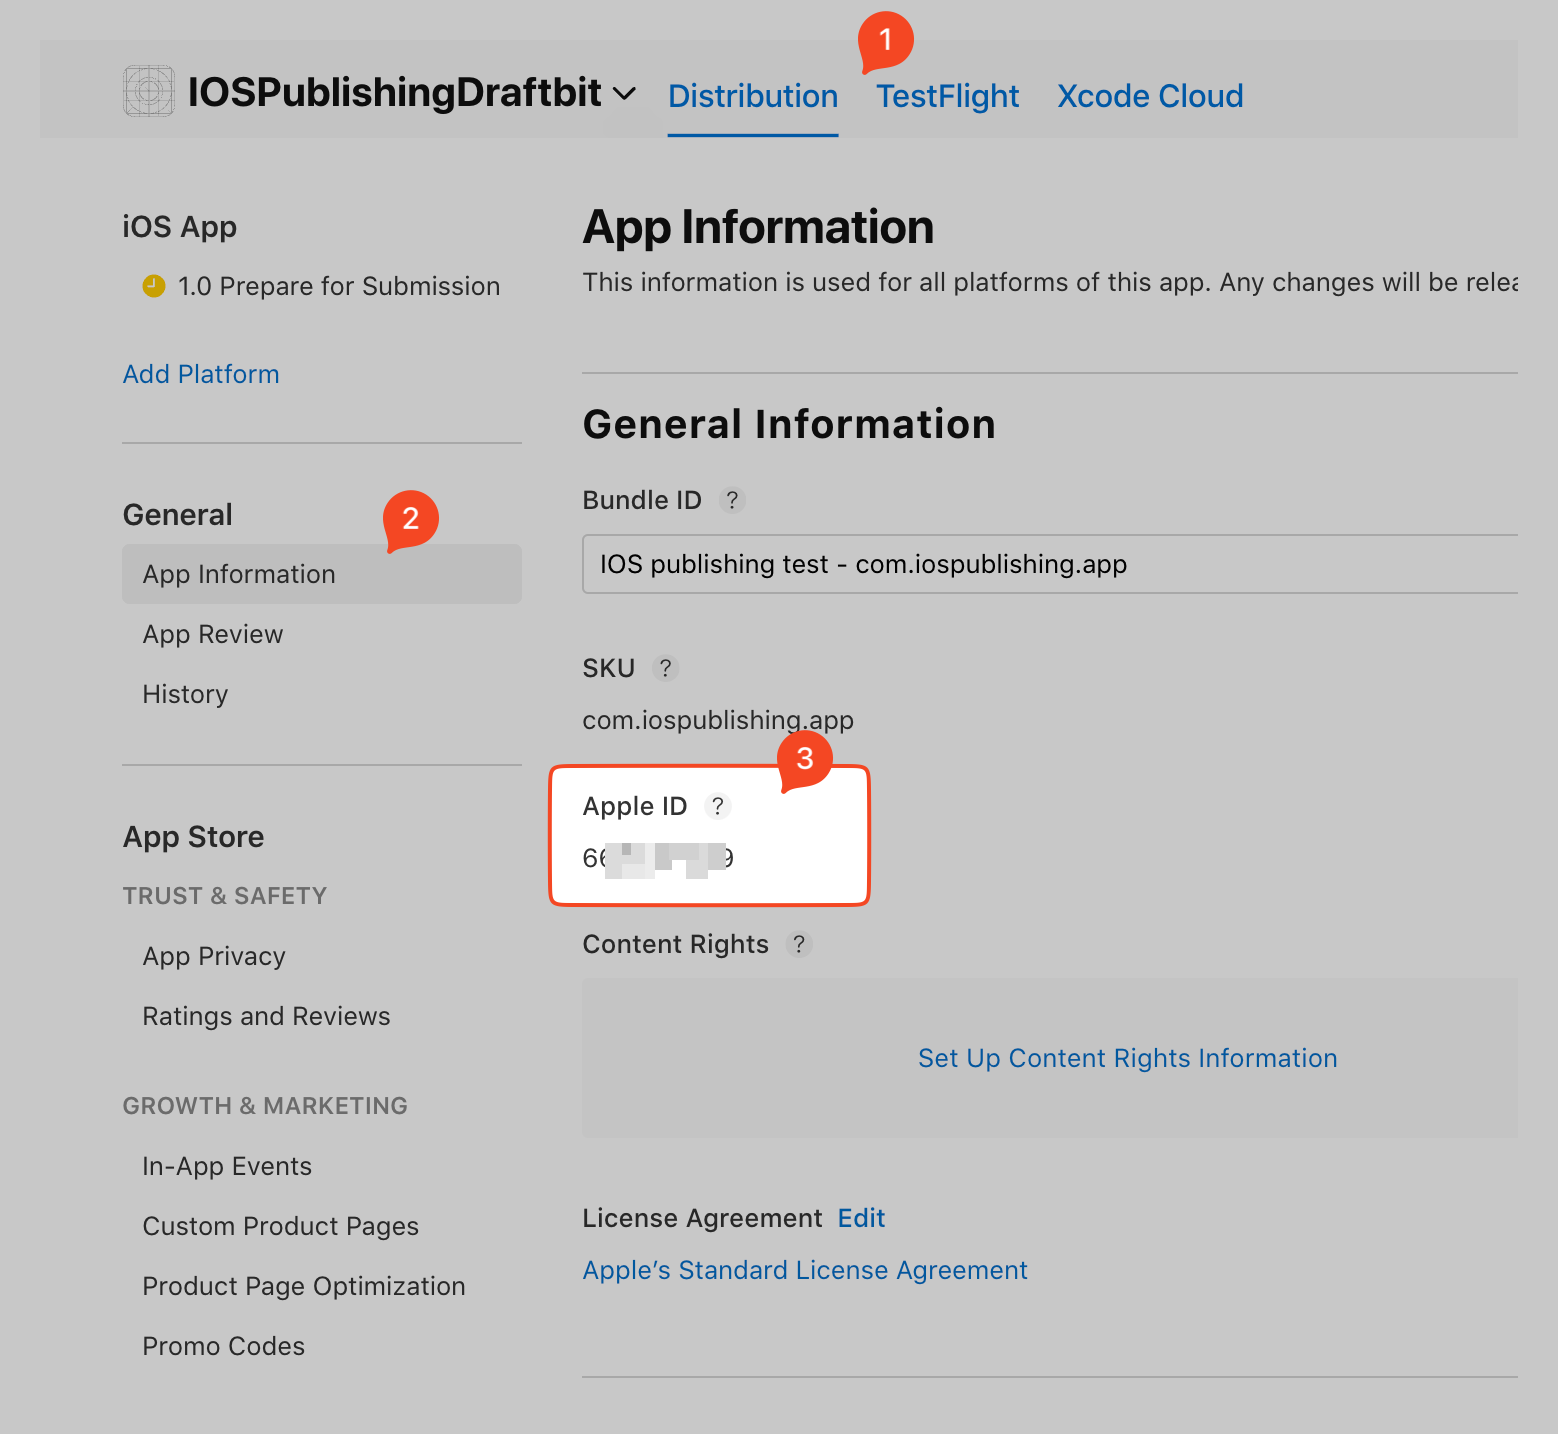
Click App Information under the General heading on
the
left
Scroll down to the General Information section
Copy your Apple ID
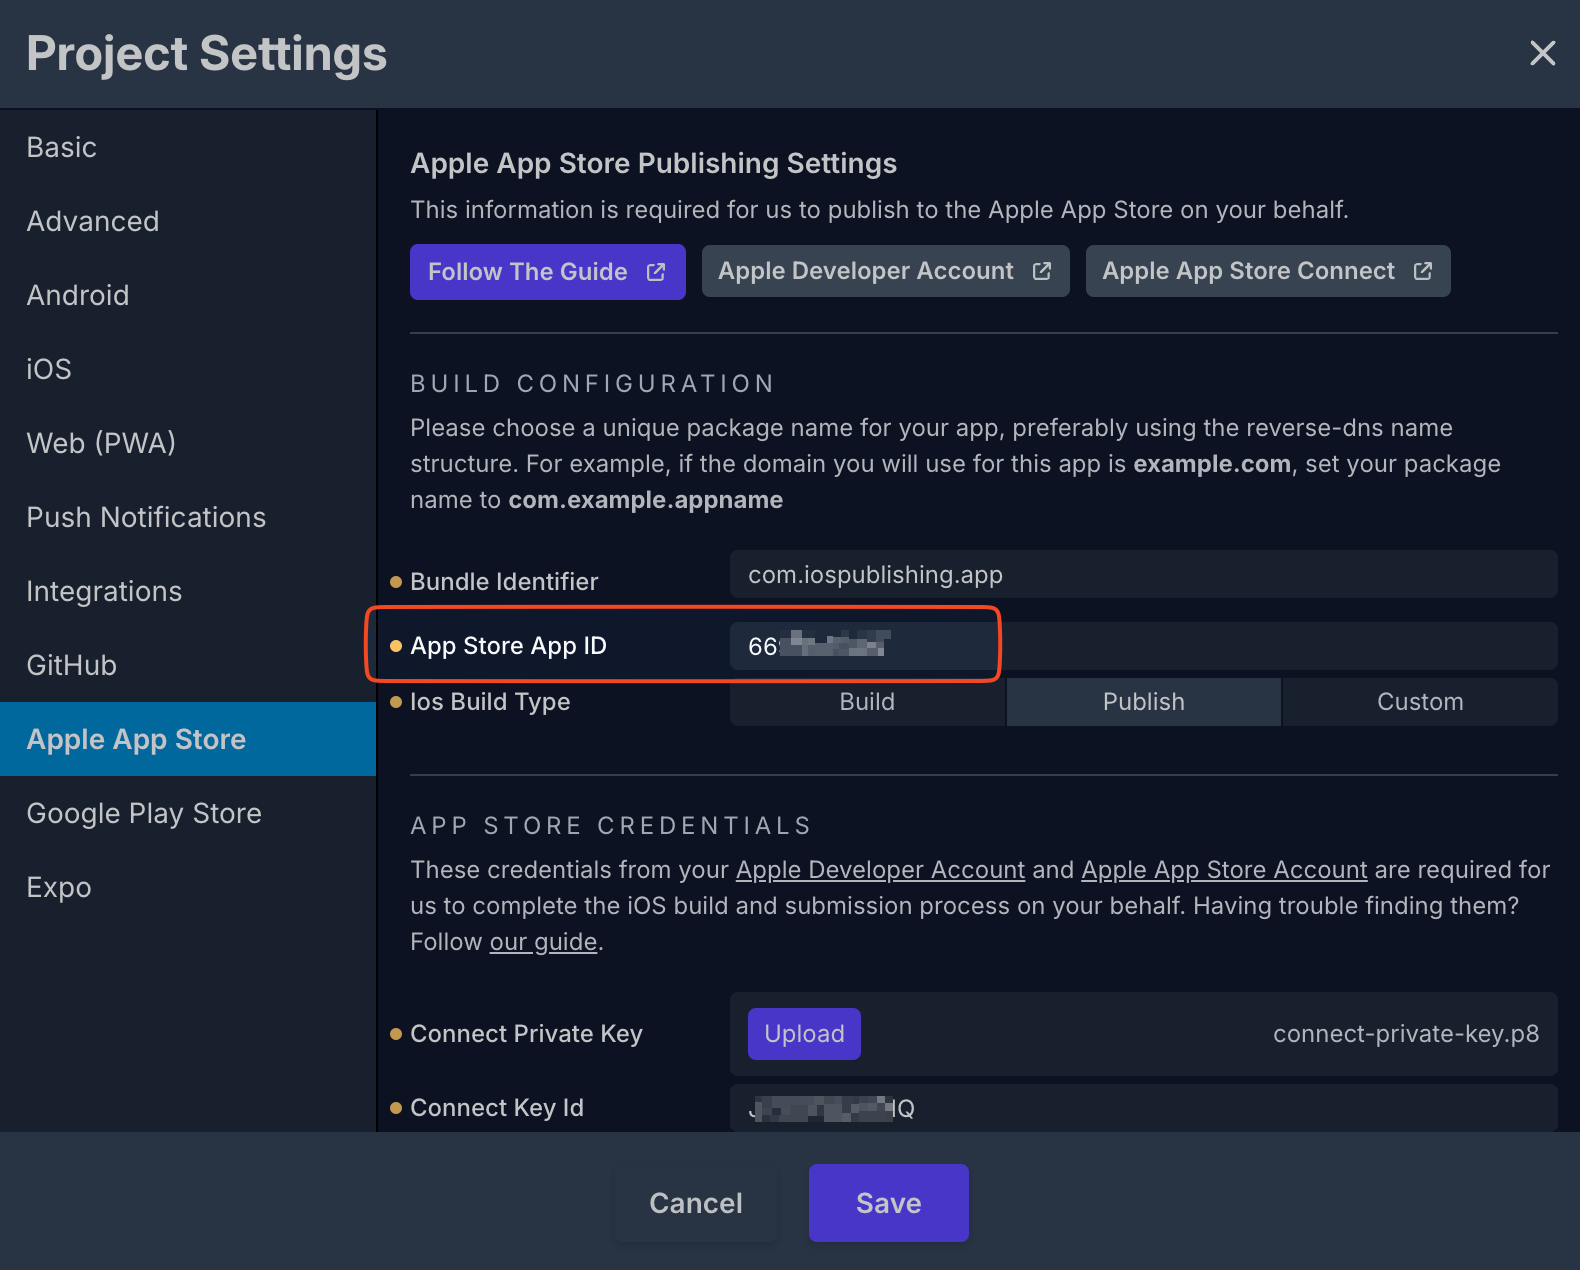
Return to Draftbit and then:
Go to Projects Settings -> Apple App Store.
Find the App Store App ID field.
Paste the Apple ID you copied during the previous step.
Click the Save button
FCM Configuration 2.4
FCM Configuration for Flutter Mobile App
This document provides a comprehensive guide to configuring Firebase Cloud Messaging
(FCM)
for your Flutter mobile app on both Android and iOS platforms.
Android: Use the Firebase Console to send test messages or use the
firebase_messaging package to test messages locally.
iOS: Ensure you have a real device or use the simulator to test
push
notifications,
as push notifications don't work on iOS simulators.
Following these steps will help you successfully configure Firebase Cloud Messaging (FCM)
for
your Flutter mobile app on both Android and iOS platforms.
Firebase CLI Quick Setup 2.5
Firebase CLI Quick Setup instruction
Step 1: Create a Firebase Project
Open Firebase Console:
Create a new project by visiting the following link:
Firebase Console.
Access Your Project:
After creating the Firebase project, open it and click on the Flutter logo. Follow
the provided setup steps.
Important Note:
Before configuring Firebase, ensure you change the package name for Android and the
bundle identifier for iOS in your app.
Installation
Install Firebase CLI (requires Node.js):
npm install -g firebase-tools
Install FlutterFire CLI:
dart pub global activate flutterfire_cli
Usage
Initialize Firebase
Run the Configuration Command:
In the root of your Flutter application, execute:
flutterfire configure
Follow the Prompts:
Choose your Firebase project.
Select the platforms (Android, iOS, web, etc.).
The CLI generates a firebase_options.dart file in your project.
If you add new platforms or Firebase services, rerun:
flutterfire configure
Web and Admin
Website & Admin Panel 3.1
Running Laravel Admin Panel for Ready eCommerce
This documentation provides a step-by-step guide to running a Laravel-based admin panel
for a
Ready eCommerce. Follow these instructions to set up your development environment and
run
the
admin panel locally.
1. Prerequisites
PHP installed (version 8.1 or higher).
Composer package manager installed.
Laravel installed globally (optional but recommended).
A MySQL or PostgreSQL database server running.
Node.js and npm installed (for managing frontend dependencies and assets).
How to Install Ready eCommerce on cPanel Hosting
A step-by-step guide on setting up your Ready eCommerce project in cPanel hosting.
Follow This Instructions
Zip your project folder.
Login to your cPanel.
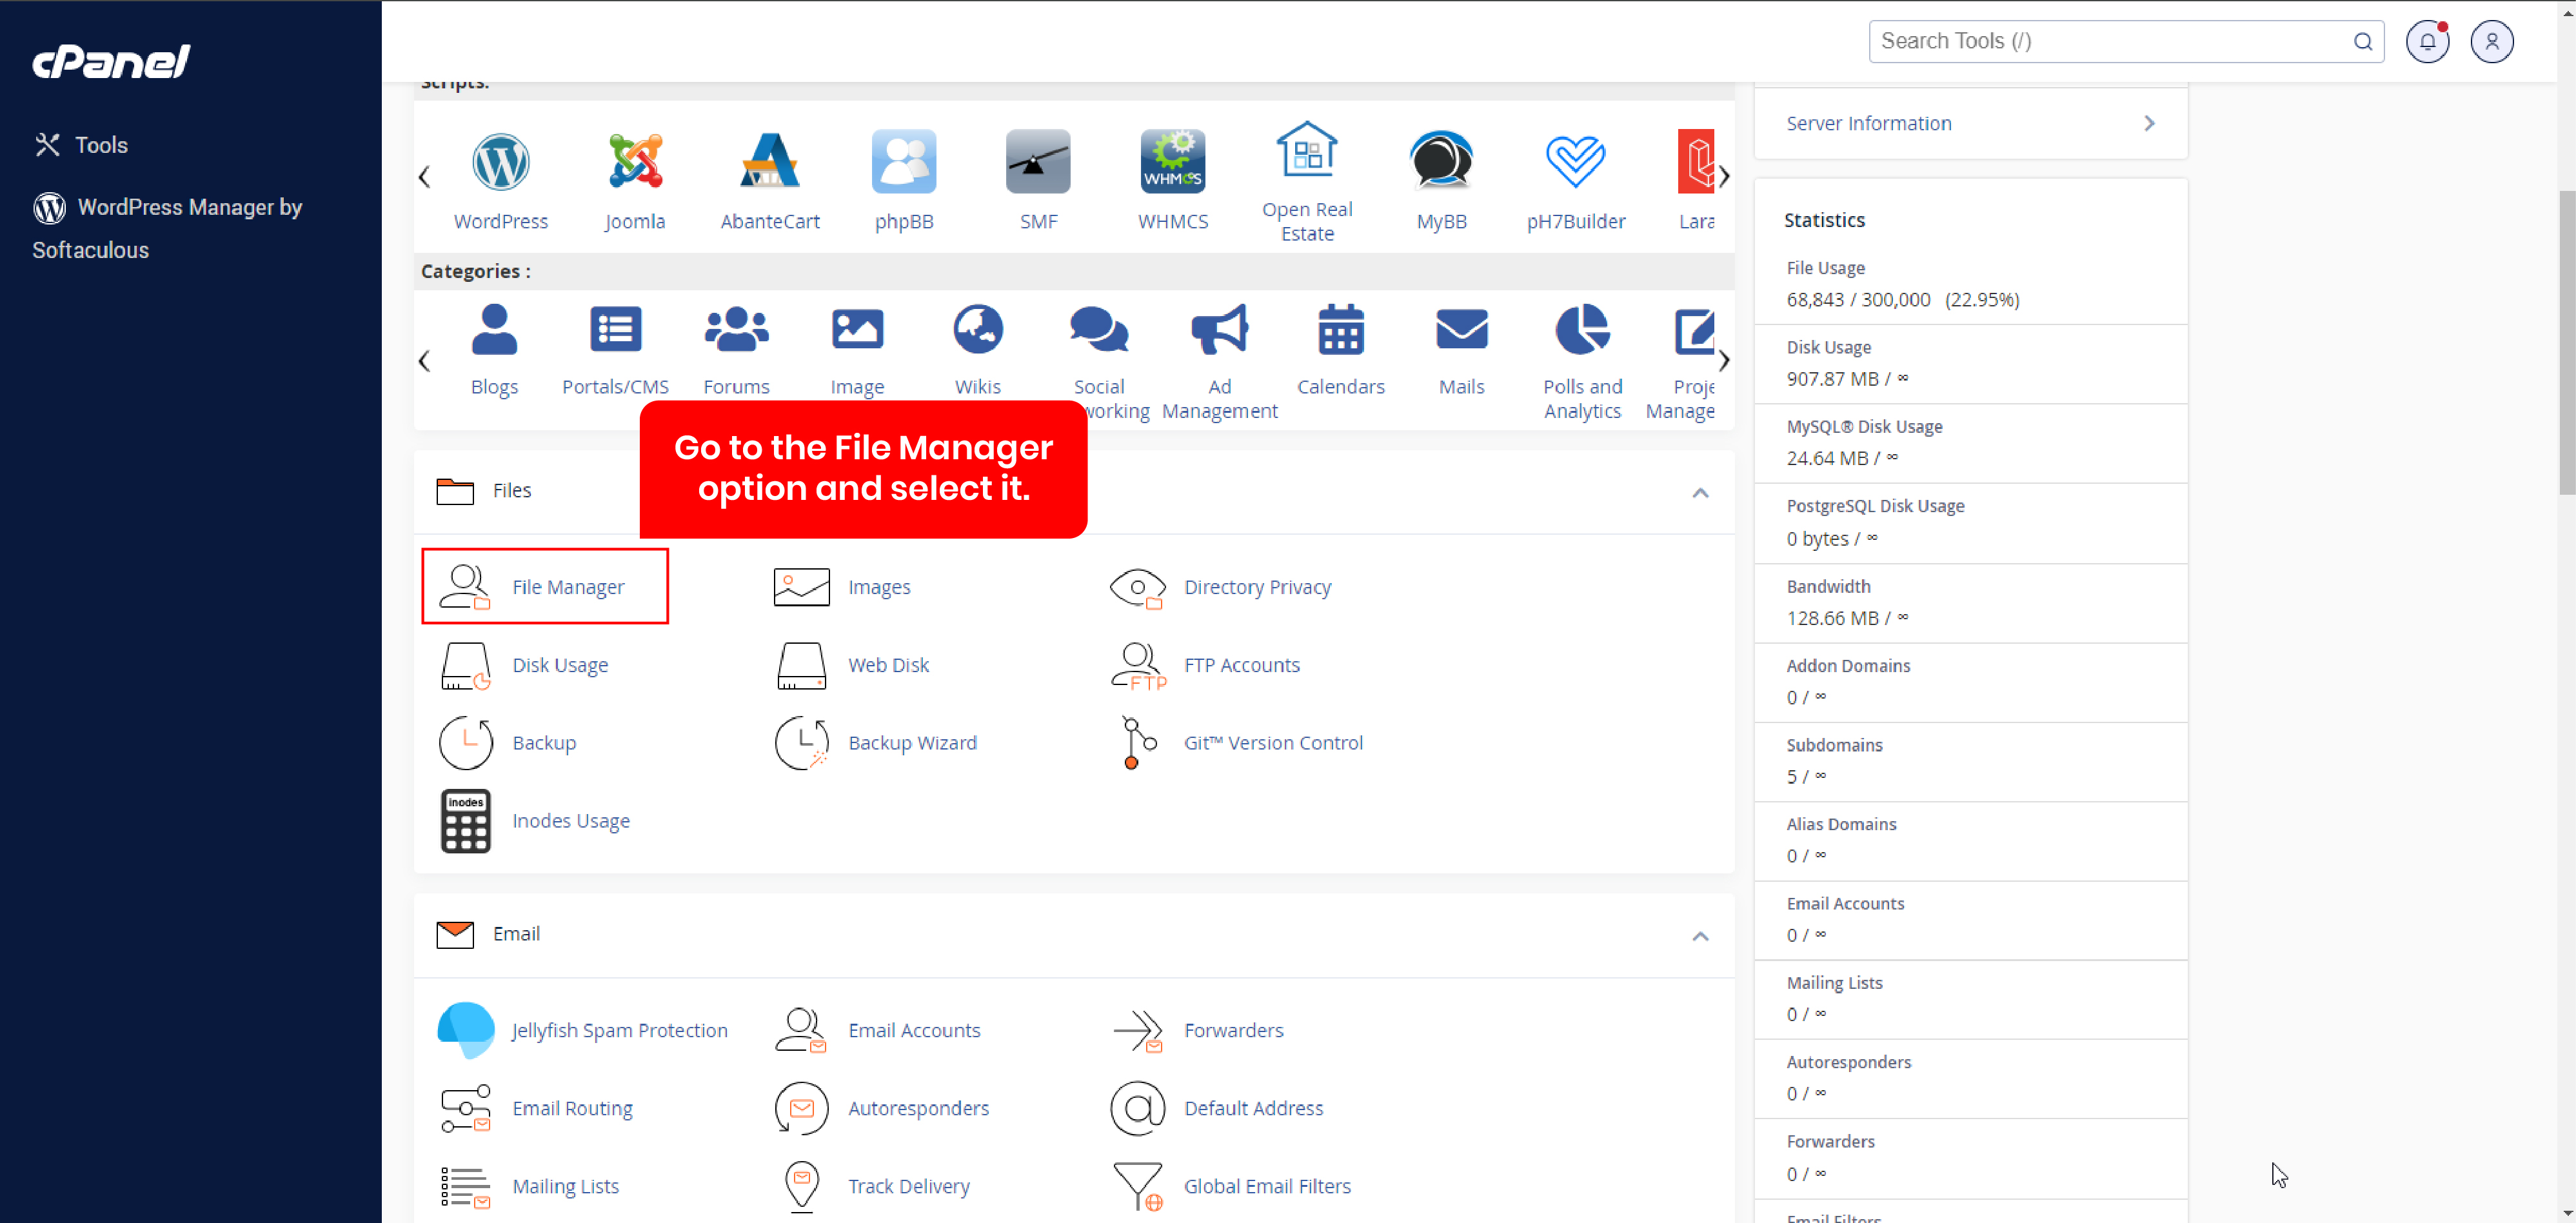
Go to the File Manager option and select it.
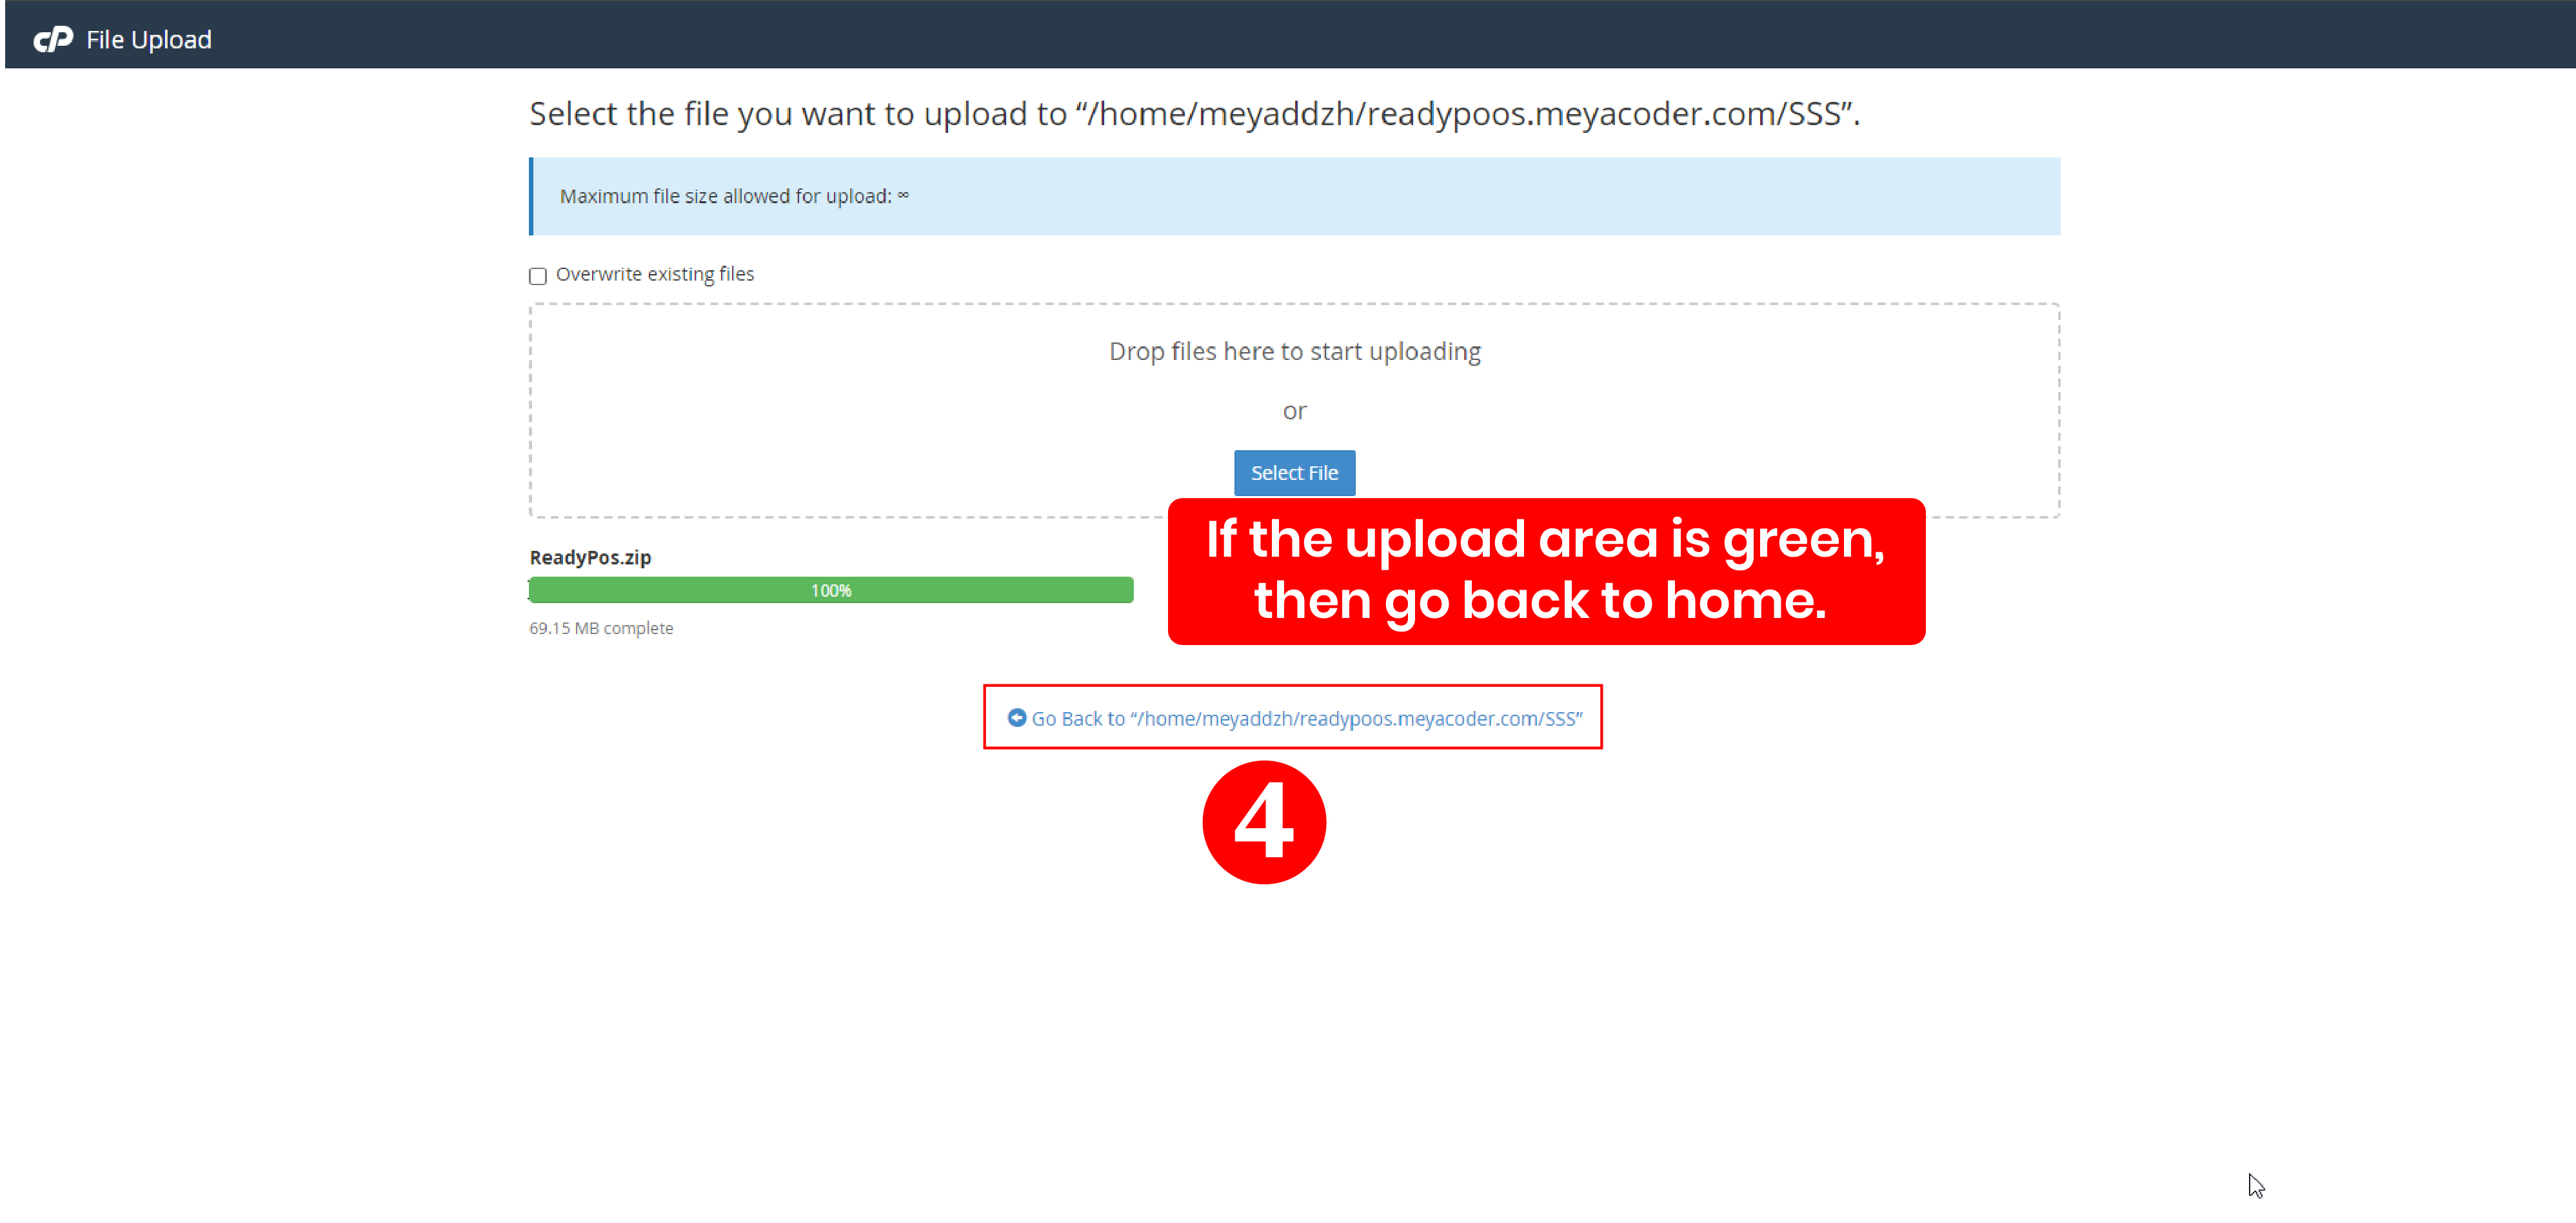
Ensure you're in the root folder, then click "Upload".
Select your zip folder and wait for the upload to complete. If the upload area is
green,
then go back
to home.
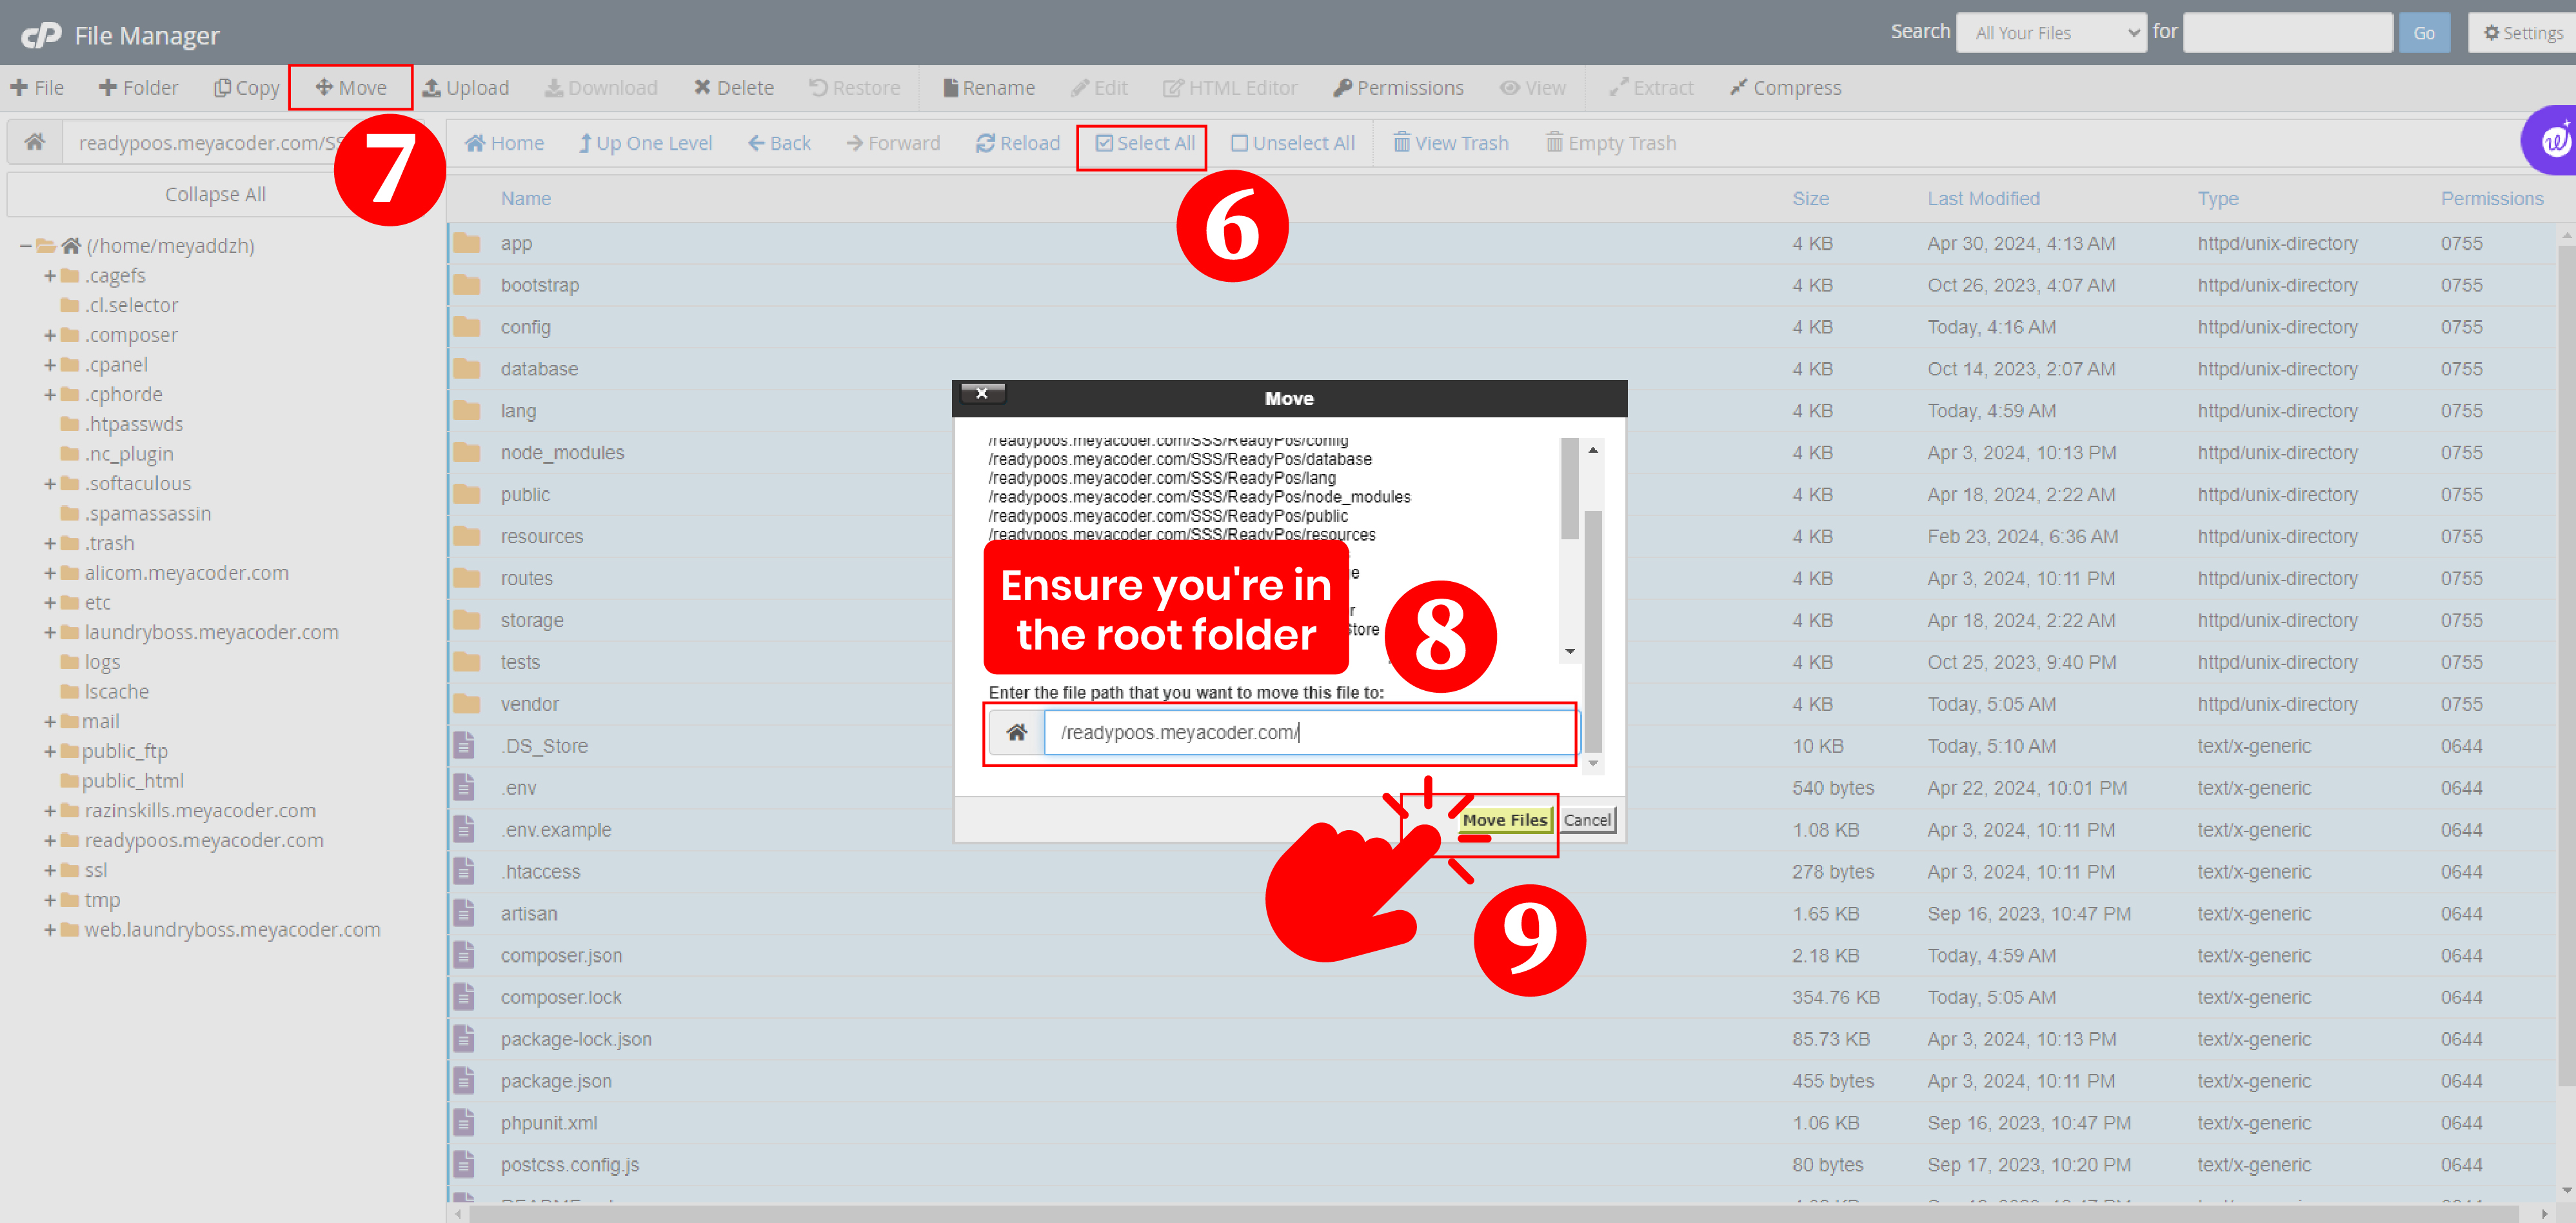
Unzip the uploaded folder.
Selectall files and directory move to the root folder.
Go back to Cpanel and navigate to Database.
Created a database and add (create if non exist) a DB user.
Example
You can then run your domain in any browser after that
Press the Start Installation Process button that appears on the screen
Then go to the root folder to check permission and give permission to the mentioned
folders
After that, if the permissions of the files are all right, then press the Next
button
After that, if the server request extensions are enabled, then click on the next
button.
If any
extension is shown as disabled, then go to select PHP version from the C panel and
enable all the
extensions that are shown as disabled, then refresh the browser and then click on
the
next button.
Then fill up the written forms and press the next button
Example
Connect to the database you created and press the next button
Example
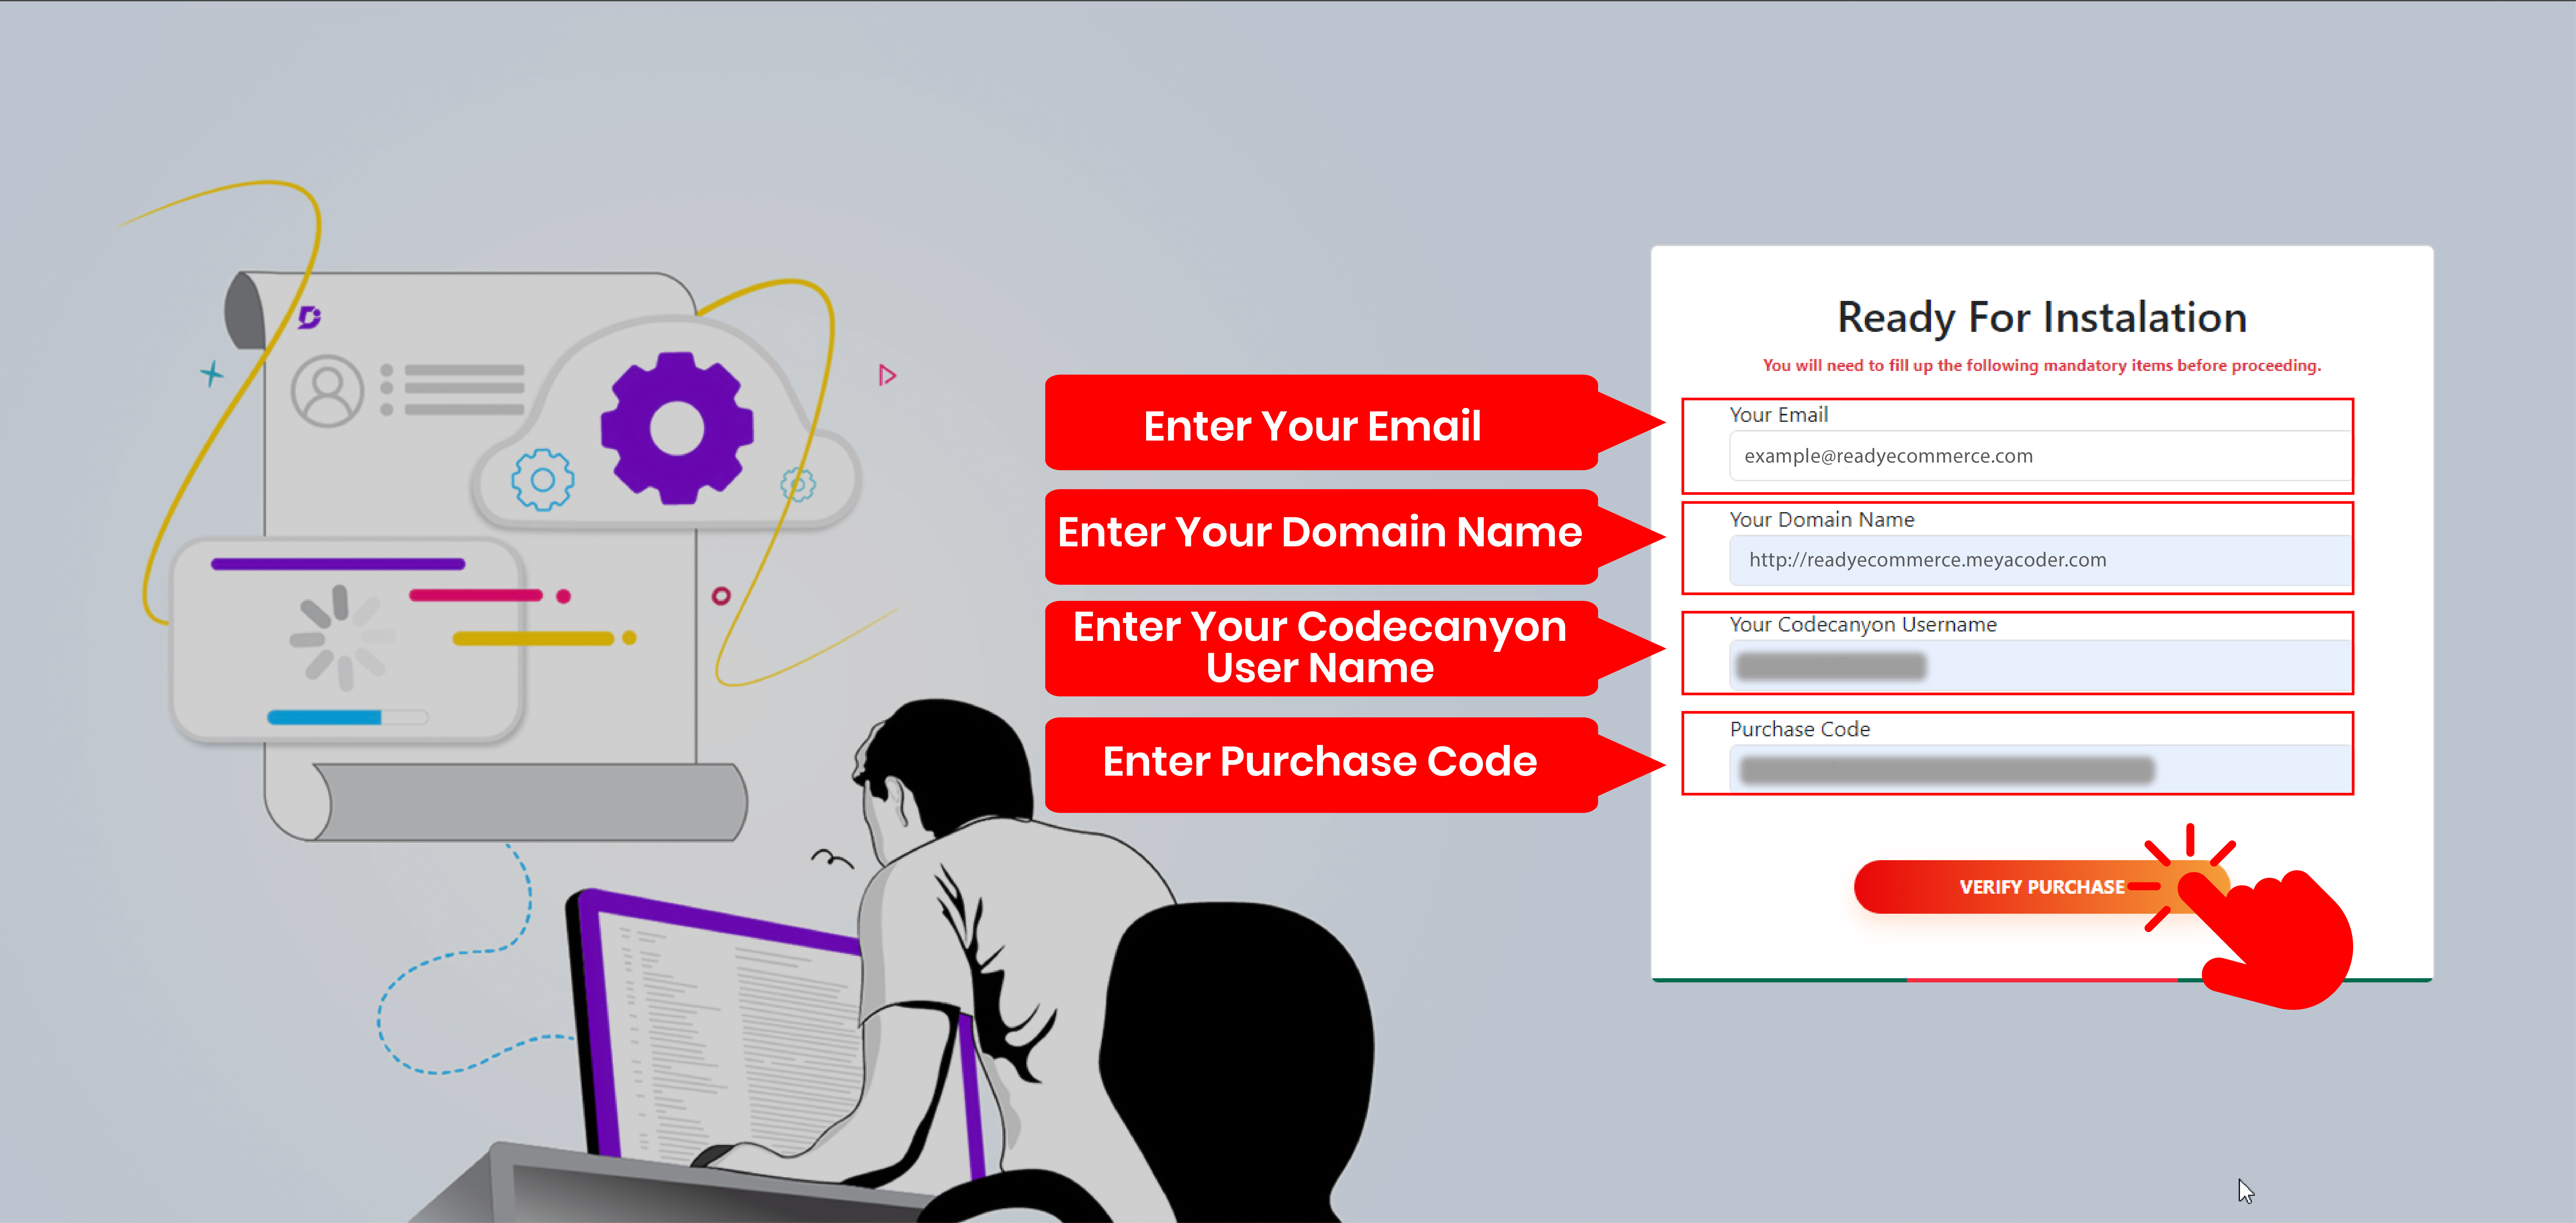
Then fill out the form using your Email Account, Domain, Codecanyon
Username, and your
Purchase Code, and click the Verify Purchases button.
Example
Click on the Final Submission button and complete the installation
process
by clicking on
the Click to Redirect button.
Full Installation Journey Example
2. Clone the Repository
Start by cloning the repository from your version control system:
Check Logs: Review the error messages in your terminal or log files
(storage/logs/) for more information on what might be going wrong.
11. Conclusion
By following these steps, you should be able to run the Laravel-based admin panel for
your
Ready eCommerce locally. If you encounter issues, refer to the troubleshooting section
or
consult
the Laravel documentation for additional guidance.
Install on localhost 3.2
To install on localhost,and follow the installation prompts for seamless
setup.
How to Install Ready eCommerce on localhost
A step-by-step guide on setting up your Ready eCommerce project in Localhost.
Follow This Instructions.
If you use windows operating system
Download and install XAMPP in C drive.
Start Your Xampp Server.
Download and Install Composer in C drive.
Unzip the downloaded archive package.
Move the unzipped file to your htdocs folder.
Creating Database
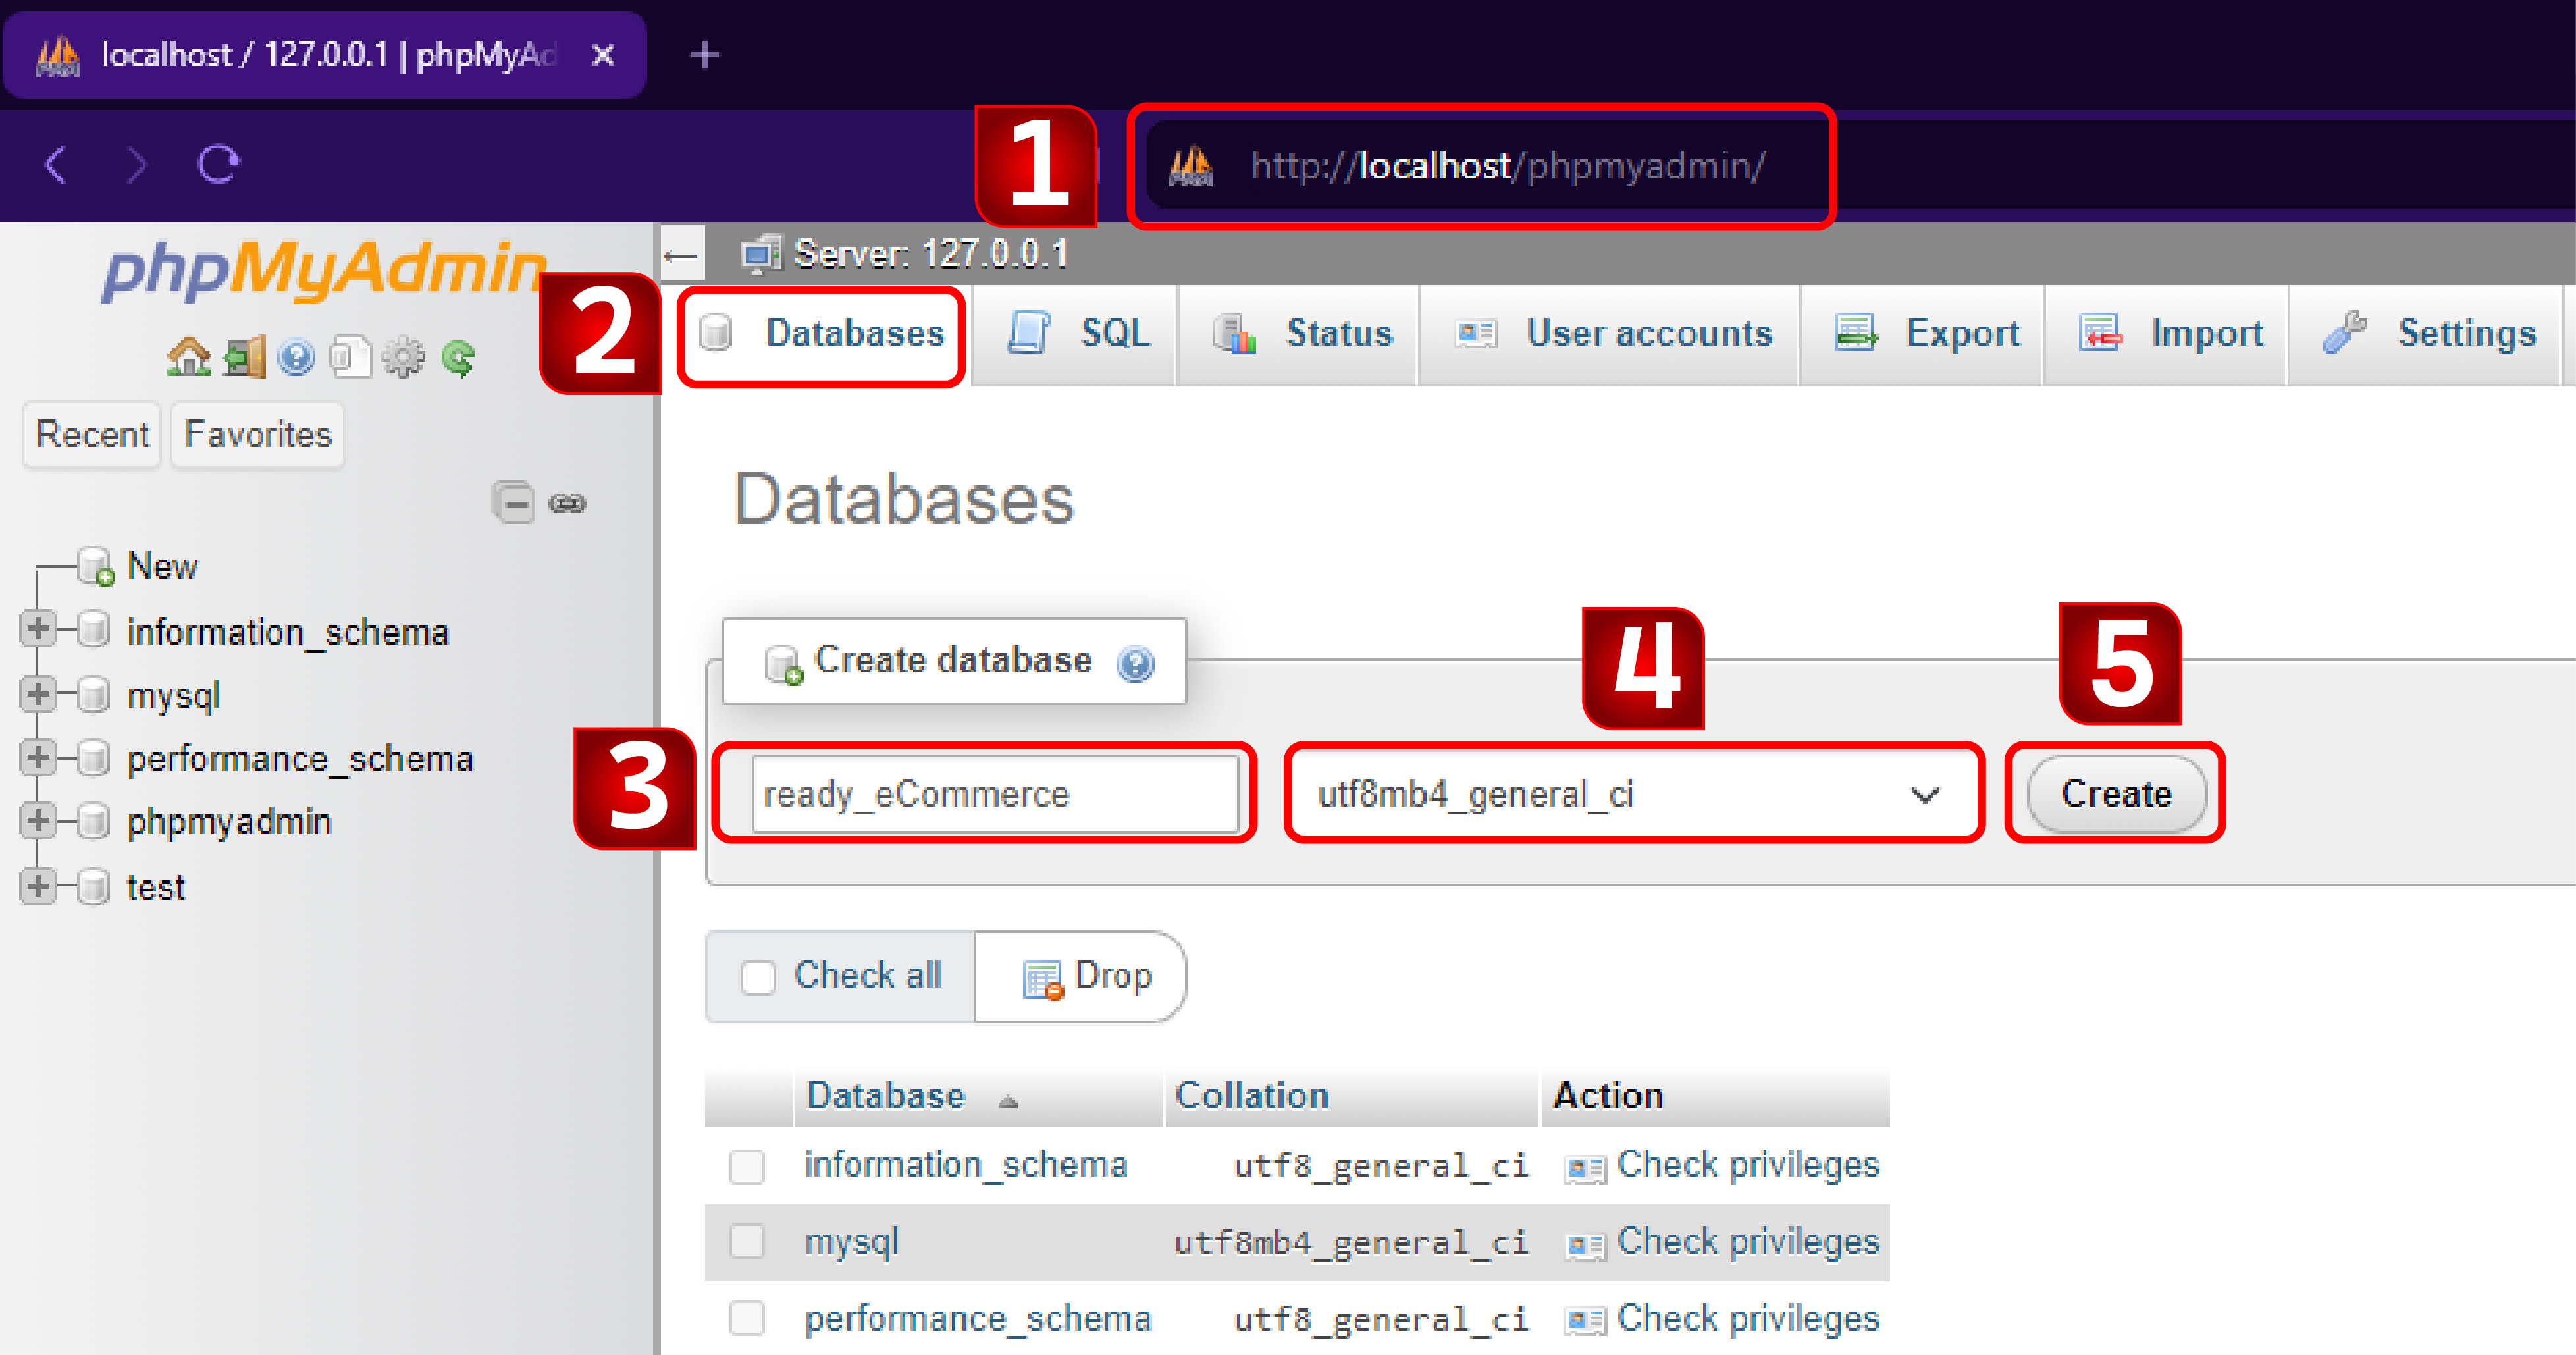
Point your browser to phpMyAdmin address by typing
http://localhost/phpmyadmin .
In phpMyAdmin, click on Databases tab.
Enter the name of new database that you want created.
you may also need to select the collation for the database. Please select
the
collation match your
language. If you do not know what to select, you can select utf8_general_ci
or
leave default
(Collation).
Click Create button.
Example
Configuration
Please copy the .env.example
and rename it to .env and
fill up the .env
APP_NAME = (Youe App Name)
APP_ENV = (Local Production)
APP_URL = (https:// Your Domain Link..)
DB_DATABASE = (Your Database Name)
DB_USERNAME = (Your Database Username)
DB_PASSWORD = (Your Database Password)
MAIL_MAILER = (SMTP Email Relay Services)
MAIL_HOST = Your Mail Host(For Example: smtp.gmail.com)
You need to fill the database connection details, administration details, and store
details to .env
example file.
Run Installation Command
Open terminal/windows powershell and go to project folder directory
If a terminal exists On your cpanel
Open your terminal and go to root directory for example
(cd public_html/)
composer install
php artisan migrate:fresh --seed
php artisan storage:link
php artisan serve
Run Project
Open you browser
browse http://127.0.0.1:8000 Or http://localhost:8000
This instruction shows how to run it locally on your PC, but it works generally
the
same on any hosting
portals. In most case in payed portals you have any web panels to configure your
public folder that
reference to /public folder in laravel folder's structure.
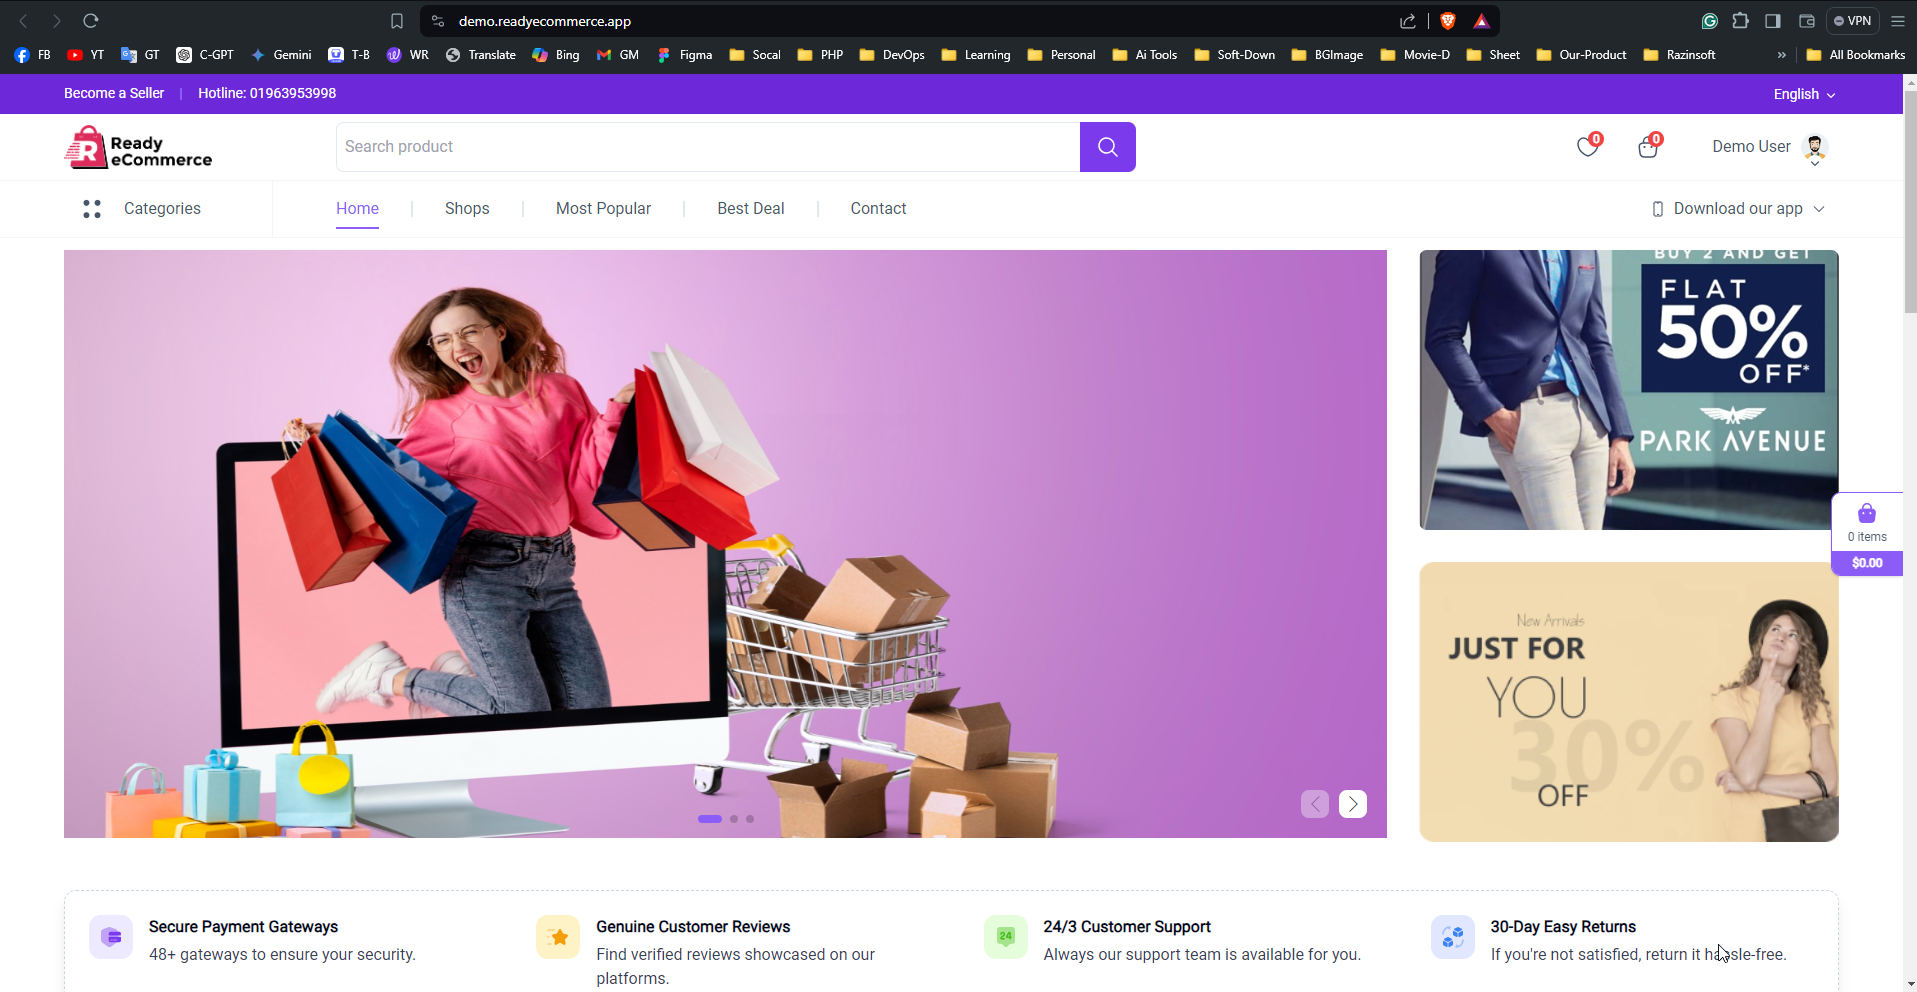
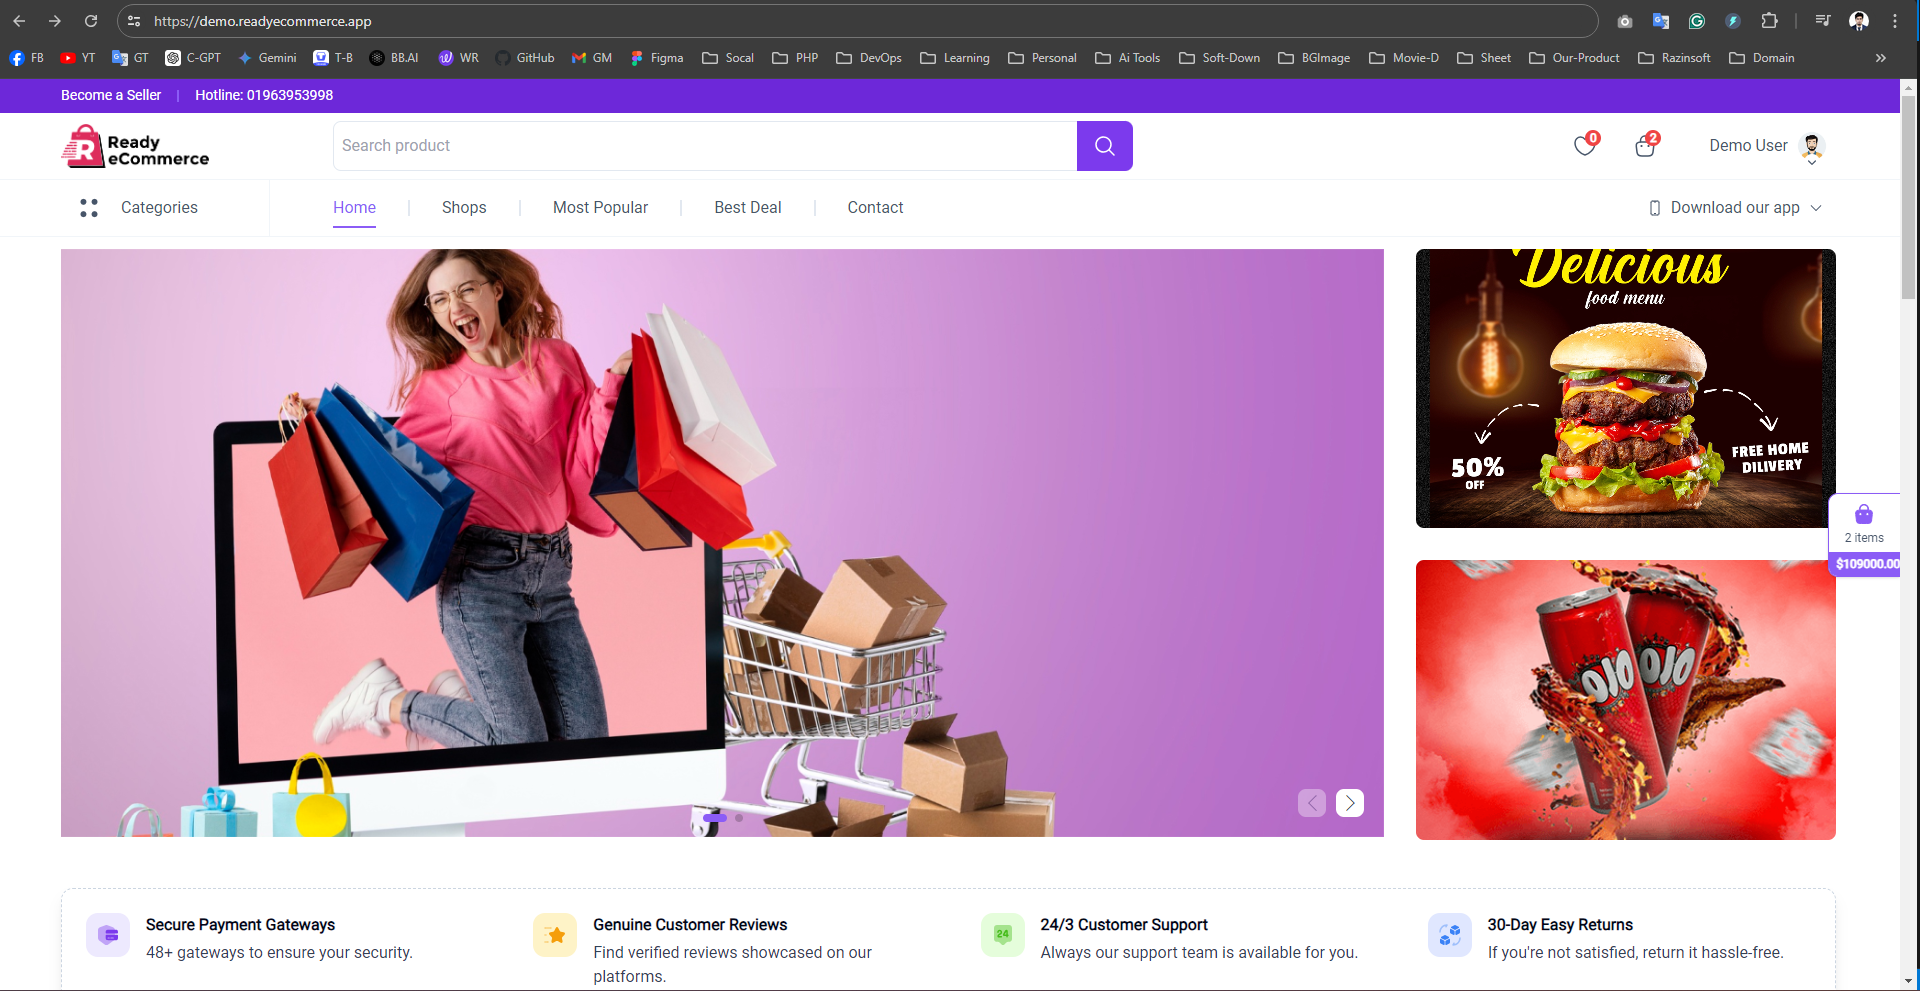
COMPLETE
You'll see a success message after successfully following the above steps. You
now
have the option to
browse your application through respected domain or IP.
System Update 3.3
The latest system update includes enhanced security features, improved
performance, bug fixes, and compatibility updates for newer hardware and software.
Follow This Instructions
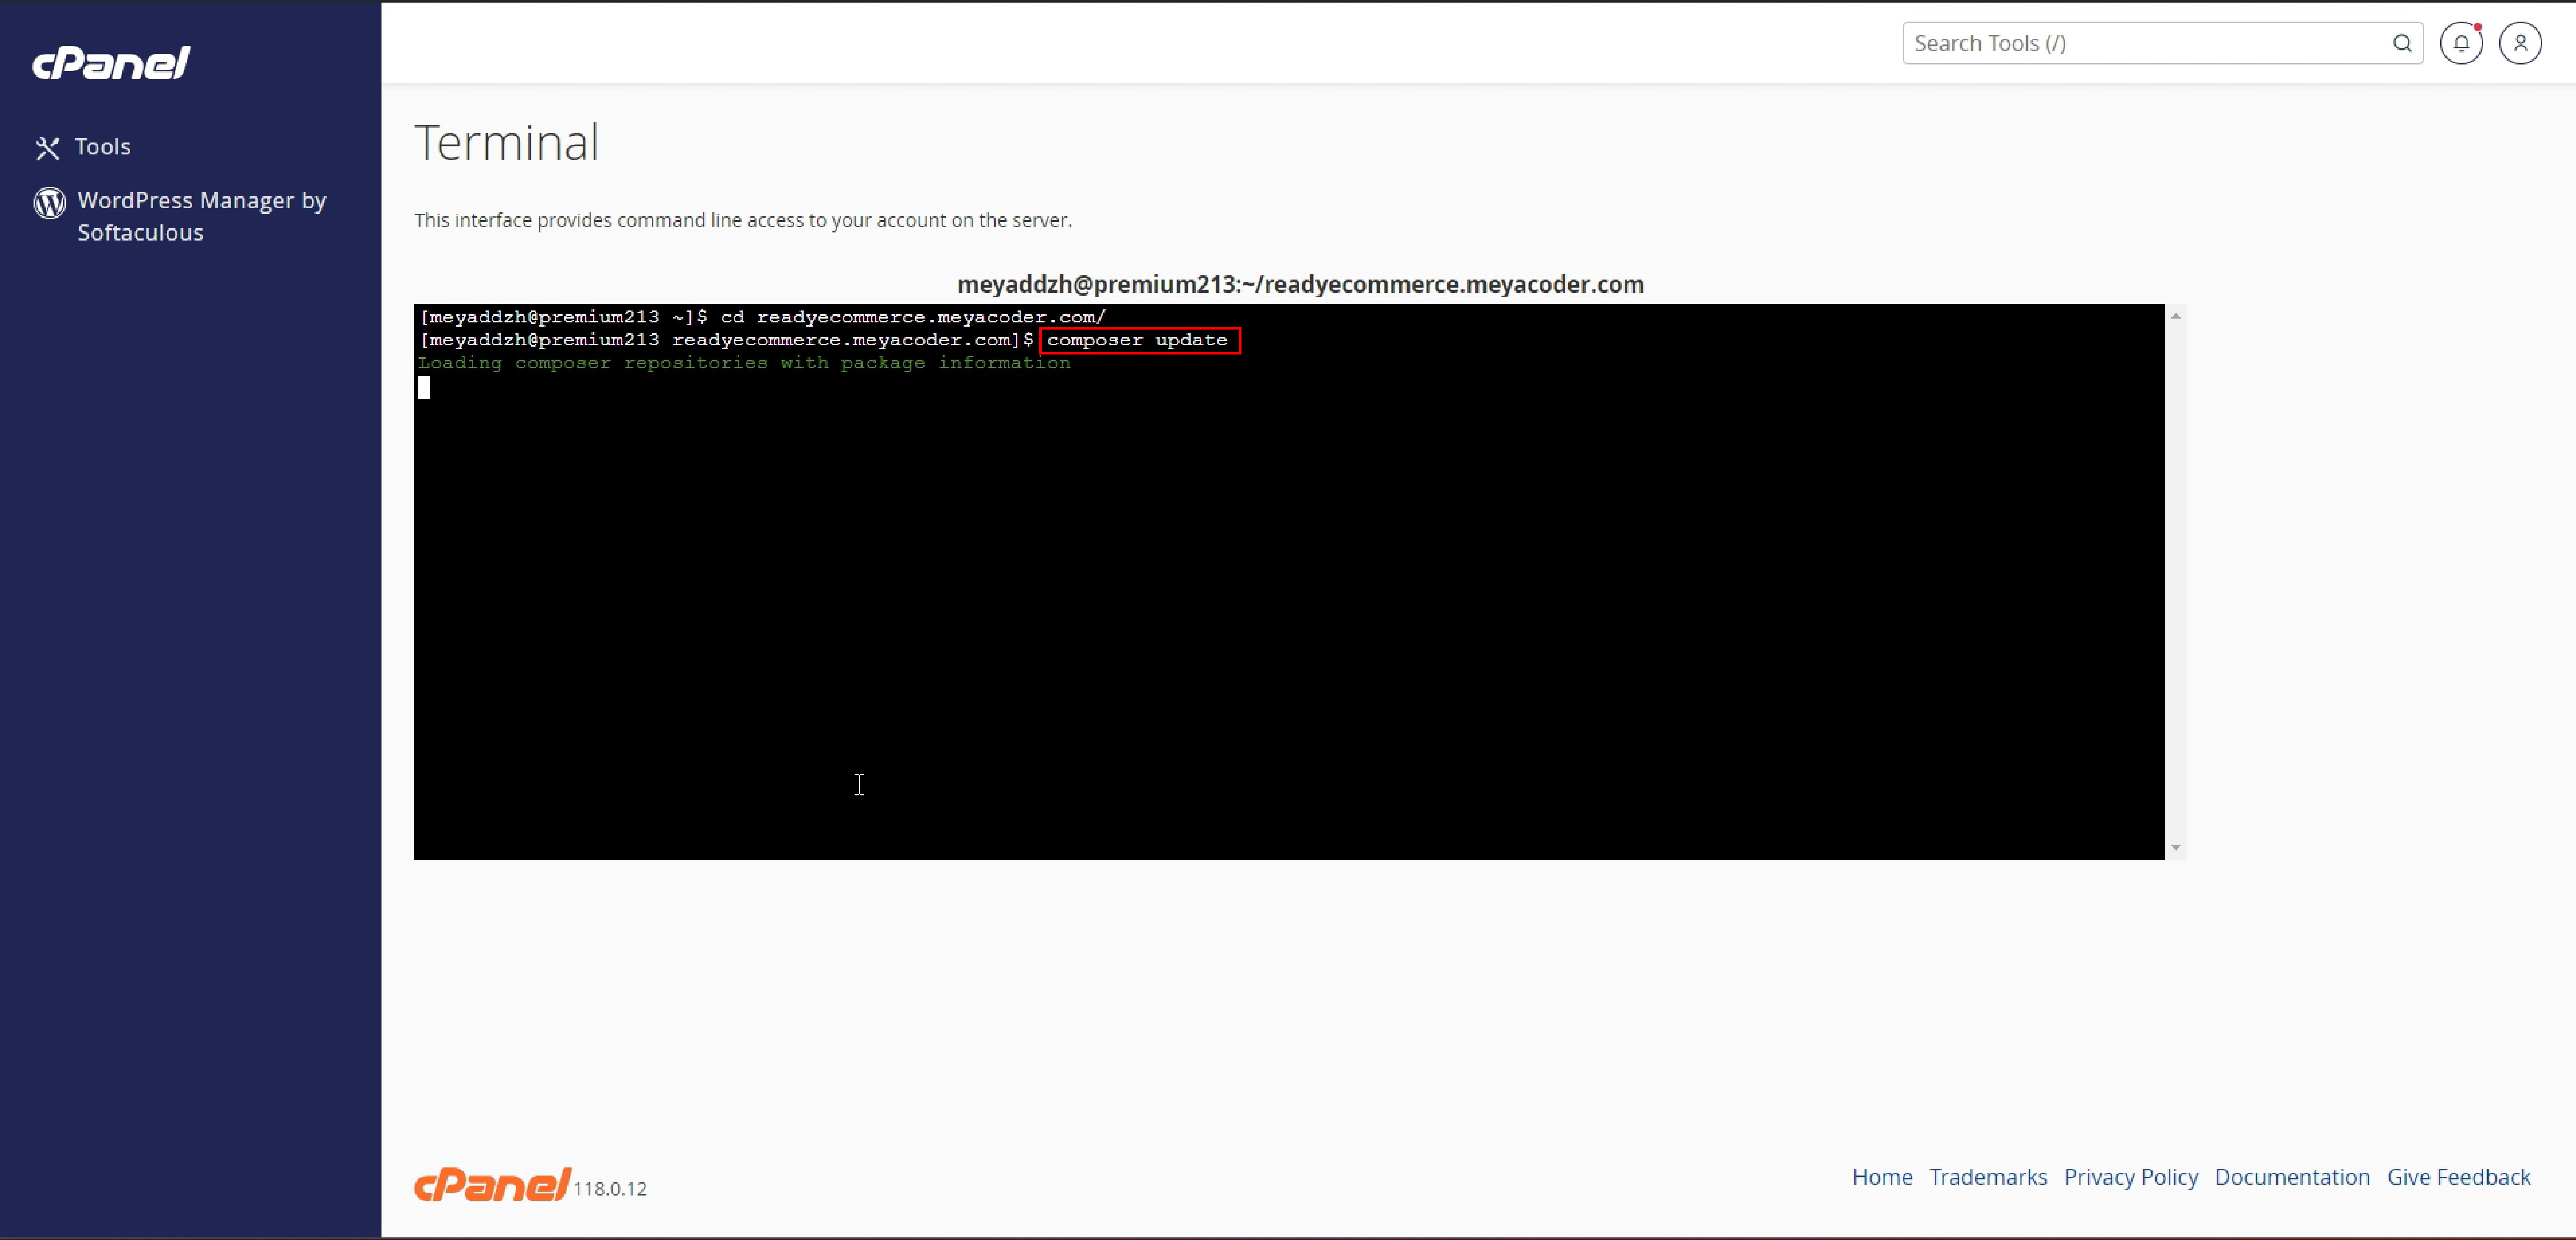
Zip your project folder.
Login to your cPanel.
Go to the cPanel Terminal.
Choose your root directory, and type the command composer update
Example
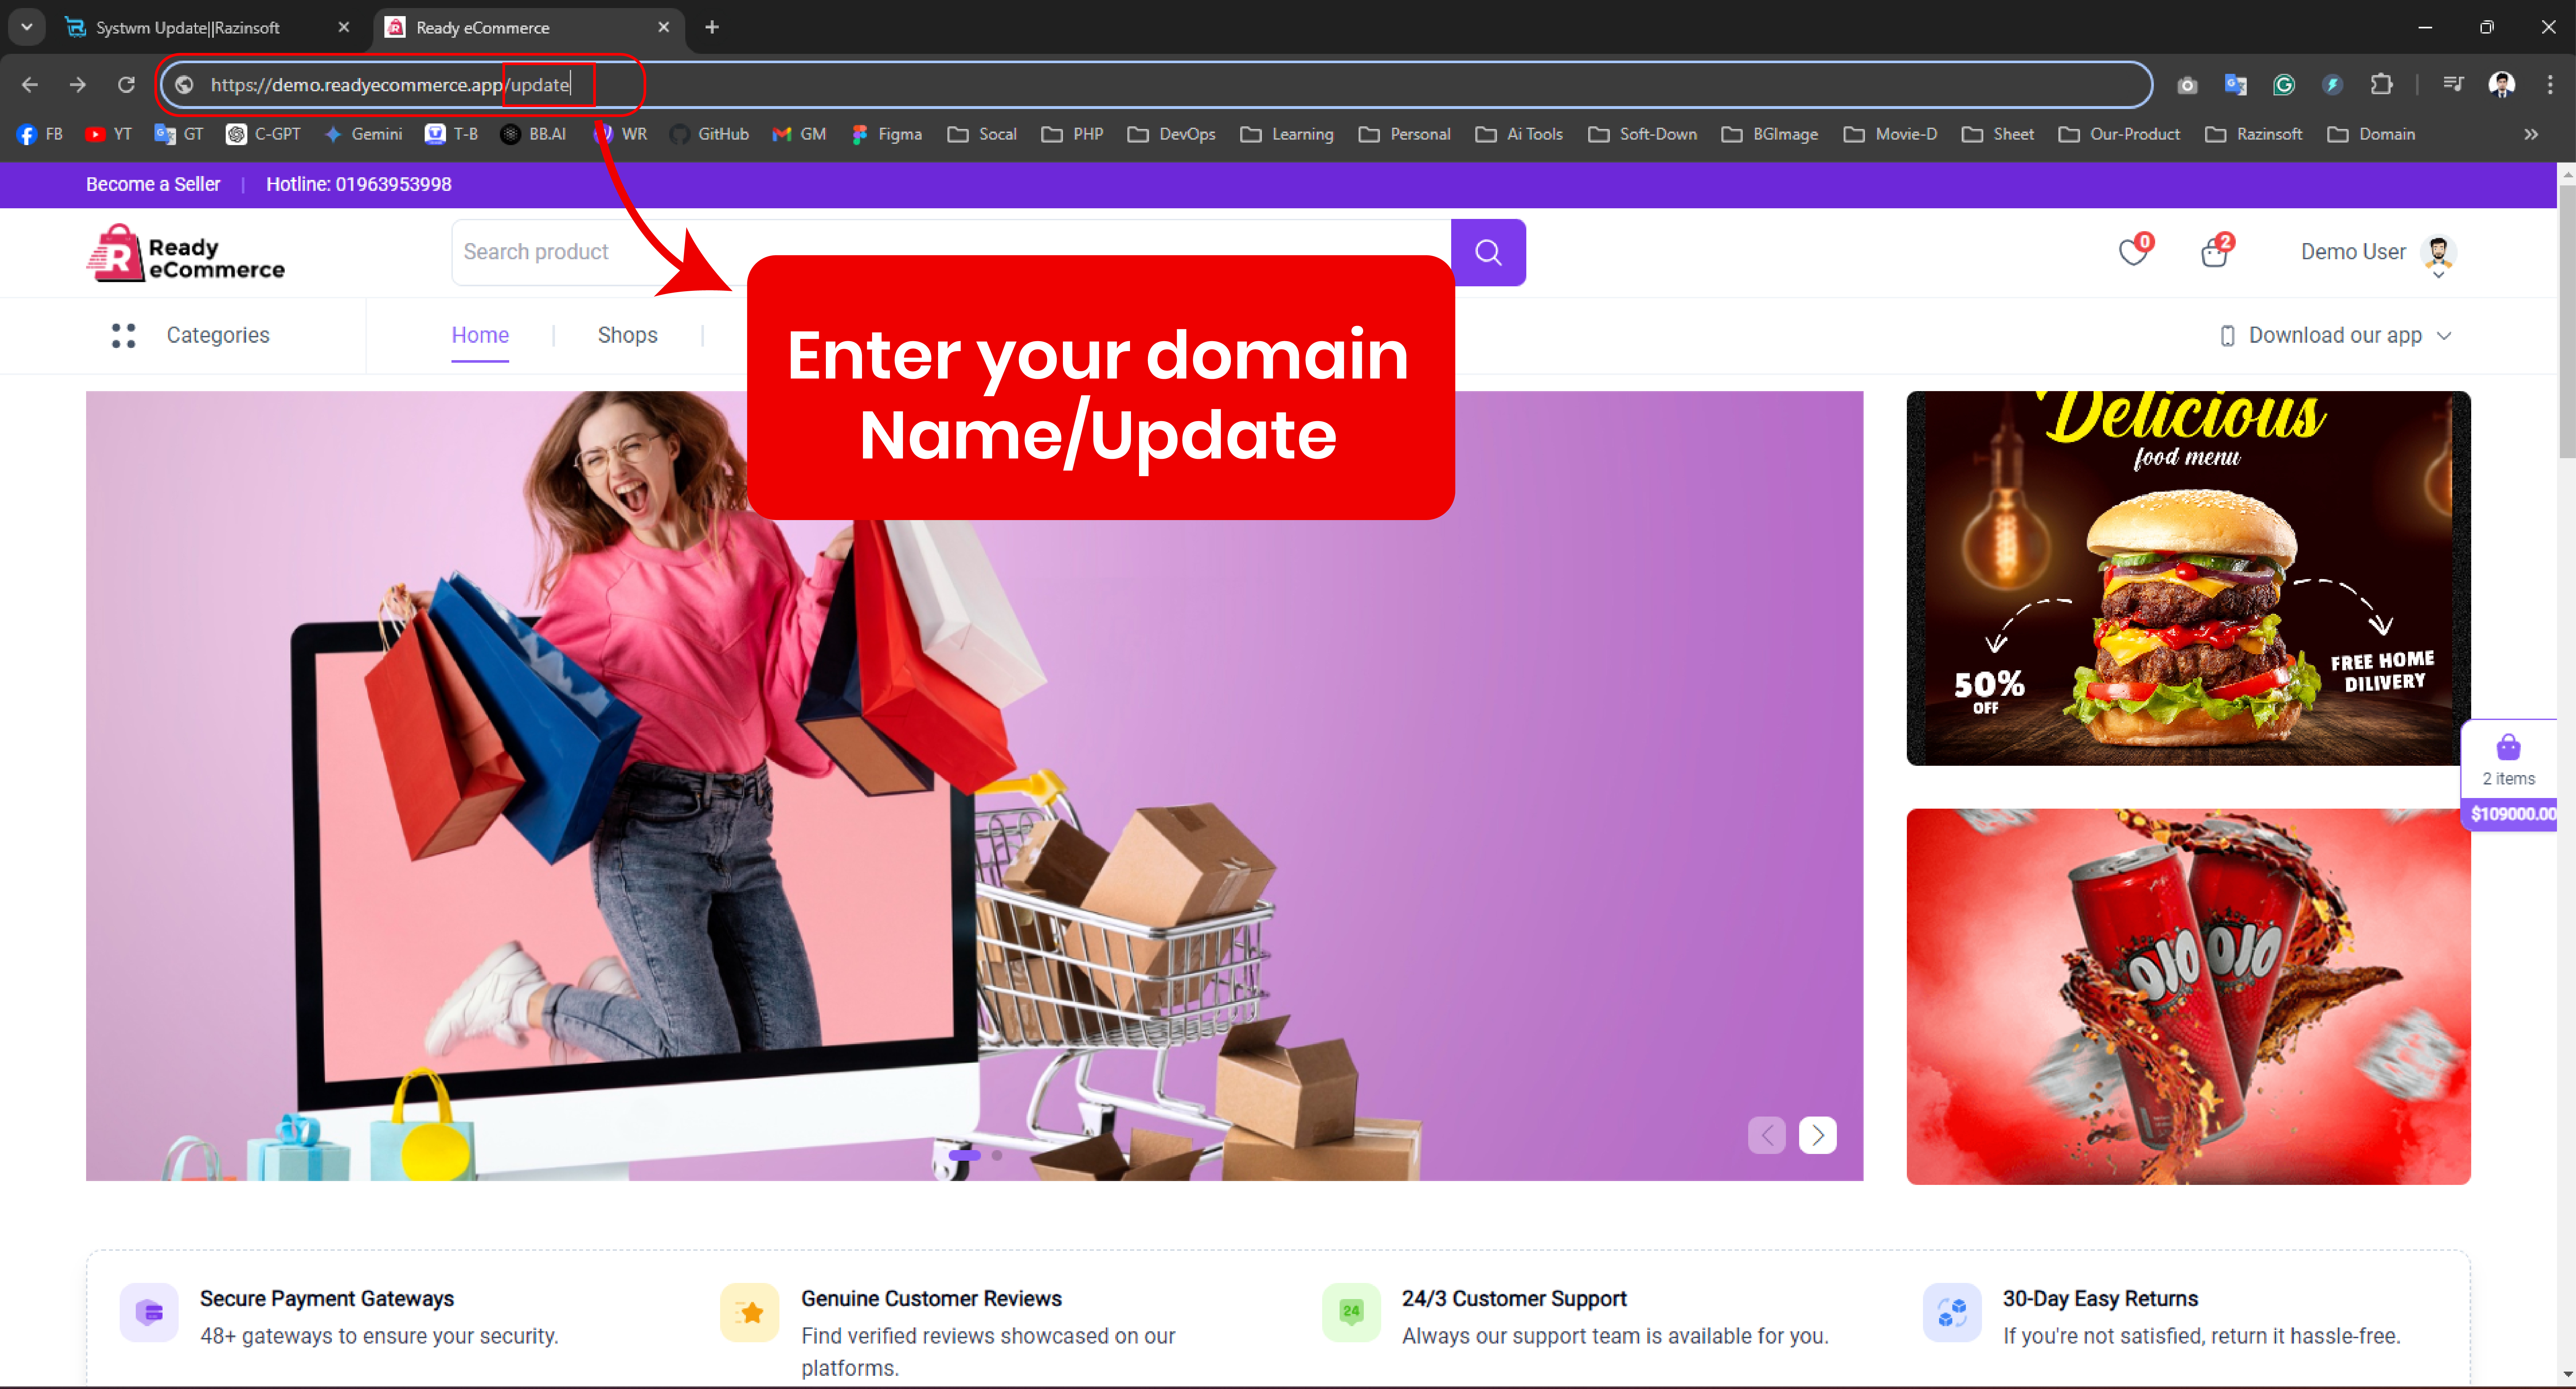
Then open any browser and search by typing domain name / update, then update
process
button will be seen on the screen and press that button to go to the next step..
Example
To verify purchases, Enter your Email, Domain, Codecanyon Username, and Purchase
code,
and press the verify purchase button.
Example
Now a Ready to Update screen will appear, select your update zip file and then
press
the
Upgrade Now button.
Example
Now a congratulation screen will appear where you have to wait for 10 seconds
then
your
post system home page will show


.jpg)
.jpg)
.jpg)
.jpg)
.jpg)
.jpg)
.jpg)
.jpg)
.jpg)
.jpg)
.jpg)
.jpg)
.jpg)
.jpg)
.jpg)